Introduction to Impex
This document provides an introduction to Impex, a security control used to manage and verify removable digital media such as USB drives, SD cards, external hard drives, floppy disks, and DVDs.
It serves both as a user guide and a brief overview of the device. Here you will find examples of common tasks and practical instructions for operating Impex stations.
The Impex station is a physical unit equipped with two USB ports on the front. Removable media is connected here to verify that it is free from malicious code.
Impex is designed to examine every file on a digital storage device. In typical use, two media devices are connected: a source and a target. Files are read from the source device and scanned. If no malicious content is detected, the files are copied to the target device. Before copying begins, the target device is formatted to ensure it contains no previous data, avoiding any mix of unverified and verified files.
The main reason Impex uses two separate media is that some types of IT attacks occur at the file level, while others involve the storage device itself being manipulated and becoming harmful to any computer it is connected to. Impex is primally designed only to transfer files, allowing the user to move data onto a storage device that can be trusted instead of relying on an unknown source device. It is also supported to only scan one device without transferring to a trusted media.
This introduction includes an example of how to transfer files between two media devices. Additional examples show how to format a USB drive, securely erase it (shred), and scan a drive without copying its contents.
To keep Impex simple and accessible, the interface supports more than 15 languages. This document explains how to change the interface language and how to view various system settings on an Impex station.
Product Names
| Word | Definition |
|---|---|
| Impex | The family name of USB Protect, Xtransfer, ICC, Repo and DataLock |
| Stations | The family name of USB Protect, Xtransfer and DataLock |
| ICC | The server which control the Stations and Datalocks |
| USB Protect | The kiosk computer used to scan mass storage devices |
| Xtransfer | USB Protect with support for sending files to network shares |
| Repo | The server that has the updates and definitions |
| DataLock | Server used for network flows that will scan files before transferring them onwards |
How Impex works
The Impex station works with multiple antivirus engines and in multiple passes. This will result in that a file will be read multiple times. Exactly how many times a file is read or how many antivirus engines are checking the files will depend on a number of items, including how many AV engines are configured on a specific Impex station and how certain configuration parameters are set in the administration server, ICC.
Since Impex reads files multiple times there can be issues with large digital media, media with many or large files, or with legacy, slow removable media. In the worst case there can be combinations of these which in turn will result in long execution times and long times to perform the checks and controls. One way to try to speed things up is that Impex will try its best to always copy files to a temporary storage on an internal storage device with very good performance. To display that there is progress with the examination, the Impex station will display a progress bar at the bottom of the screen.
Impex and ICC
One or more Impex stations is connected to a server, called Impex Control Center, ICC. From the ICC one can set parameters in the Impex station. Depending on prior changes that have been done with ICC, the Impex station that you have access to might look different, behave differently and deliver different results.
An Impex station sends information to the ICC. An example of information sent is the scan record and metadata of files and scannings. Another example is audit logs on who is using the station and what actions they are doing.
An Impex station does not require a permanent connection to an ICC to operate. It can instead be run in standalone mode, disconnected from any network, with software, engine definitions and configuration installed and updated locally using Signify bundles. See USB Protect in offline mode in the Operating modes chapter for details.
Impex and peripherals
Impex can be equipped with many peripherals or auxiliary additions. One common example is the addition of a receipt printer, that will be used to print physical evidence that a scan has taken place. Other additions and peripherals include wall mounts, various media as well as a DVD reader or a SD card reader.
Using Impex in your organisation
Many organisations have developed special policy documents, handbooks and routines for how removable media can or is allowed to be used, how they should be examined, how they need to be protected, etc. It is important that you are informed and have competence on what types of media is accepted as permitted media, which can be used as source or target devices, what one should do if Impex is alarming that it has detected malware, and how you should handle digital or physical receipts from Impex.
Core station functions
This chapter brings together the core operations you can perform with an Impex station: scanning and transferring files between two USB drives (including Bitlocker-protected drives), sending files to and from a network share with Xtransfer, formatting a drive, scanning a single drive without transferring, securely erasing a drive (shred), and scanning encrypted archives.
Scan and transfer files from one USB drive to another
This chapter contains a step-by-step guide for scanning mobile media, e.g. a USB drive, to examine if there is malicious content on it, like computer viruses, trojan horses or other malware. If no malware is found, it transfers the content to a second USB drive.
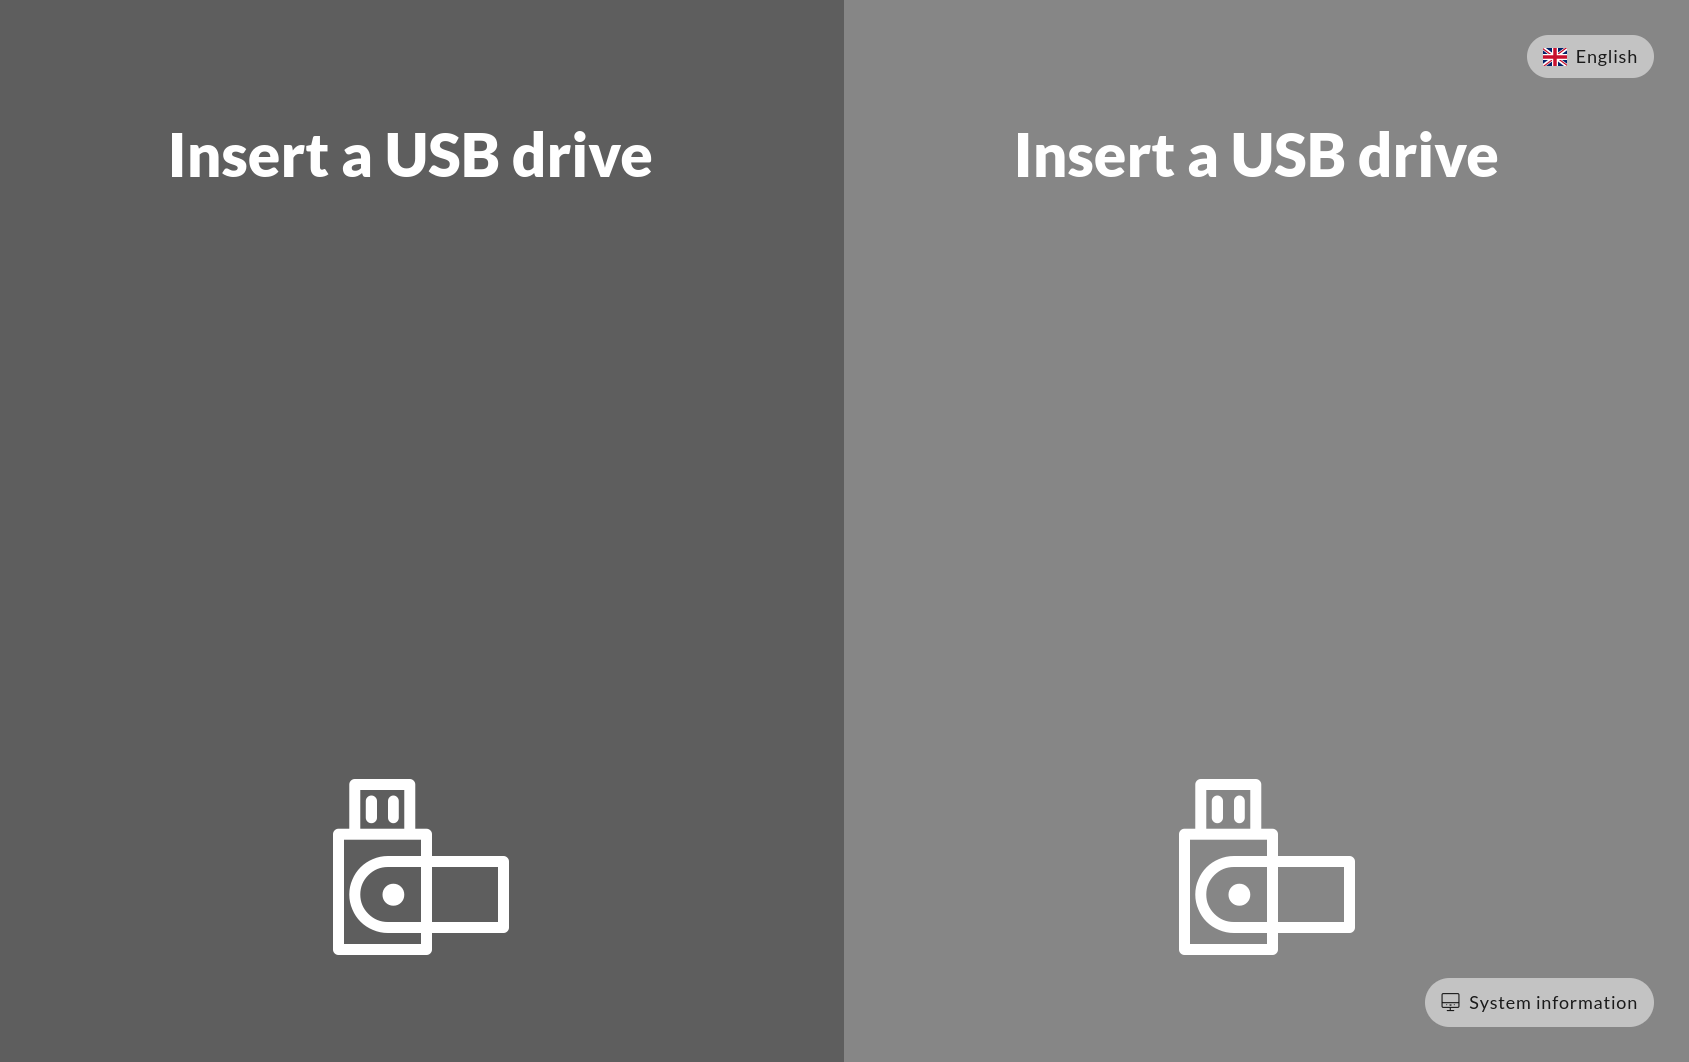
In the following example the source media is attached to the left port. Impex will of course support having the source media or the target media attached to any of the ports. This flexibility can be changed from the administration server ICC to make certain media usable only in certain ways.
Before you start, you will see a generic screen welcoming you to insert your media into the Impex station. At this point in time, it is also possible to change the language that is used for all dialogues. Impex is available in most major languages.
1. Insert the source media (usb drive) into the left port
2. Insert the destination media or target drive in the right port
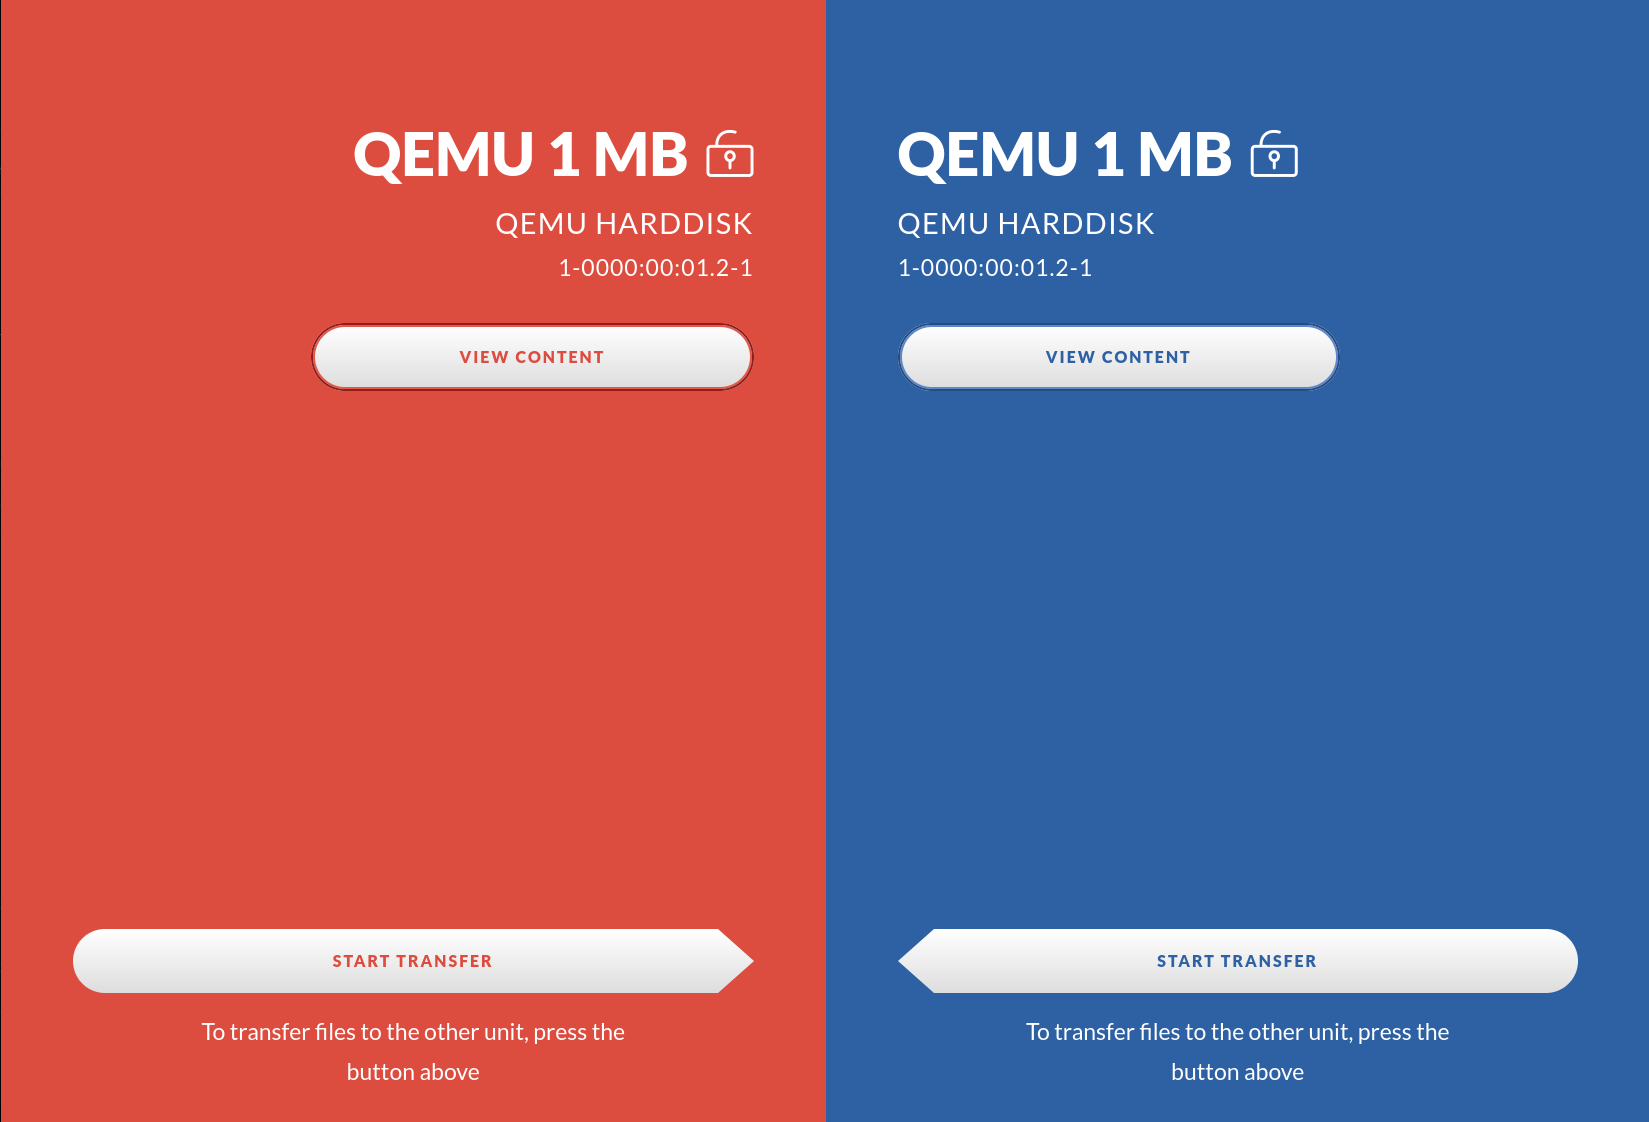
The screen should now display both of the drives, their brand, model name and serial number. Note that if the serial number is longer than 30 characters it will only show the last 30 characters.
Press the “View Content” button to look at the actual files on the drive.
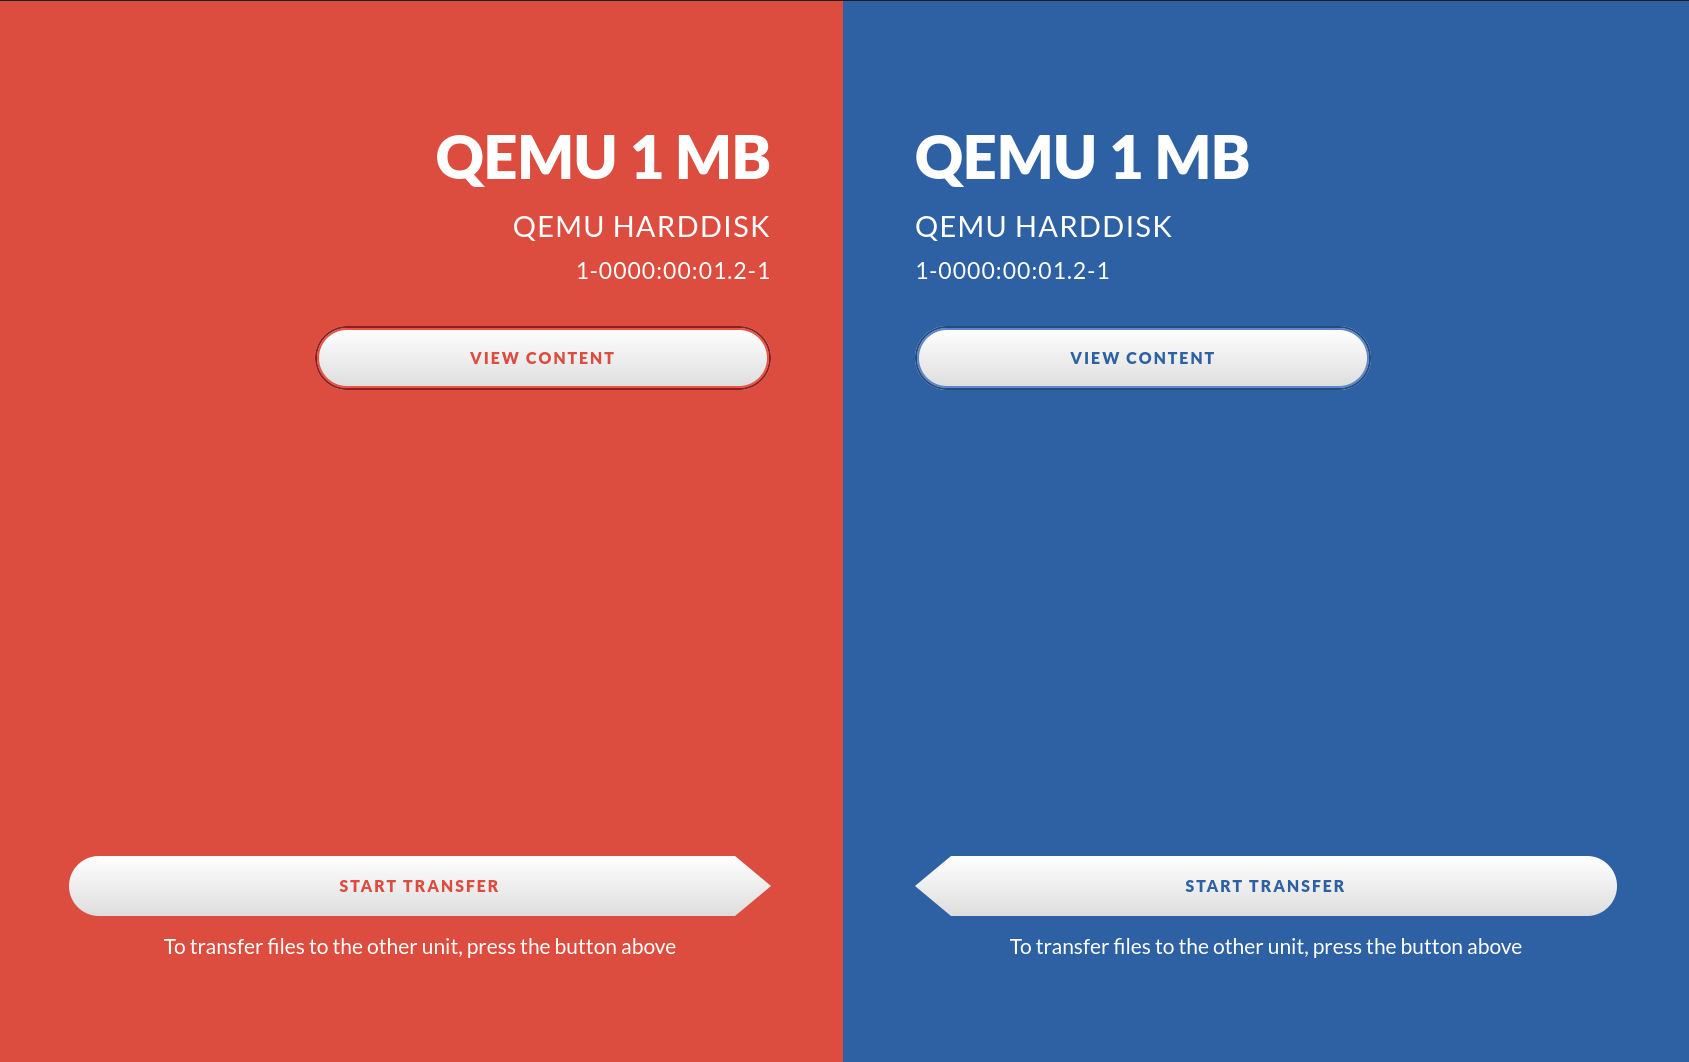
3. Press on the left arrow to transfer the files to the right side drive
Please note that the right side drive will be erased and cleaned (formatted) to make sure it is empty. If the source drive is a CD or DVD the target drive file system will be exfat.
4. Depending on your local security policy you might have to enter your identification using the on-screen keyboard and press a confirm button to continue
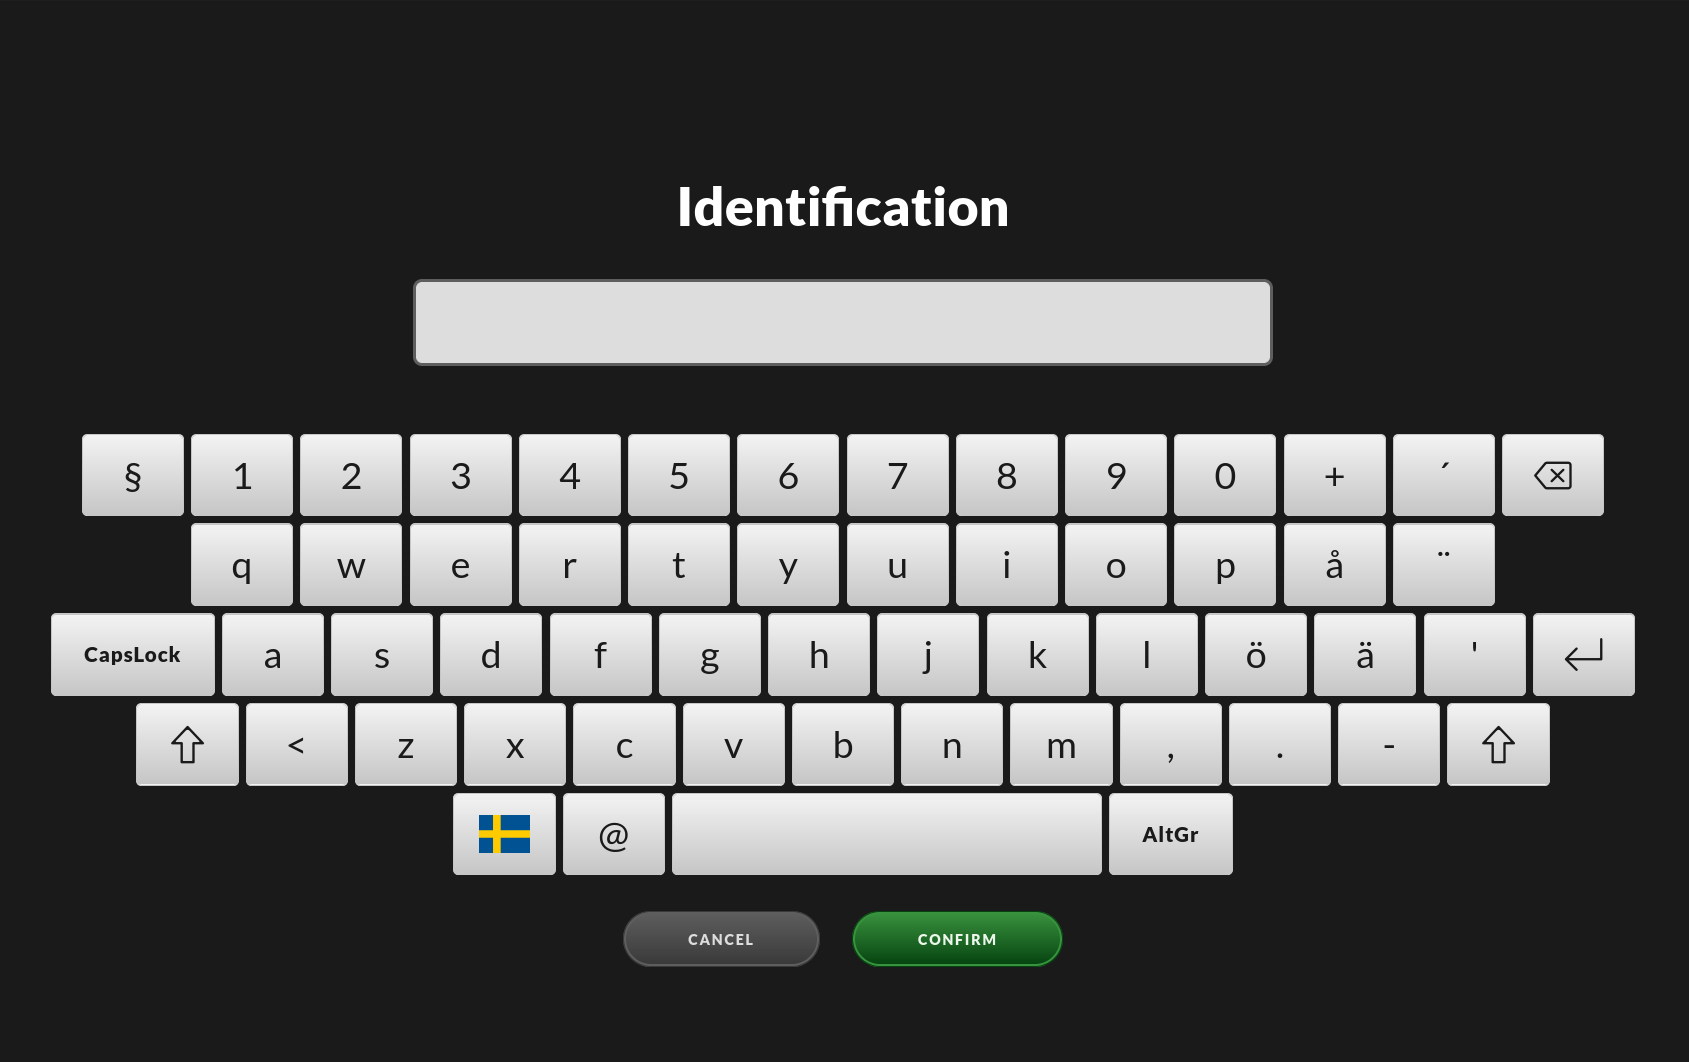
This is a pop-up screen on which you need to fill in your email address. If the Impex has been configured to, there might also be a list of preloaded names to choose from, making it easier, and faster, for users to use the identification screen. This will work as the following - you start to fill in the name, but as soon as your name is determined to be one of the computer’s internal list, it will show you the names that start with the characters you have entered. If the name is on the list, you can easily just select it by pressing a finger on the touch screen on the name, and the name will be filled in automatically in the Impex station name form.
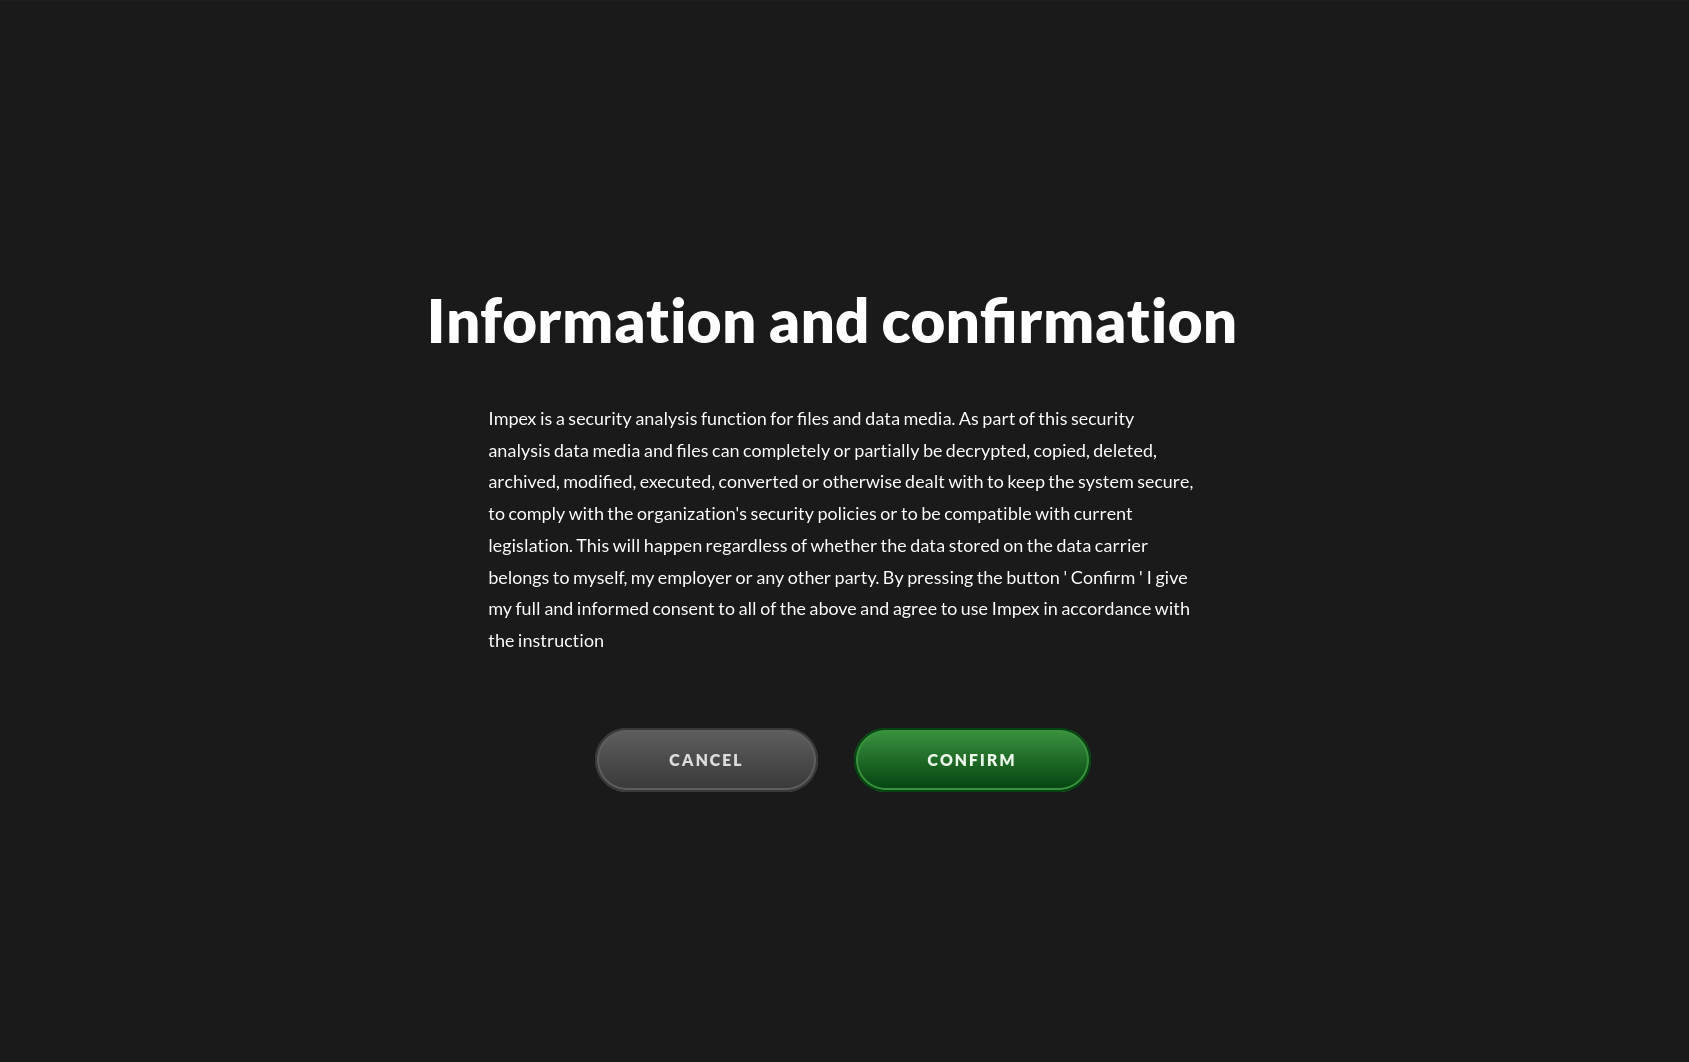
The confirmation screen will display some information describing the process used by, and the action taken by, Impex. It asks you to read and acknowledge this information before proceeding.
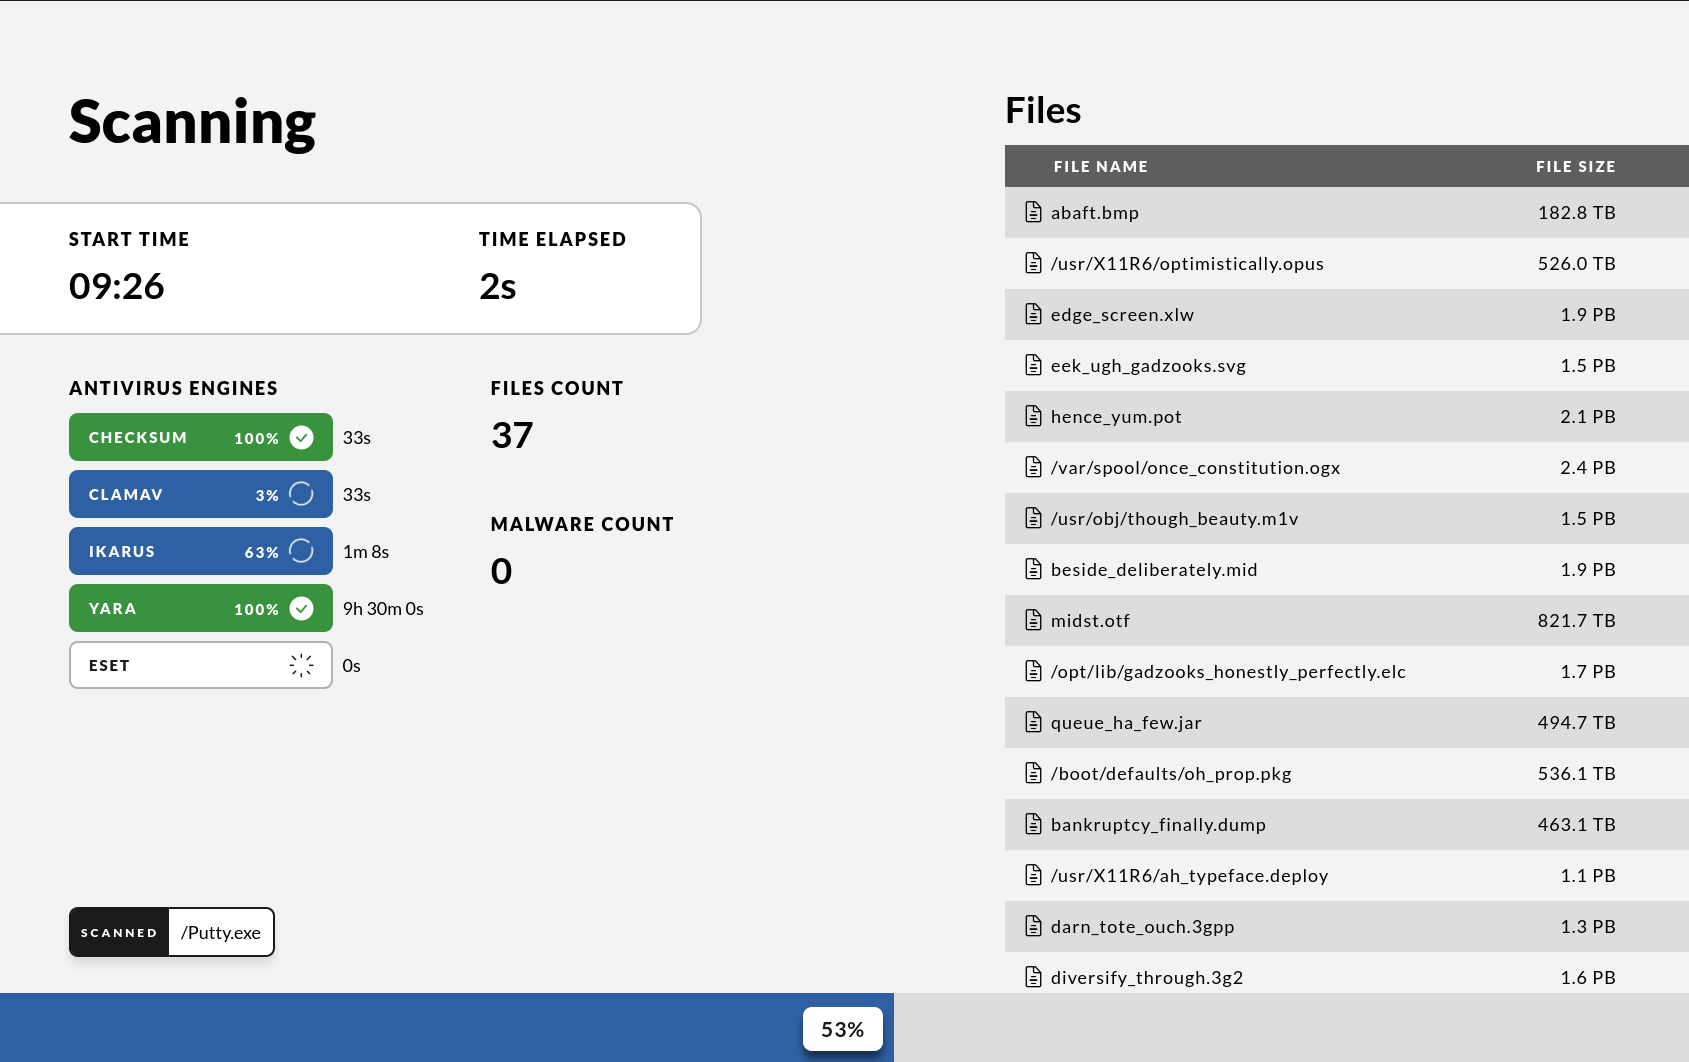
The files on your source USB drive will now be analysed for virus, malware and other unwanted software. During this process a progress bar will be shown depicting a rough estimate on how much time is left.
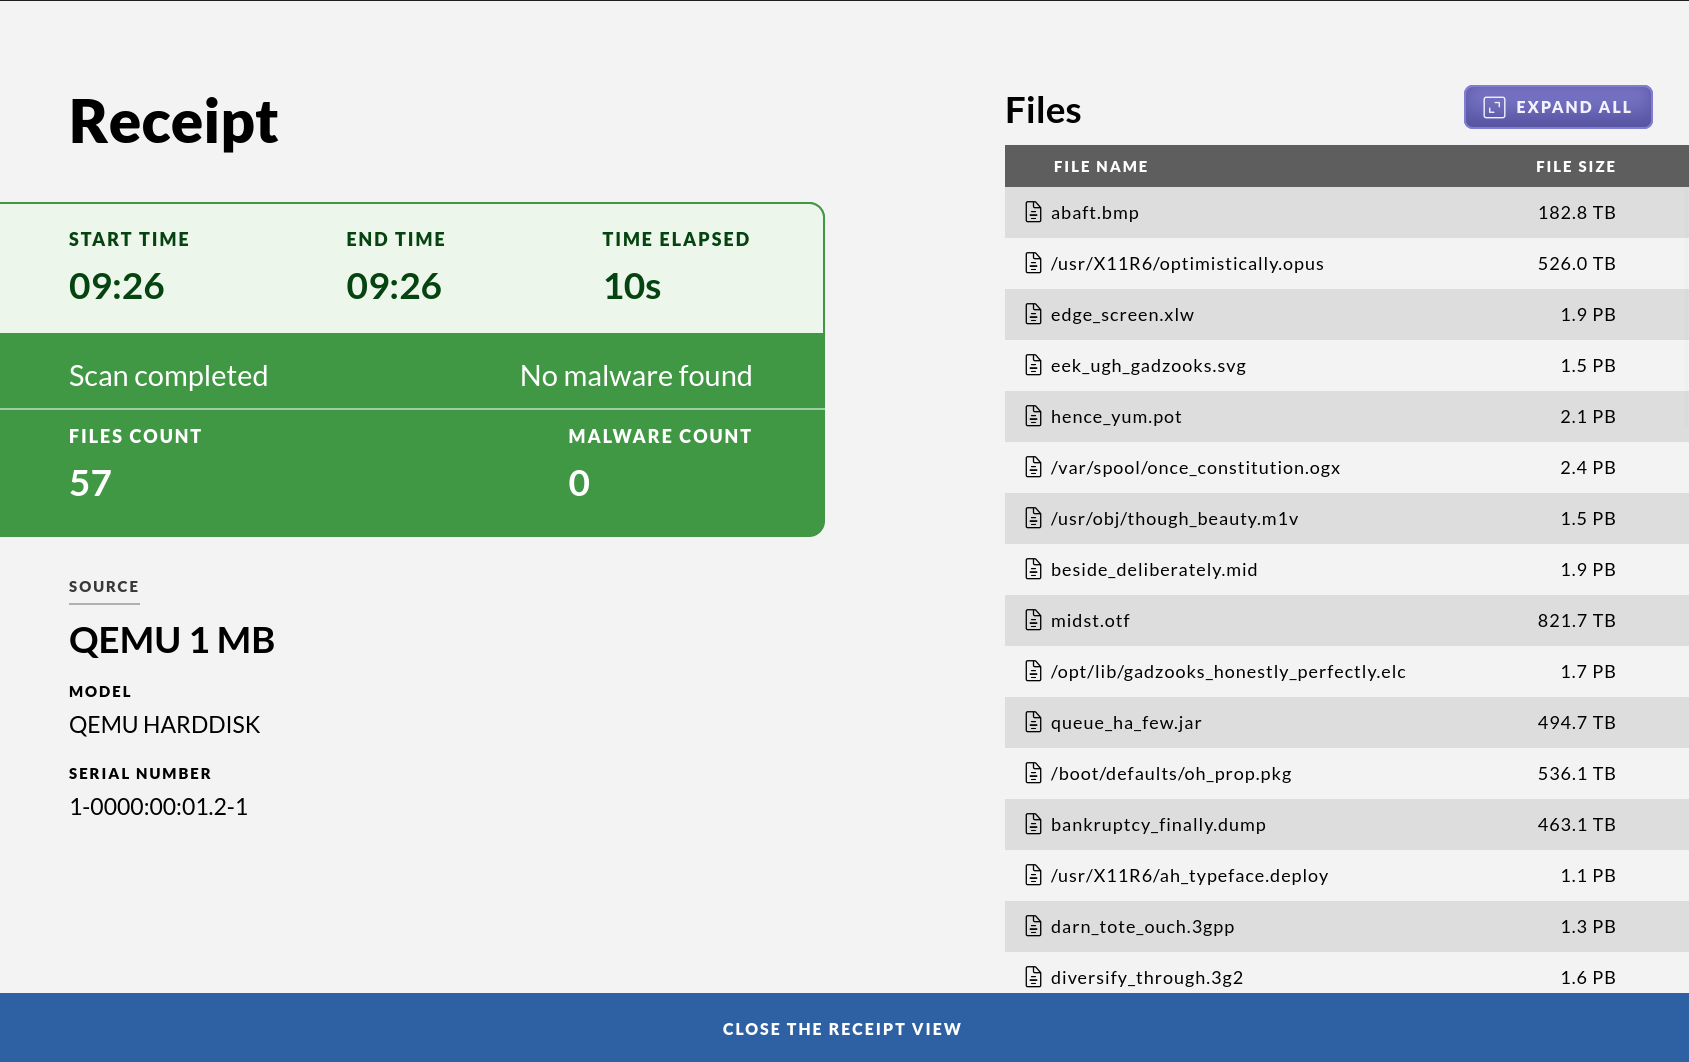
If nothing malicious was detected you will see a green screen together with a receipt which gives an overview of which files were scanned and their unique checksums. If a printer is attached and enabled you will also get a printout of a summary.
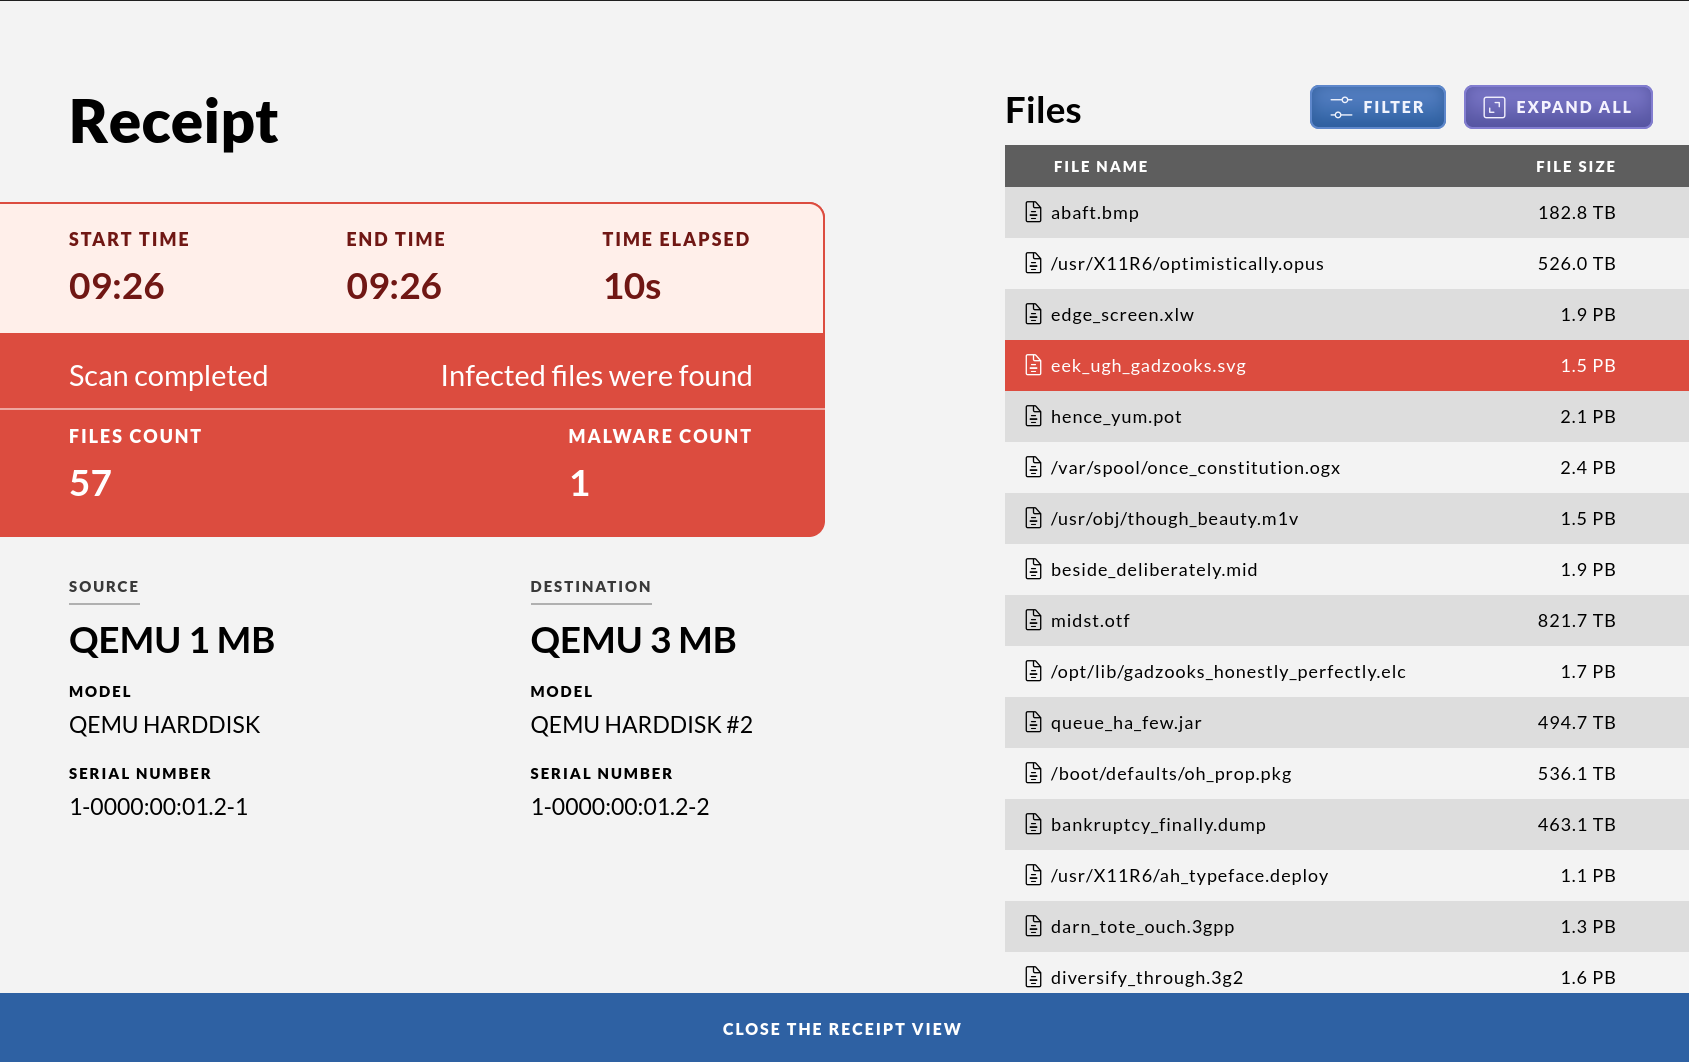
In the case that unwanted files were detected the screen will go red and a listing will show which file or files contained malware. Note that in this case no files will be transferred so the target USB drive will still be clean. If a printer is attached and enabled you will also get a printout. To view only the malicious files, press “Filter”. The source drive containing the malicious files will not be modified or cleaned by the system.
Your local security policy should dictate what to do with the source USB drive in case malware is found.
5. To complete the scanning press “Done” and pull out the USB drives
If at any point you want to abort the procedure, pull the USB drives. It is also worth mentioning that the station does not require you to copy from left to right. The process can also be done in the other direction. That means you can also transfer files from right to left. The files will be analysed and scanned before being copied, no matter in what direction they are copied to. This can in certain situations be more intuitive depending on the physical placement of the Impex station.
Scan and transfer from a bitlocker USB drive to another device
This chapter contains a step-by-step guide for scanning mobile media, e.g. a USB drive with a bitlocker container, to examine if there is malicious content on it, like computer viruses, trojan horses or other malware. If no malware is found, it transfers the content to a second USB drive.
Before you start, you will see a generic screen welcoming you to insert your media into the Impex station. At this point in time, it is also possible to change the language that is used for all dialogues. Impex is available in most major languages.
1. Insert the bitlocker source media (usb drive) into the left port
2. Enter the bitlocker password to unlock the encrypted container
3. Insert the destination media or target drive in the right port
The screen should now display both of the drives, their brand and model name. Press the “View Content” button to look at the actual files on the drive.
3. Press on the left arrow to transfer the files to the right side drive
Please note that the right side drive will be erased and cleaned (formatted) to make sure it is empty. If the source drive is a CD or DVD the target drive file system will be exfat.
4. Depending on your local security policy you might have to enter your identification using the on-screen keyboard and press a confirm button to continue
This is a pop-up screen on which you need to fill in your email address. If the Impex has been configured to, there might also be a list of preloaded names to choose from, making it easier, and faster, for users to use the identification screen. This will work as the following - you start to fill in the name, but as soon as your name is determined to be one of the computer’s internal list, it will show you the names that start with the characters you have entered. If the name is on the list, you can easily just select it by pressing a finger on the touch screen on the name, and the name will be filled in automatically in the Impex station name form.
The confirmation screen will display some information describing the process used by, and the action taken by, Impex. It asks you to read and acknowledge this information before proceeding.
The files on your source USB drive will now be analysed for virus, malware and other unwanted software. During this process a progress bar will be shown depicting a rough estimate on how much time is left.
If nothing malicious was detected you will see a green screen together with a receipt which gives an overview of which files were scanned and their unique checksums. If a printer is attached and enabled you will also get a printout of a summary.
In the case that unwanted files were detected the screen will go red and a listing will show which file or files contained malware. Note that in this case no files will be transferred so the target USB drive will still be clean. If a printer is attached and enabled you will also get a printout. To view only the malicious files, press “Filter”. The source drive containing the malicious files will not be modified or cleaned by the system.
Your local security policy should dictate what to do with the source USB drive in case malware is found.
5. To complete the scanning press “Done” and pull out the USB drives
If at any point you want to abort the procedure, pull the USB drives. It is also worth mentioning that the station does not require you to copy from left to right. The process can also be done in the other direction. That means you can also transfer files from right to left. The files will be analysed and scanned before being copied, no matter in what direction they are copied to. This can in certain situations be more intuitive depending on the physical placement of the Impex station.
Scan and transfer from USB drive to bitlocker device
This chapter contains a step-by-step guide for scanning mobile media, e.g. a USB drive without a bitlocker container to an bitlocker device, to examine if there is malicious content on it, like computer viruses, trojan horses or other malware. If no malware is found, it transfers the content to a second USB drive.
Before you start, you will see a generic screen welcoming you to insert your media into the Impex station. At this point in time, it is also possible to change the language that is used for all dialogues. Impex is available in most major languages.
1. Insert the bitlocker source media (usb drive) into the left port
2. Insert the destination media or target drive in the right port
3. Enter the bitlocker password to unlock the encrypted container
The screen should now display both of the drives, their brand and model name. Press the “View Content” button to look at the actual files on the drive.
3. Press on the left arrow to transfer the files to the right side drive
Please note that the right side drive will be erased and cleaned (formatted) to make sure it is empty. If the source drive is a CD or DVD the target drive file system will be exfat.
4. Depending on your local security policy you might have to enter your identification using the on-screen keyboard and press a confirm button to continue
This is a pop-up screen on which you need to fill in your email address. If the Impex has been configured to, there might also be a list of preloaded names to choose from, making it easier, and faster, for users to use the identification screen. This will work as the following - you start to fill in the name, but as soon as your name is determined to be one of the computer’s internal list, it will show you the names that start with the characters you have entered. If the name is on the list, you can easily just select it by pressing a finger on the touch screen on the name, and the name will be filled in automatically in the Impex station name form.
The confirmation screen will display some information describing the process used by, and the action taken by, Impex. It asks you to read and acknowledge this information before proceeding.
The files on your source USB drive will now be analysed for virus, malware and other unwanted software. During this process a progress bar will be shown depicting a rough estimate on how much time is left.
If nothing malicious was detected you will see a green screen together with a receipt which gives an overview of which files were scanned and their unique checksums. If a printer is attached and enabled you will also get a printout of a summary.
In the case that unwanted files were detected the screen will go red and a listing will show which file or files contained malware. Note that in this case no files will be transferred so the target USB drive will still be clean. If a printer is attached and enabled you will also get a printout. To view only the malicious files, press “Filter”. The source drive containing the malicious files will not be modified or cleaned by the system.
Your local security policy should dictate what to do with the source USB drive in case malware is found.
5. To complete the scanning press “Done” and pull out the USB drives
If at any point you want to abort the procedure, pull the USB drives. It is also worth mentioning that the station does not require you to copy from left to right. The process can also be done in the other direction. That means you can also transfer files from right to left. The files will be analysed and scanned before being copied, no matter in what direction they are copied to. This can in certain situations be more intuitive depending on the physical placement of the Impex station.
Xtransfer: sending files to and from a network share
Xtransfer is an extension that can be installed on top of an Impex station that uses a network share as one side of the transfer instead of a second USB drive. Files can be uploaded from a USB drive to a network share or the other way around.
An Xtransfer side does not show the usual “insert USB device” screen. Instead, once you insert your security key, the station recognizes that side as an Xtransfer side and a list of available shares is shown.
1. Insert your security key
Insert your security key (for example a YubiKey) into the station.
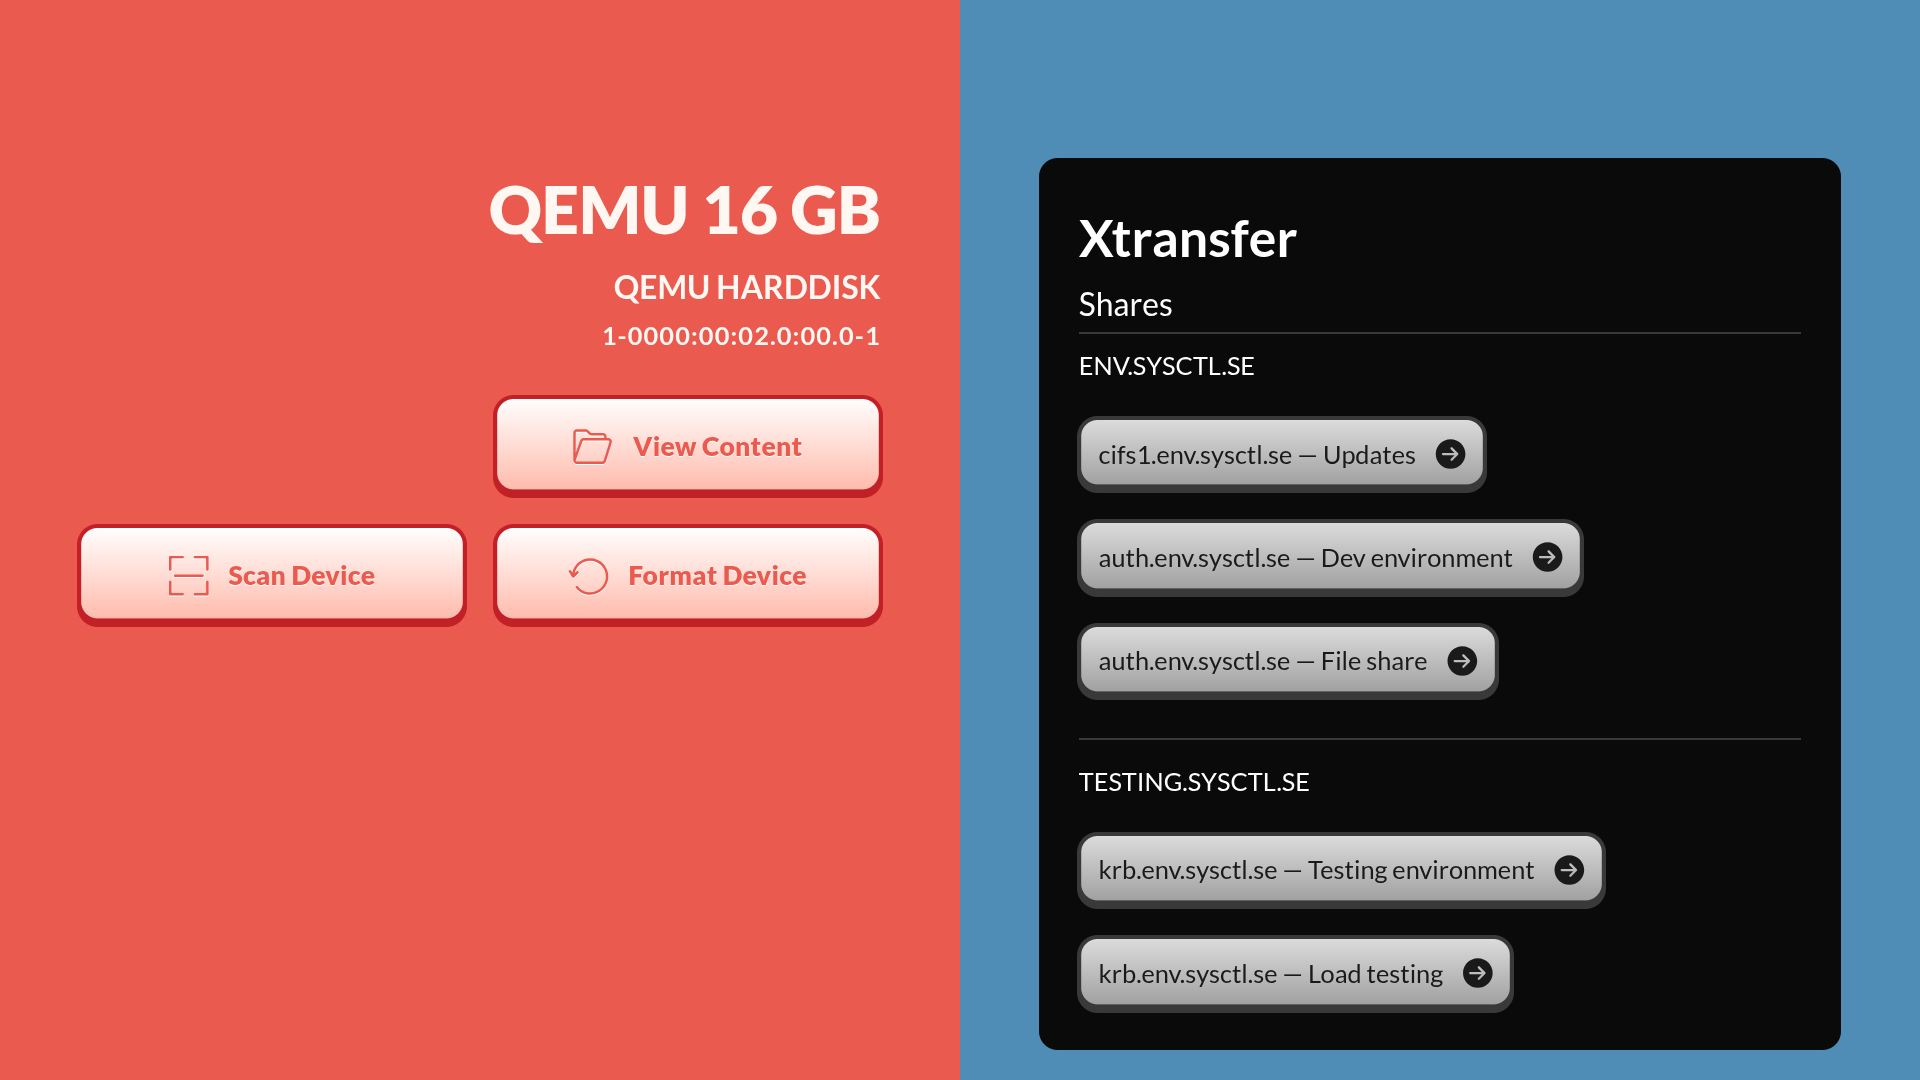
2. Select a share
The available network shares are grouped by domain. Press the share you want to use to continue.
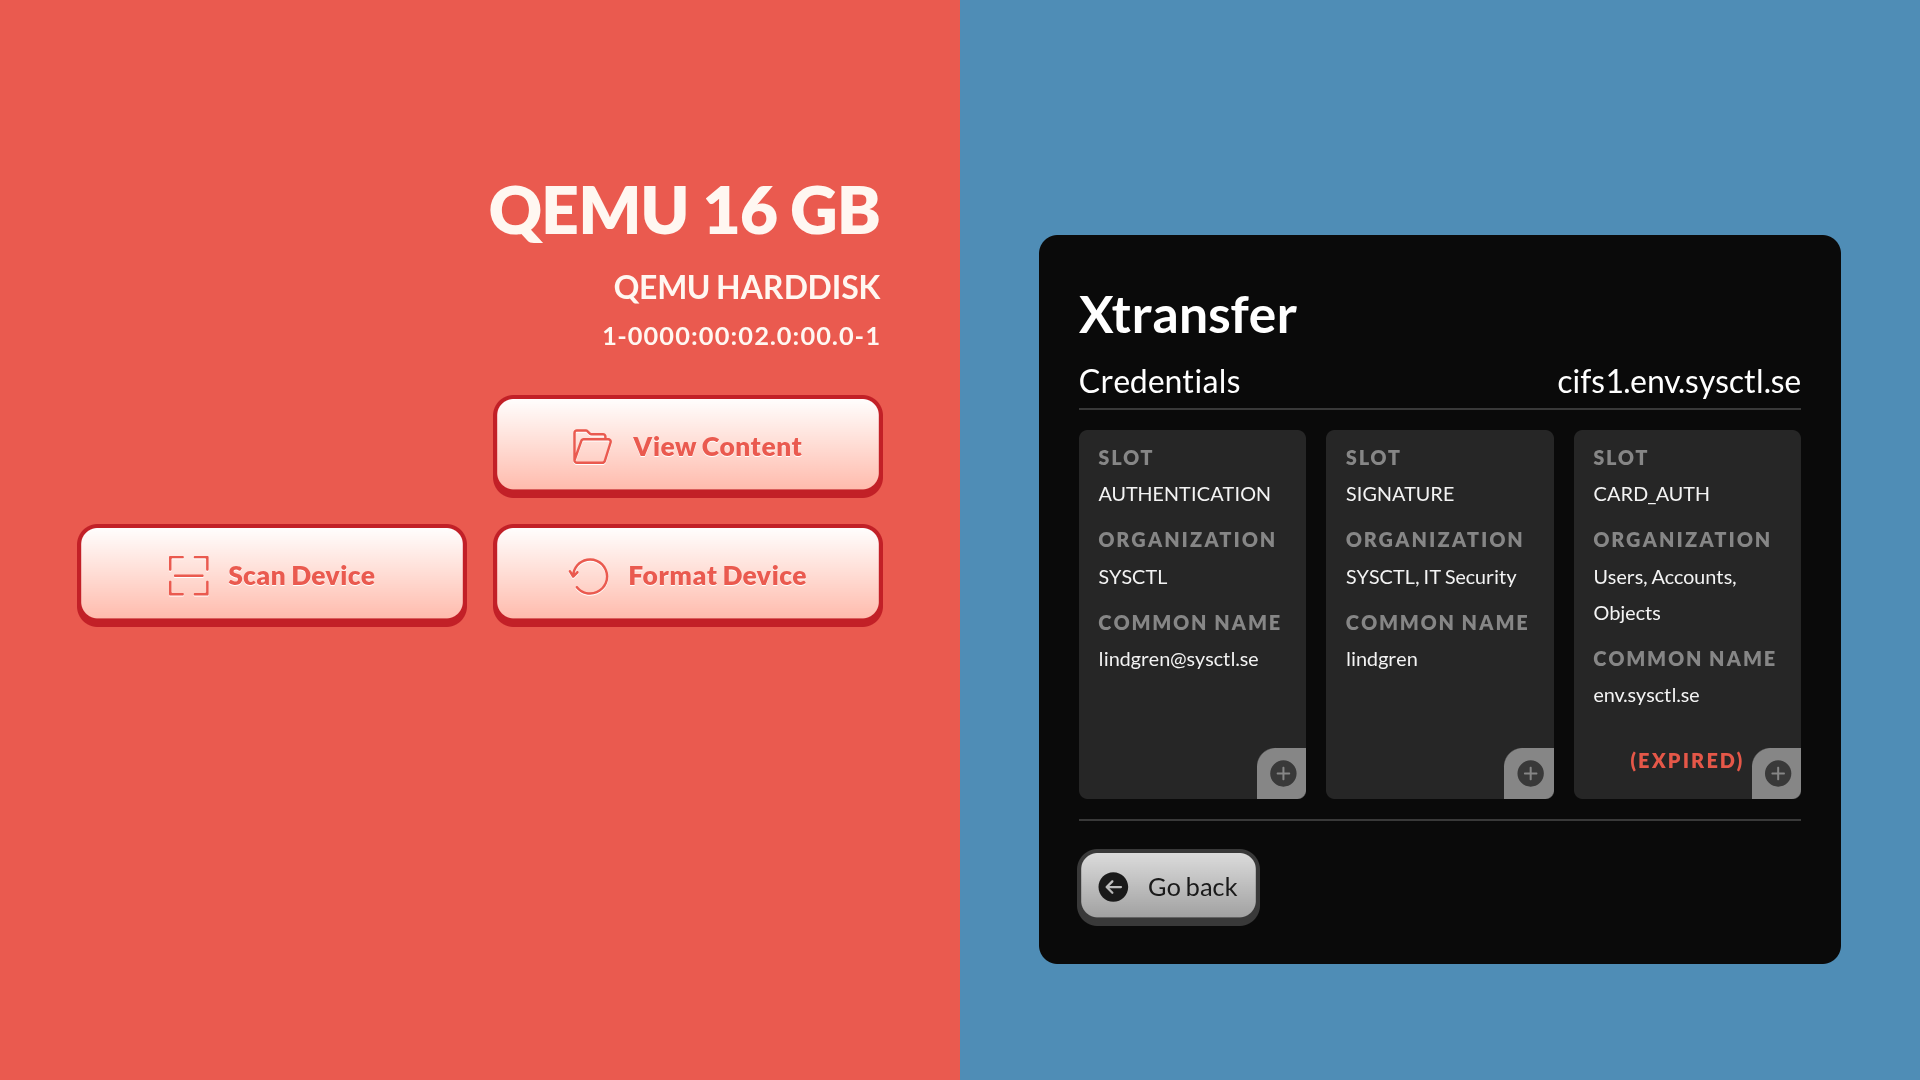
3. Select a credential
Each available credential (“Slot”) is listed with its organization and common name. Press the one you want to authenticate with.
4. Enter your PIN, if required
If the selected credential requires a PIN, the on-screen keyboard opens with the title “Enter PIN”. Type your PIN and press “Confirm”, or “Cancel” to pick a different credential.
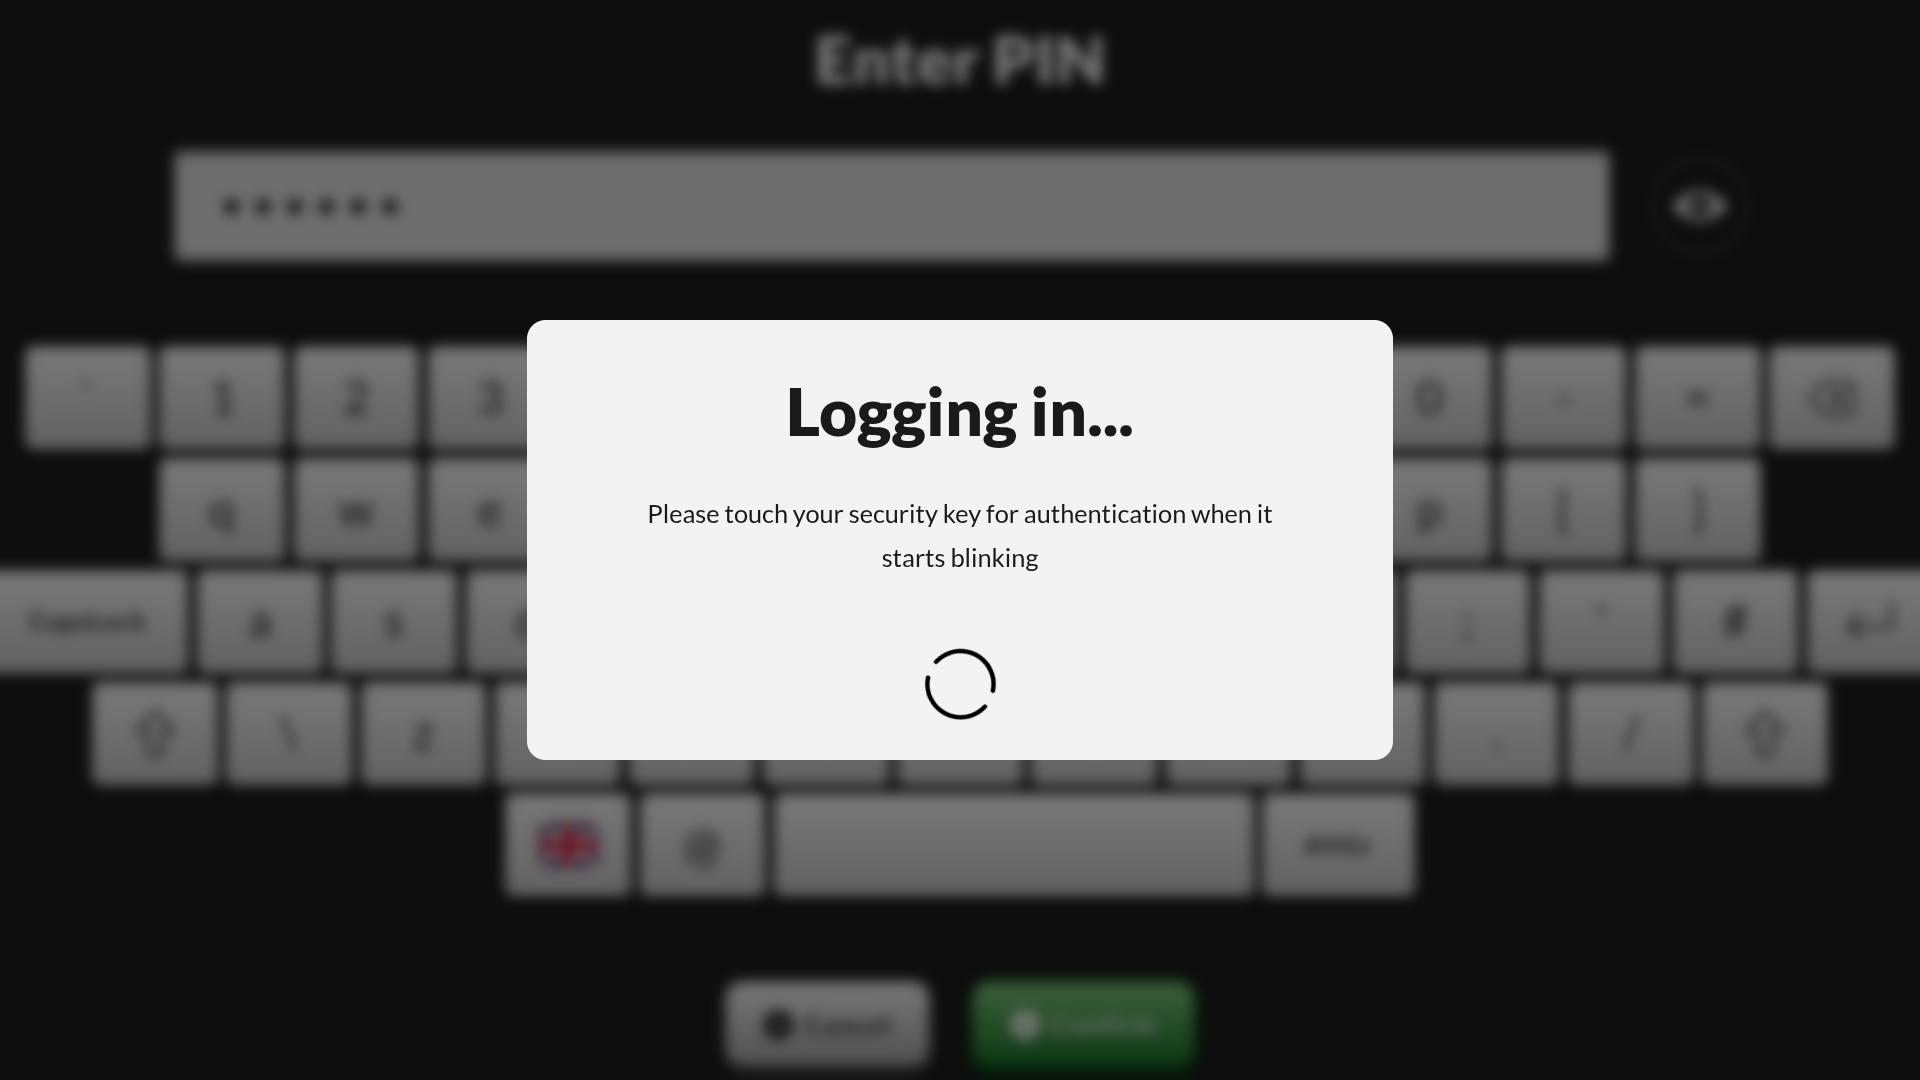
5. Touch your security key, if required
If touch is required for the credential, a “Logging in…” screen will asks you to touch your security key when it starts blinking.
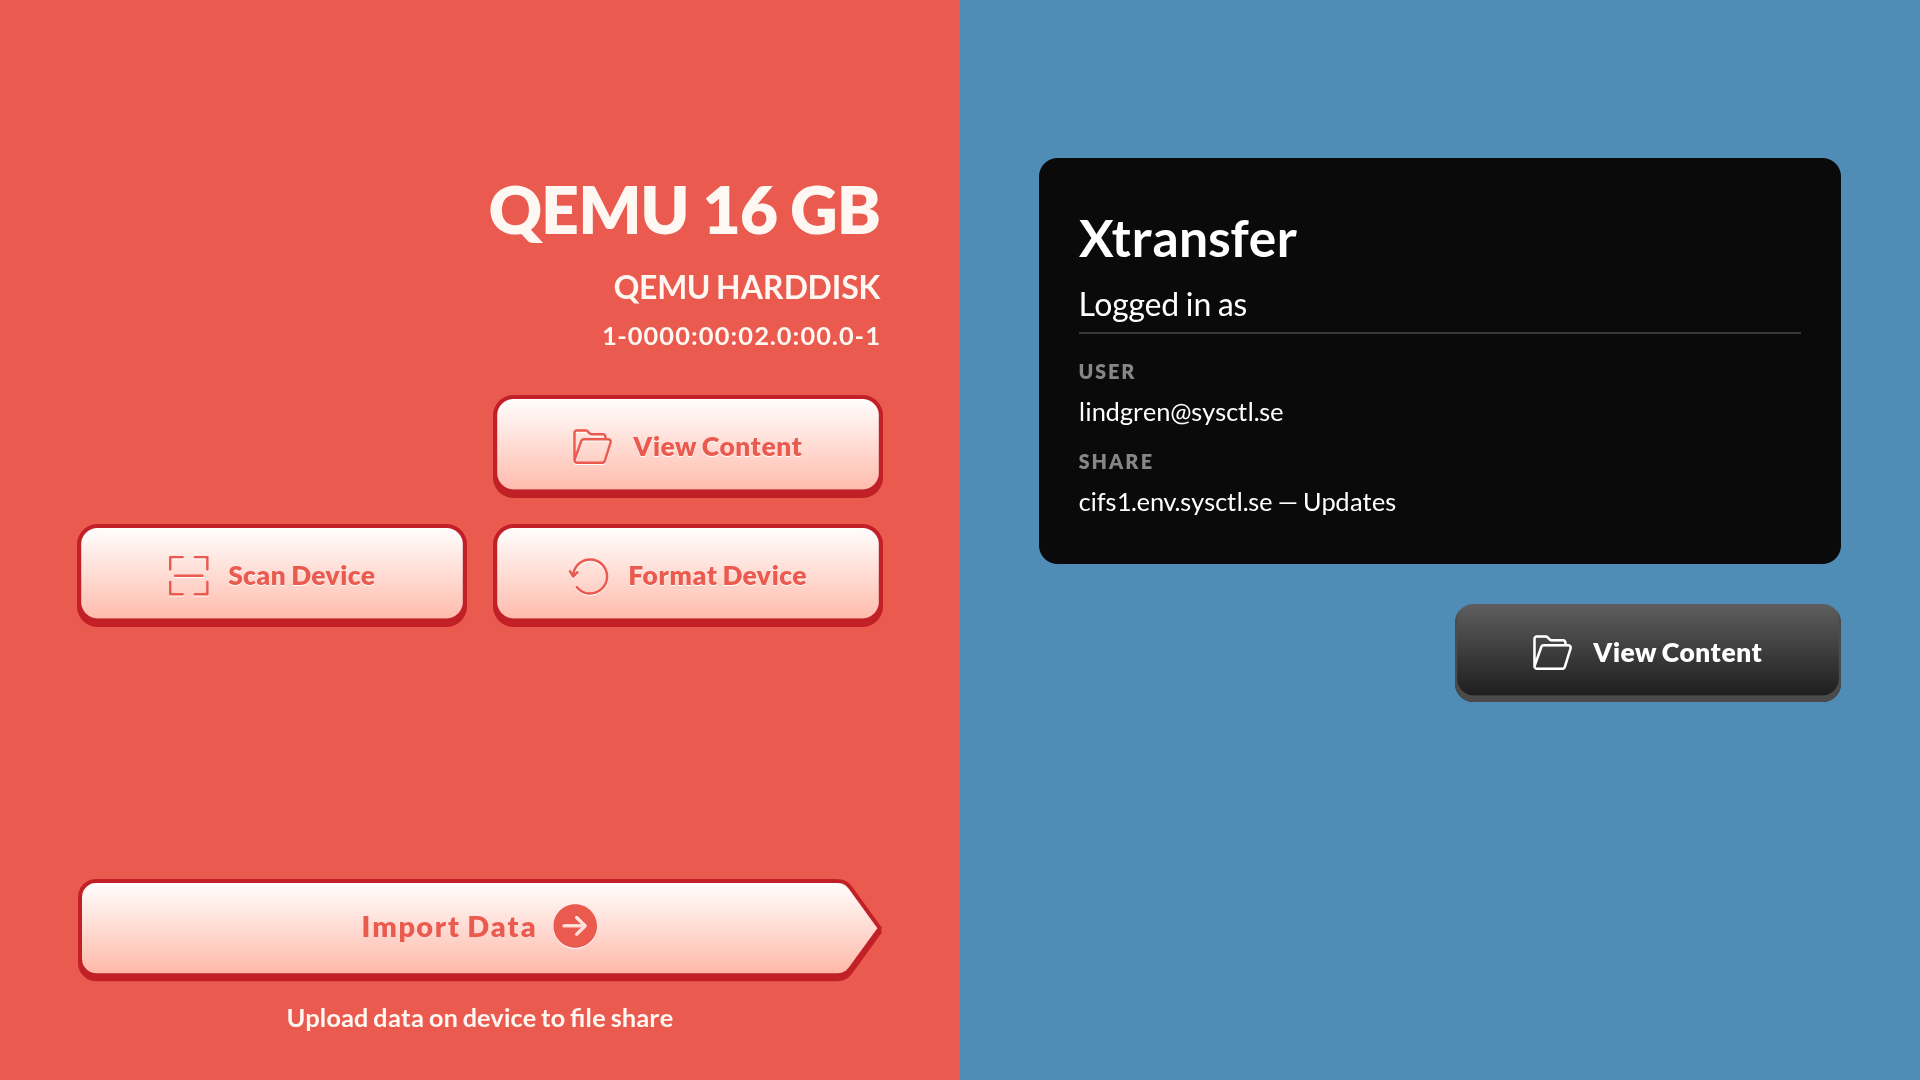
Once connected, the share is shown as the logged-in side, similar to how an inserted USB drive is shown on a normal side.
Importing data from the share to a USB drive
Insert a USB drive into the station and press “Import data” to upload the files present on the USB drive to the connected network share. As with a normal transfer, the files are scanned before being written.
Exporting data from the share
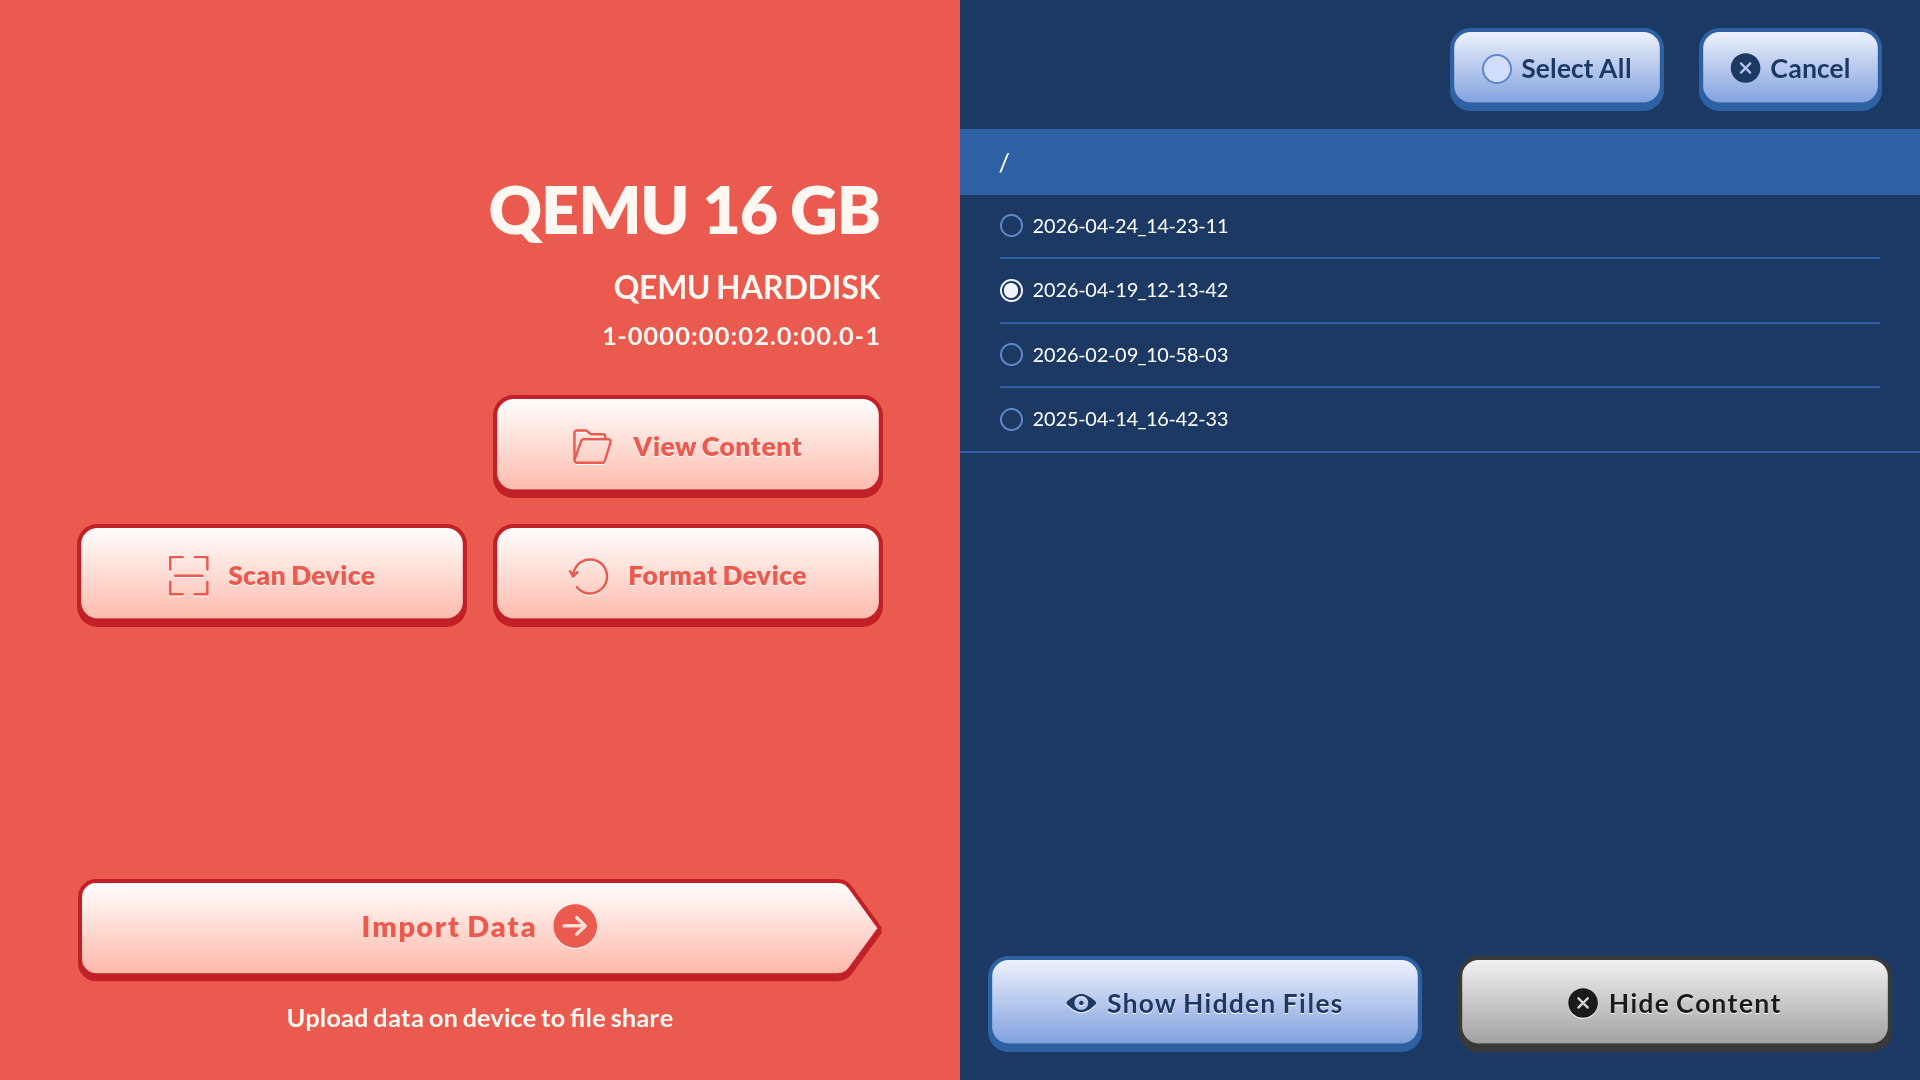
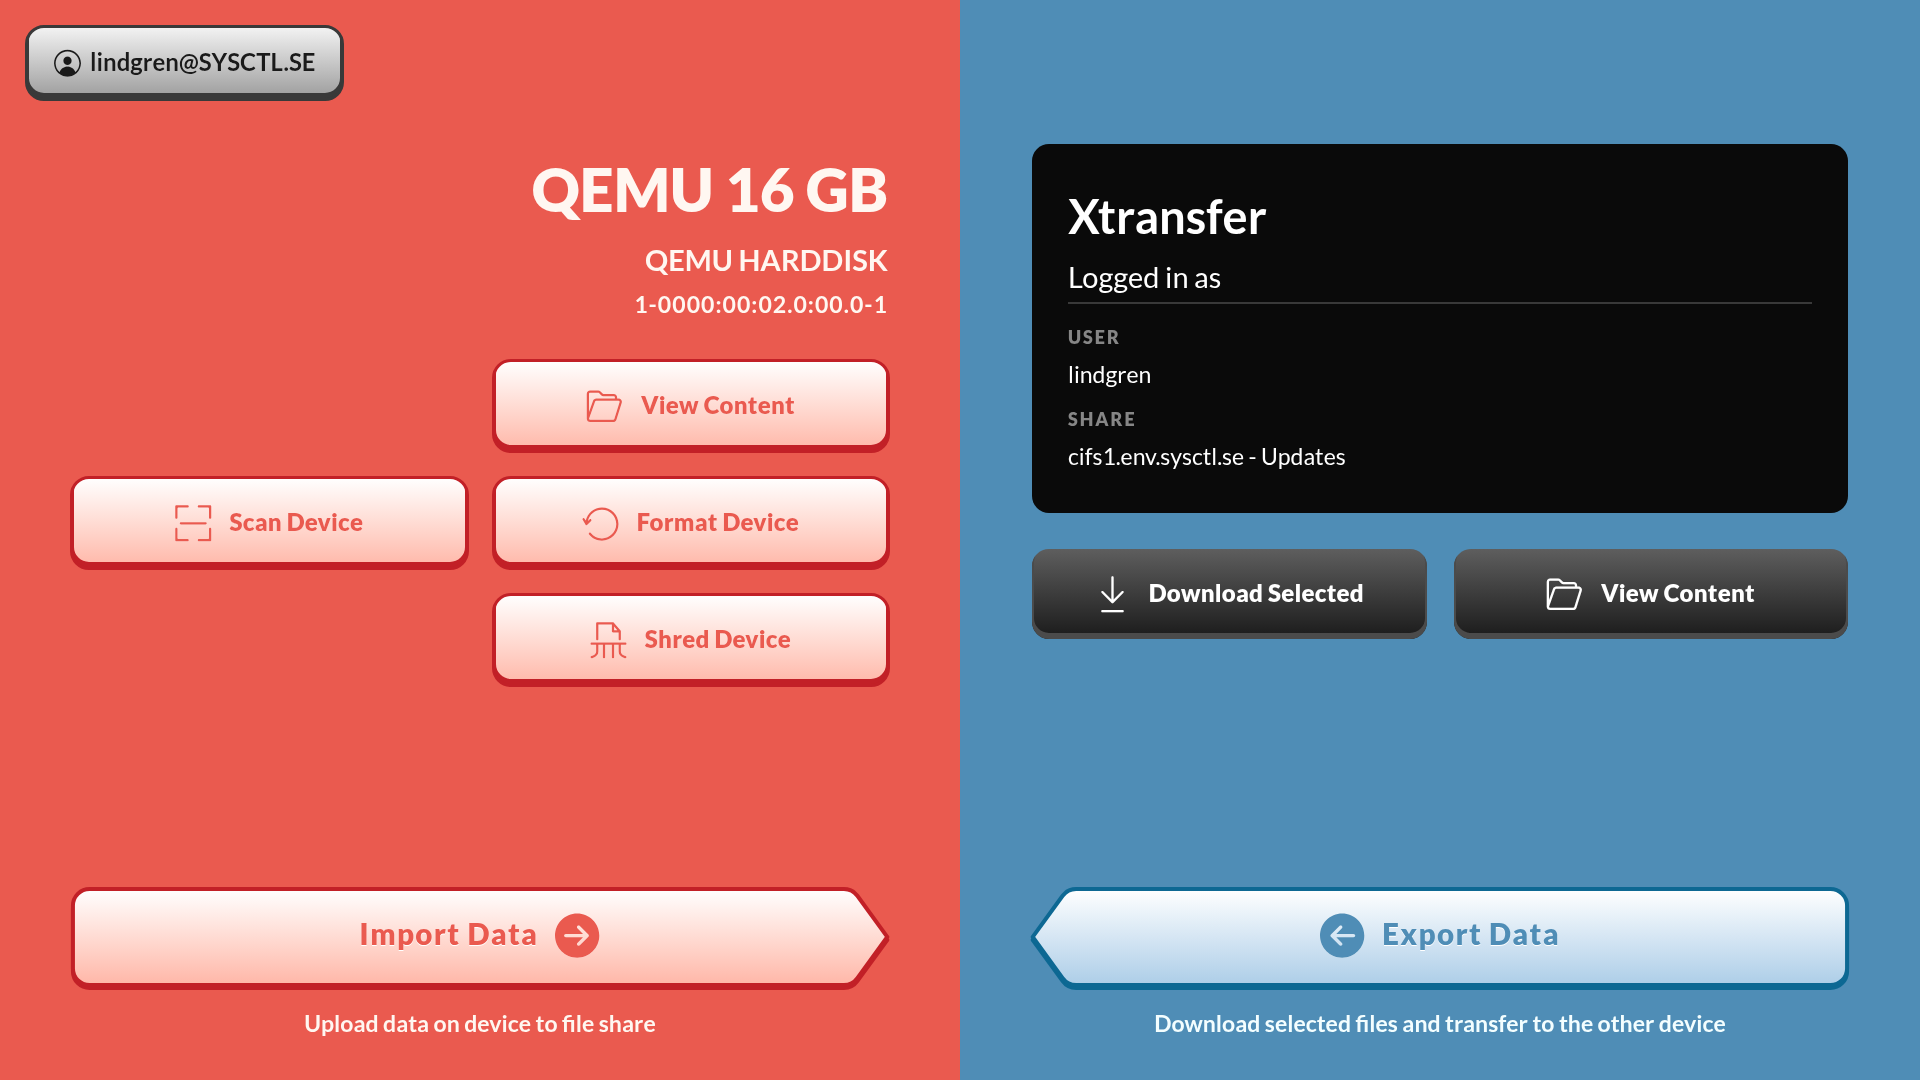
In order to download files from a share, the files must first be selected. Press “View Content” to browse the files in a folder structure. Selecting a folder will select all the files within it. Once files have been selected two possible actions can be chosen:
- Press “Export data” to scan and transfer the selected files to the target USB in one operation.
- Press “Download selected” to scan the files and transfer them to the target USB as two separate steps.
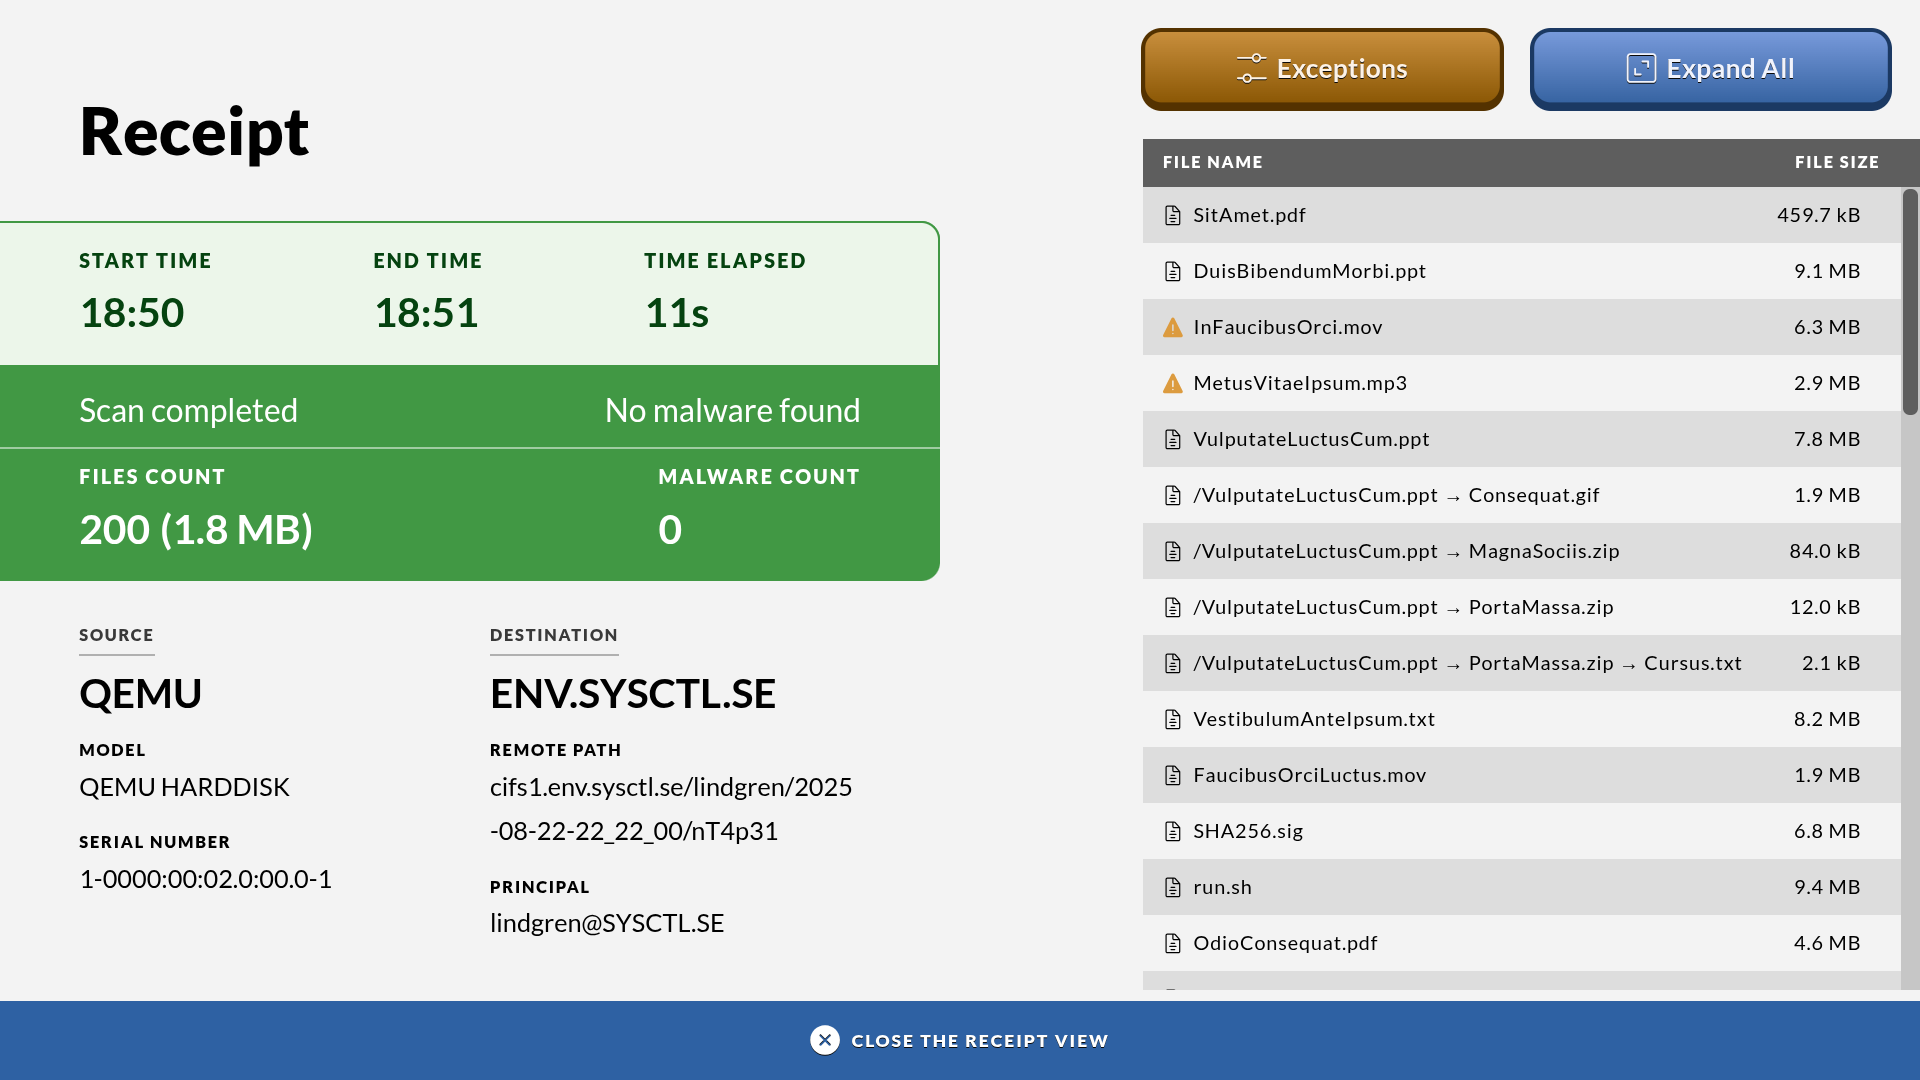
Xtransfer summary
The scan summary for an Xtransfer operation shows the network realm, the remote path used, and the credential (“Principal”) used to authenticate, in addition to the usual scan results. If malware was found, the remote path shows “Not uploaded” instead of the actual path, since no files are transferred in that case.
Logging out of Xtransfer
To log out of an Xtransfer session, simply remove your security key. This can also be done during an ongoing operation, which will then finish before you are logged out.
Format a USB drive
If the “Allow format only” option has been enabled in the Impex Control Center one can also use the Impex station for formatting a USB drive. If the option is turned on the “Format device” button appears when just one drive is inserted. It does not matter in which port the drive is inserted.
Format a Bitlocker drive
When formatting a bitlocker drive one can format it in two ways. If the Bitlocker password is entered, the filesystem inside the Bitlocker container will be formatted as NTFS. If the Bitlocker password is not entered, by pressing “cancel”, the entire drive will be formatted and the Bitlocker container will thus be wiped, turning the drive into a normal USB drive.
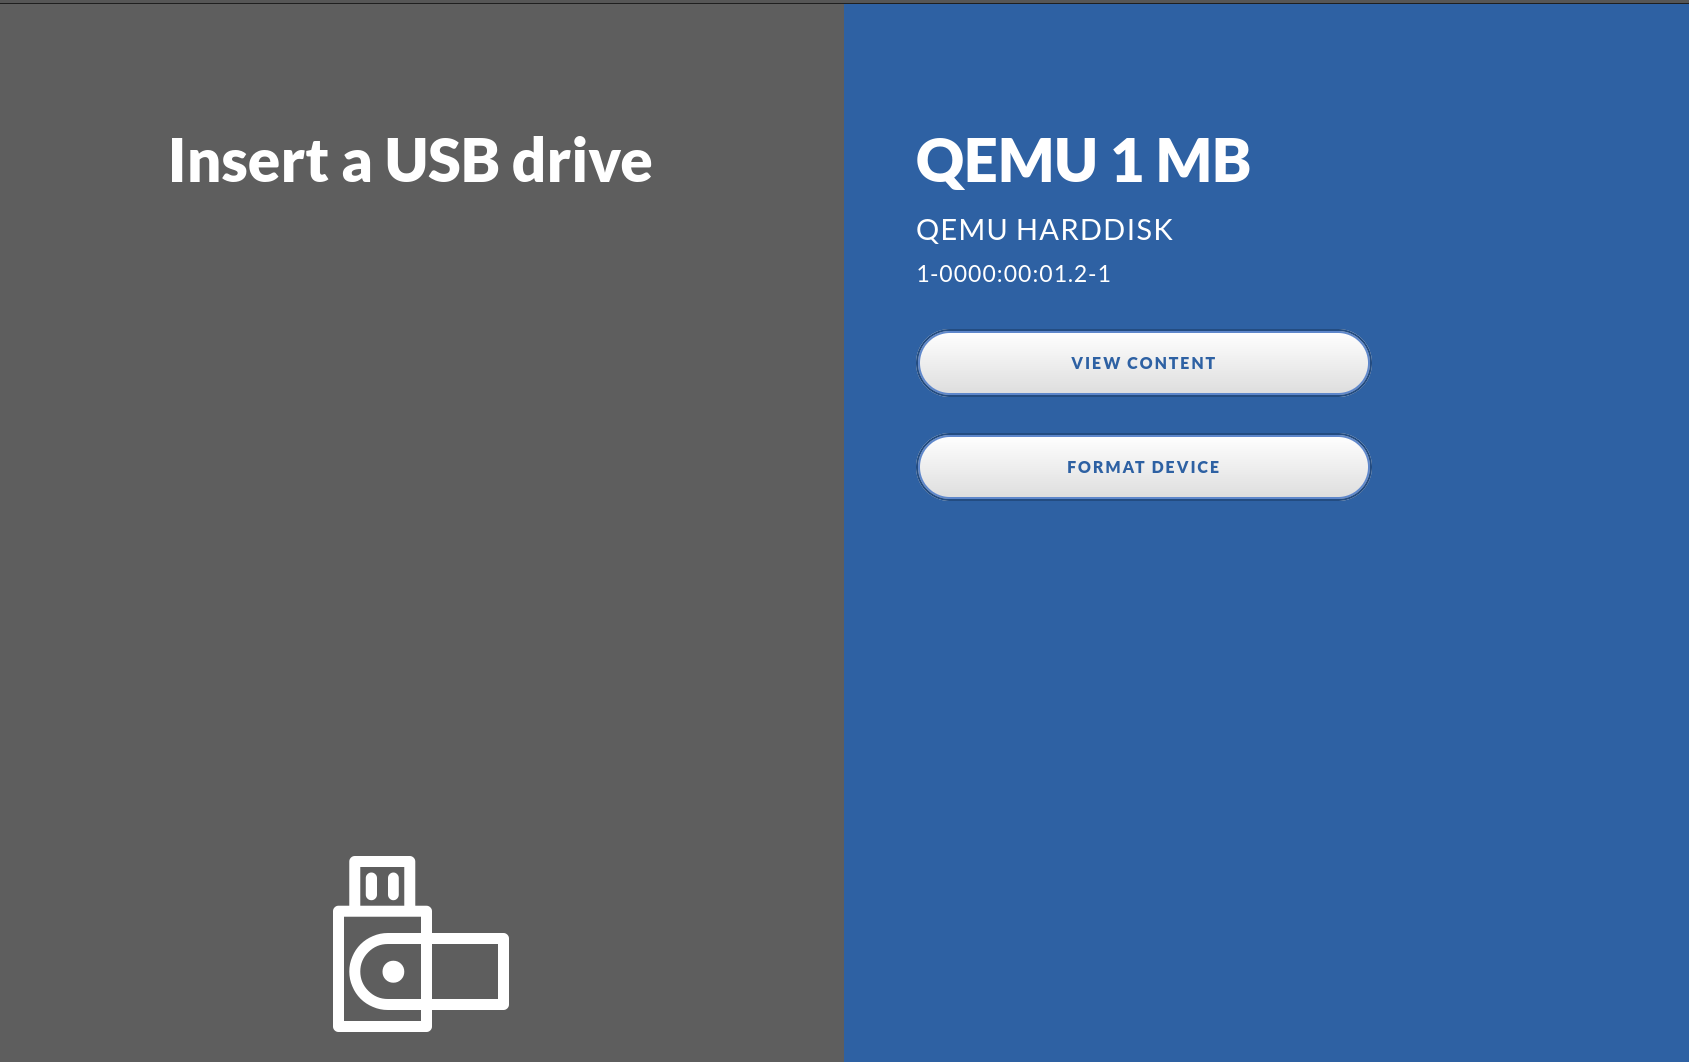
1. Insert a USB Drive
2. Press the “Format Device” button
3. Read the text and then press “Confirm”
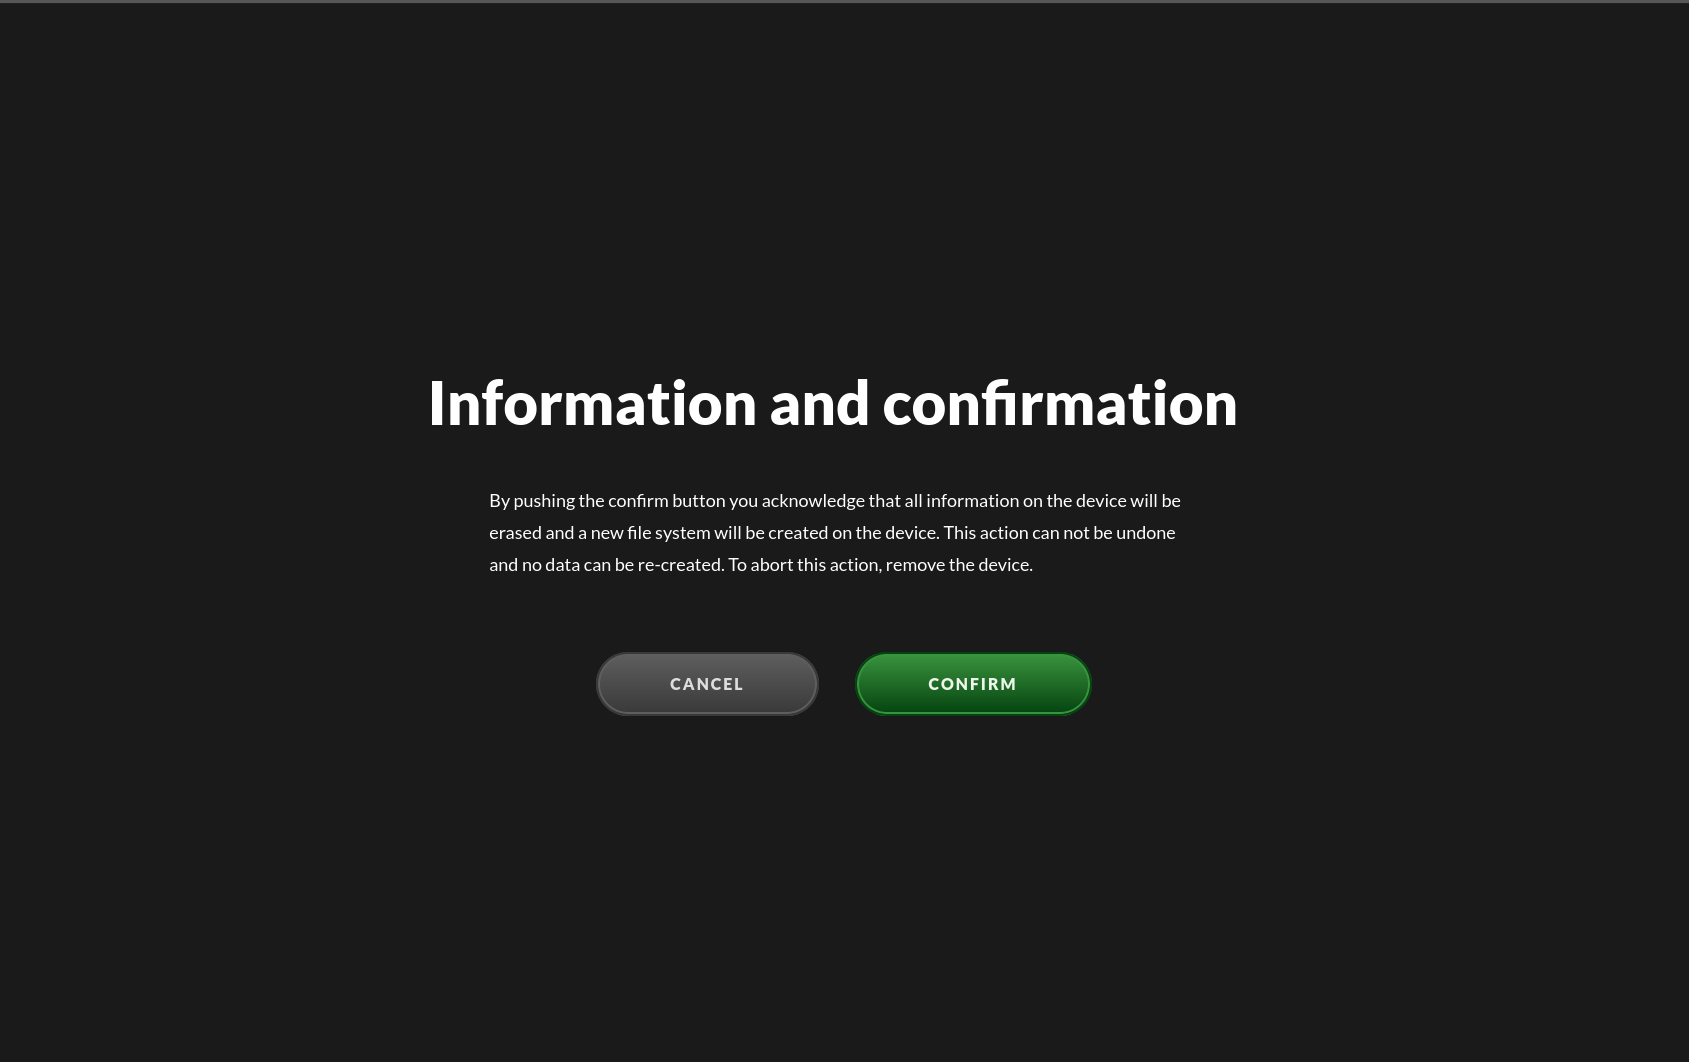
This screen will display text describing the actions you are about to take. If you click on “confirm”, the next step will be to format the attached USB drive. If you have changed your mind, or performed this action in error, just remove the attached USB device to interrupt the formatting.
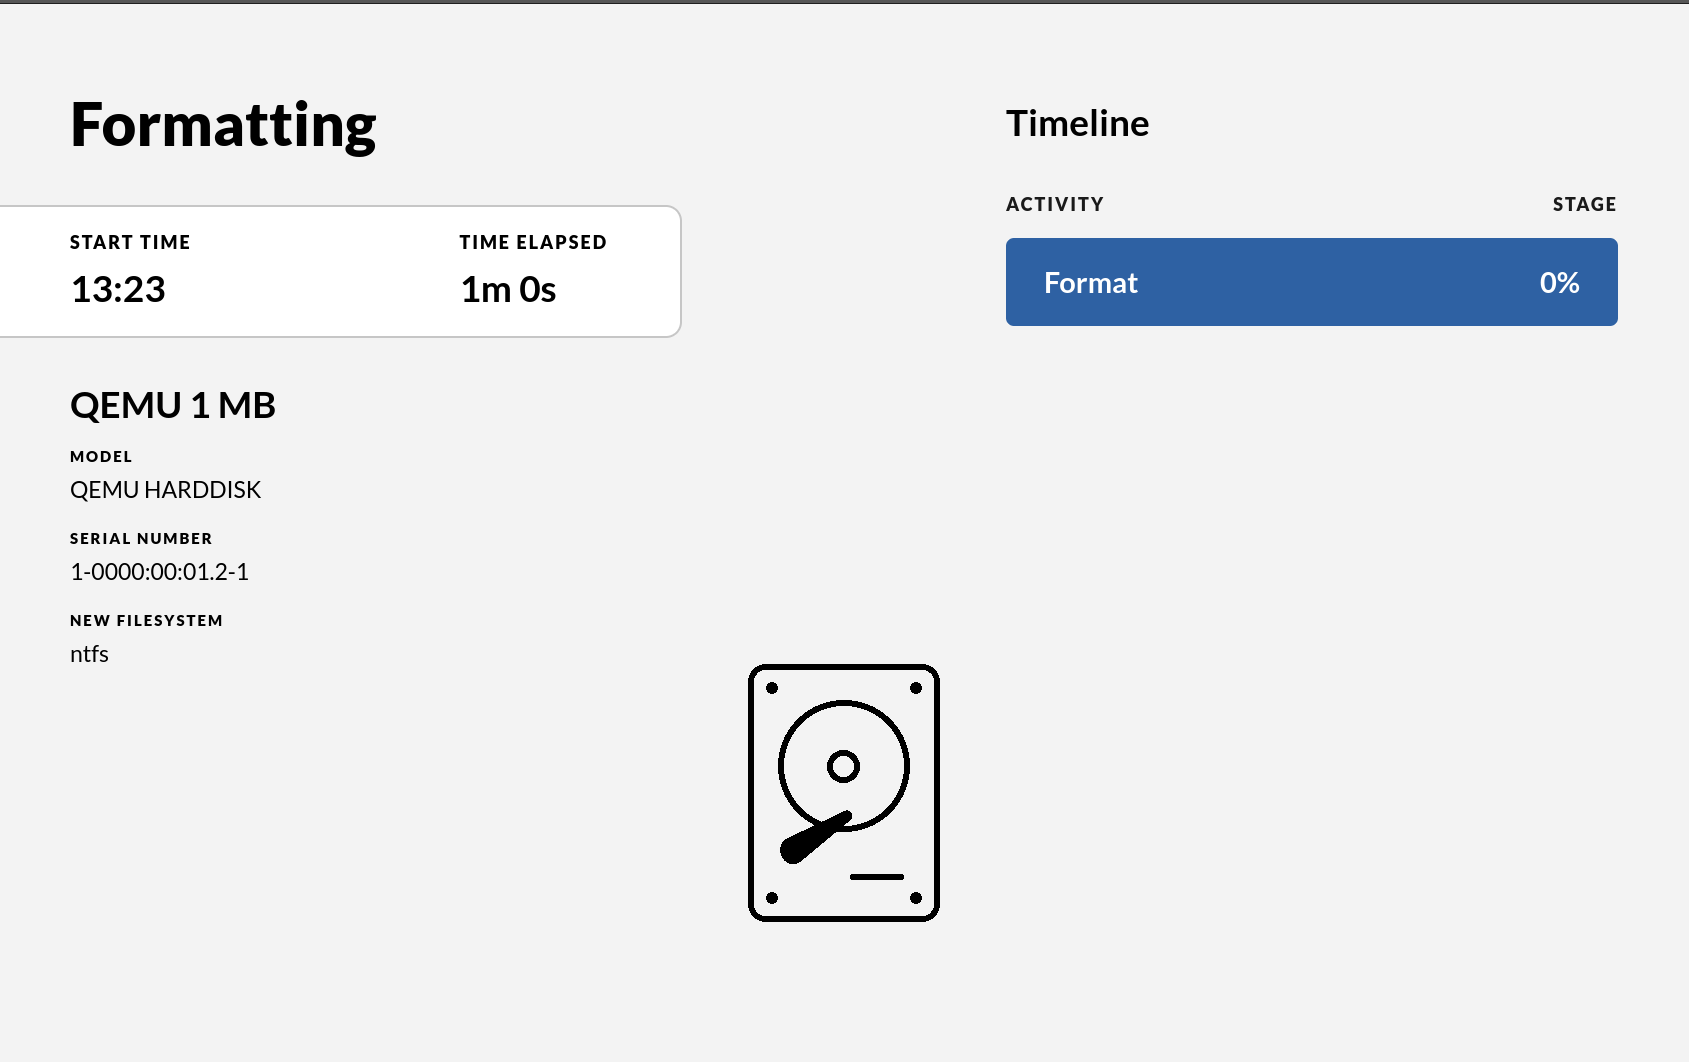
The progress bar is a measure that will display the progress of the actual formatting
After acknowledging that the user understands that the USB drive will be erased and all information on it will be lost the drive will be formatted and a new FAT32 file system created on it. If the drive is larger than 2TB it will be partitioned with GPT and the file system will be exfat. The default file system FAT32 can be changed in the ICC to be always exfat or always NTFS.
If the station has been configured to allow filesystem selection, you can instead choose the target filesystem yourself. Before confirming, press the filesystem shown to open “Choose file system” and select the option you want from the list provided by the ICC (for example vfat, ntfs or exfat).
After the process is complete the final view will contain a receipt showing information about the drive.
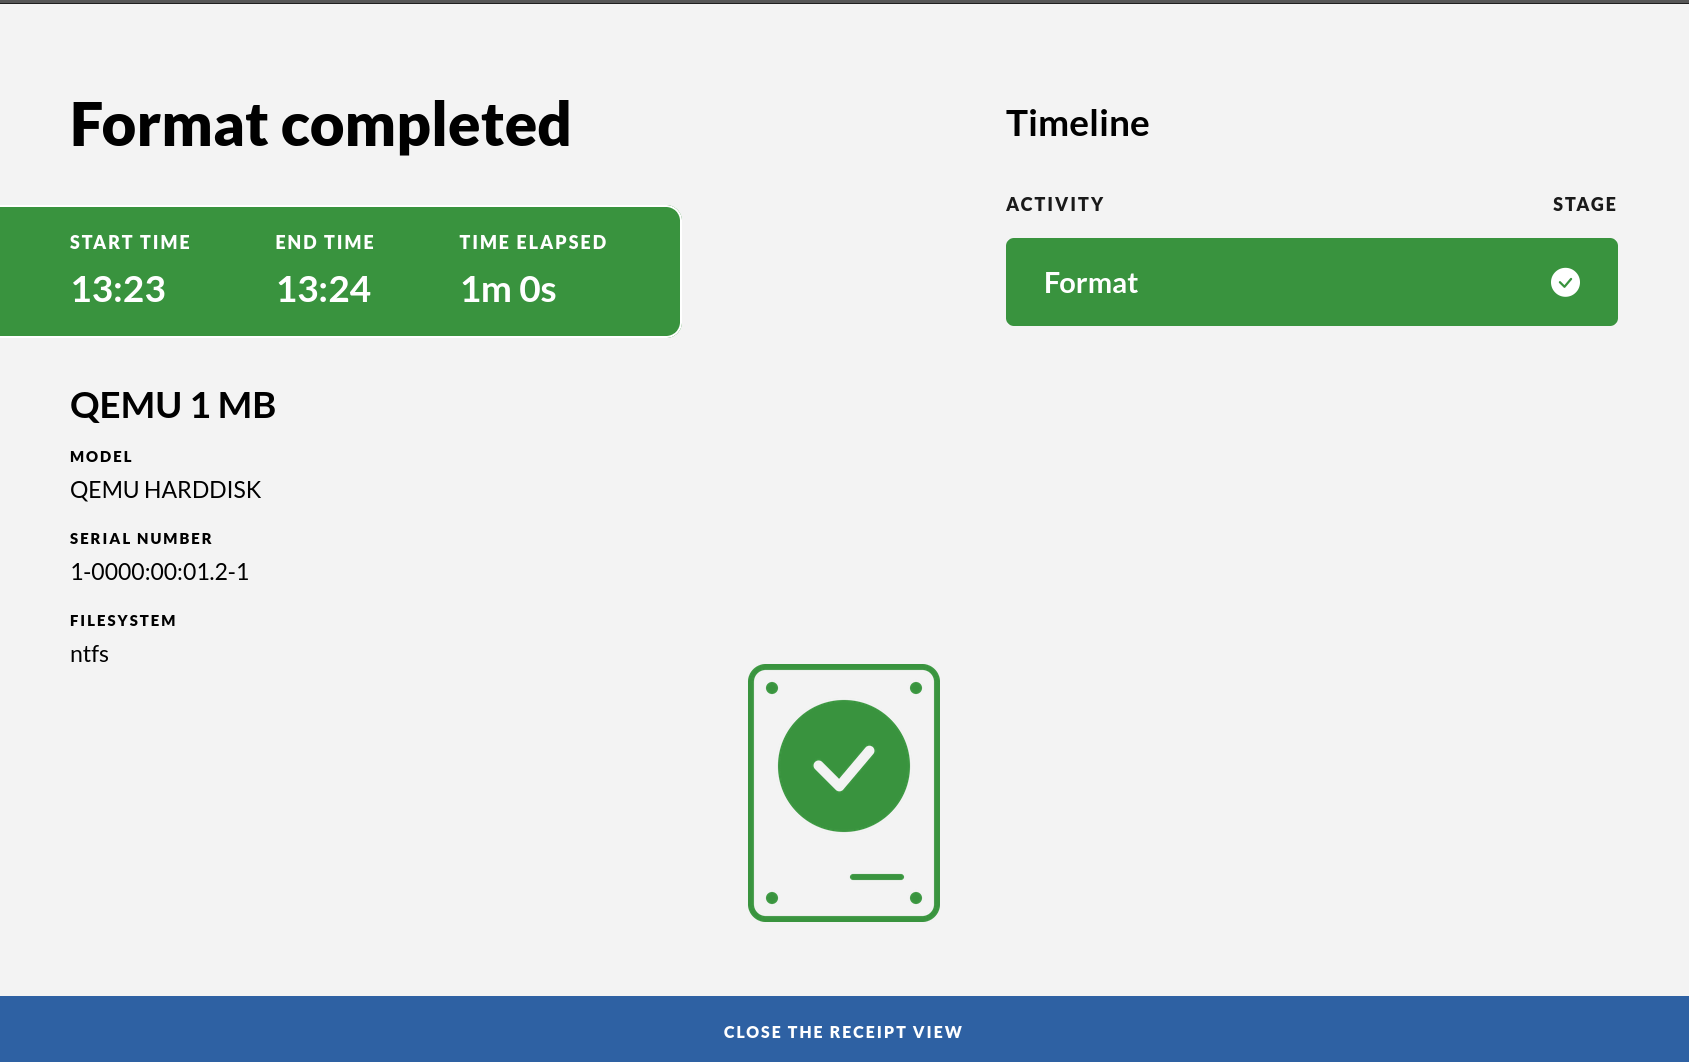
The receipt is shown on the screen. The receipt contains important information, including:
- brand and model of the attached usb devices
- name of the attached usb devices
- size of the attached usb devices
- file system used when formatting
- serial numbers of the attached devices
4. Press “Done” and remove the USB drive
The USB drive is now formatted and clean, ready for use.
Scan one USB drive
If the “Allow scan only” option has been enabled in the Impex Control Center one can also use the Impex station for scanning a USB drive without transferring any files. If enabled, a “Scan Device” button appears when only one drive is inserted. It does not matter in which port the drive is inserted.
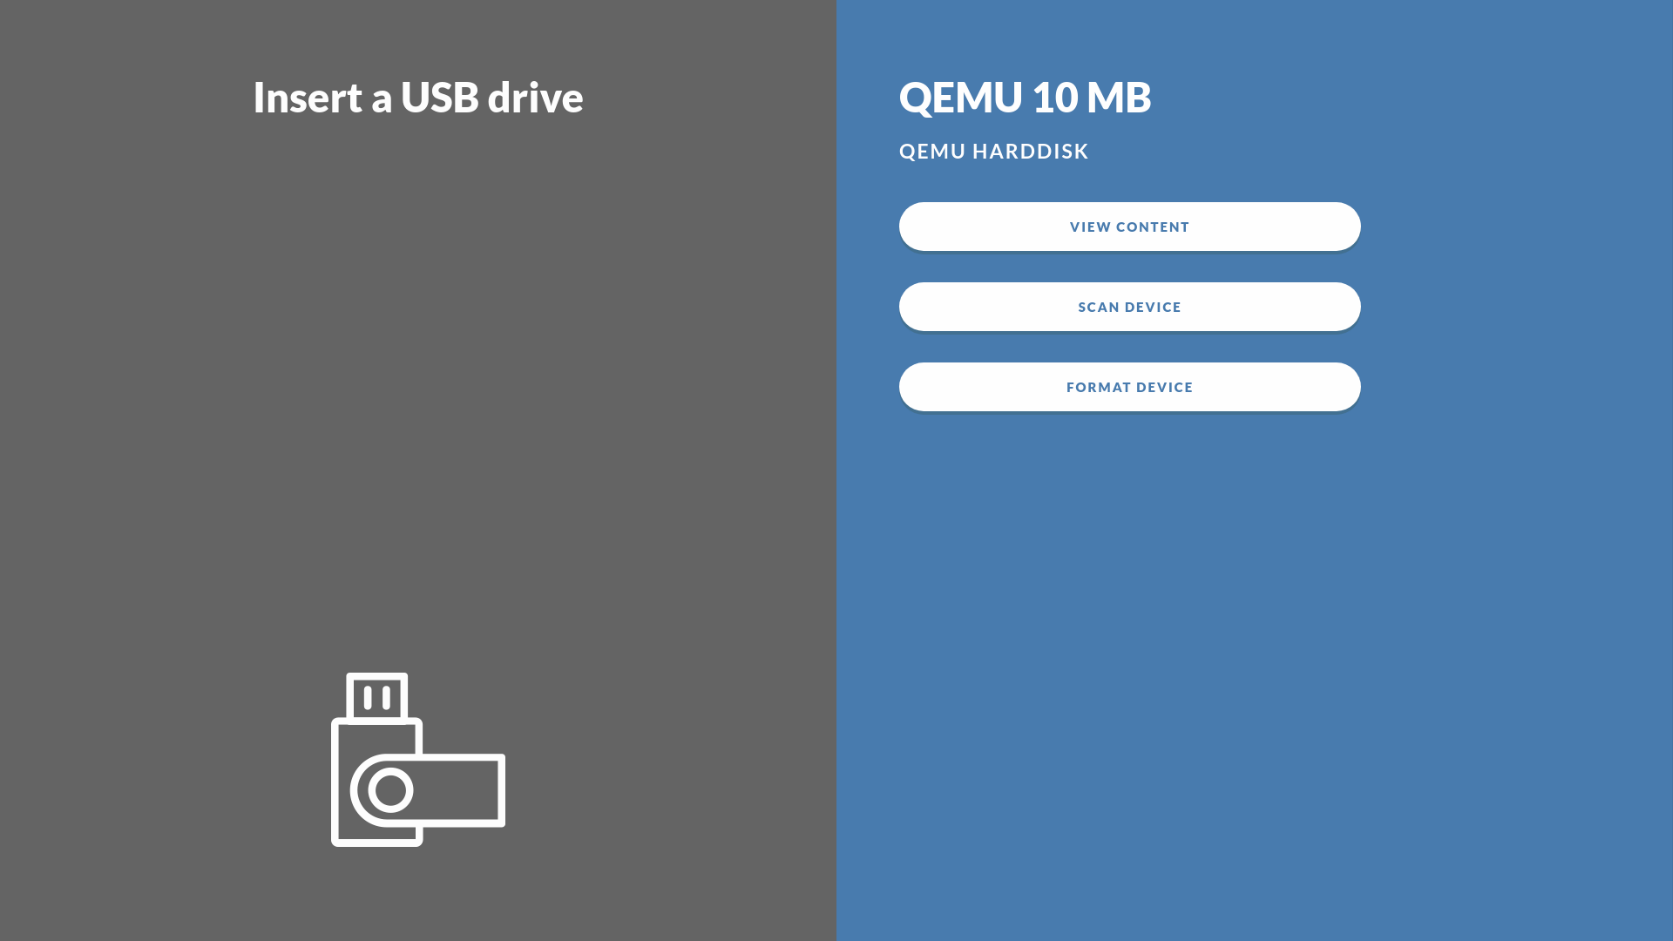
1. Insert a USB Drive
2. Press the “Scan Device” button
Depending on your local security policy you might have to enter your identification using the on-screen keyboard and press a confirm button to continue.
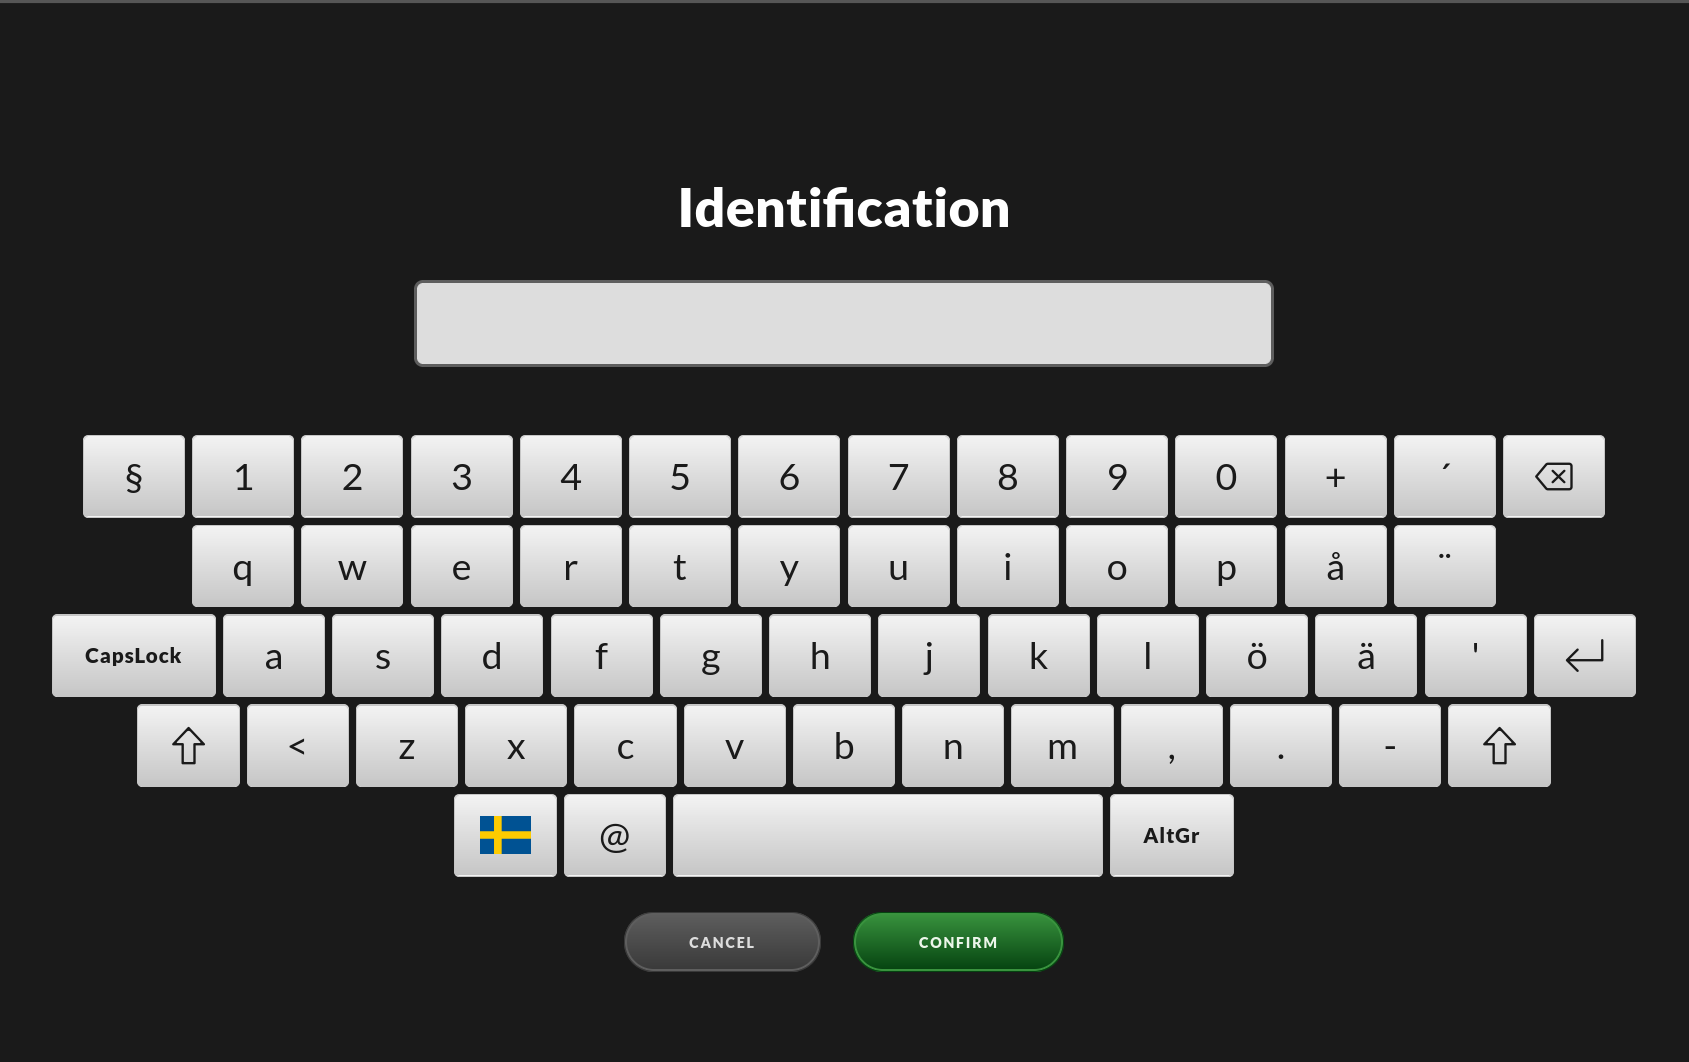
This is a pop-up screen on which you need to fill in your email address. If the Impex has been configured to, there might also be a list of preloaded names to choose from. making it easier, and faster, for users to use the identification screen.
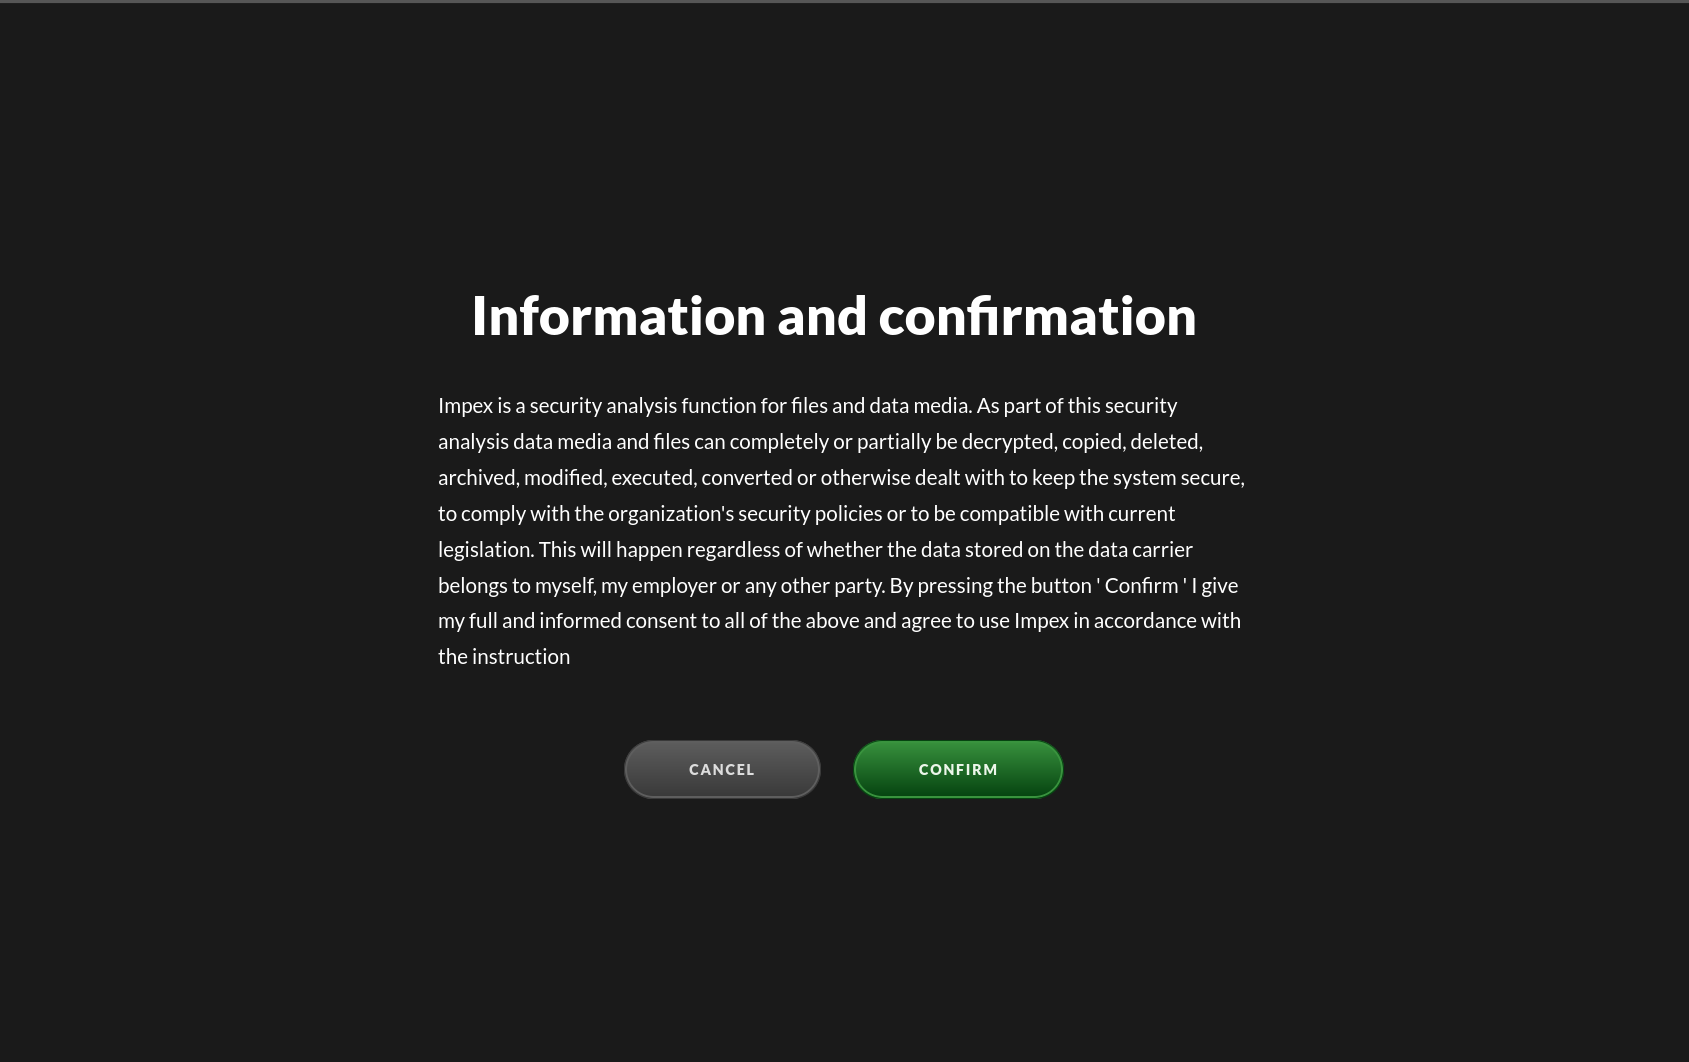
The confirmation screen will display some information describing the process used by, and the action taken by, Impex. It asks you to read and acknowledge this information before proceeding.
The files on the USB drive will now be analysed for virus, malware and other unwanted software. During this process a progress bar will be shown depicting a rough estimate on how much time is left.
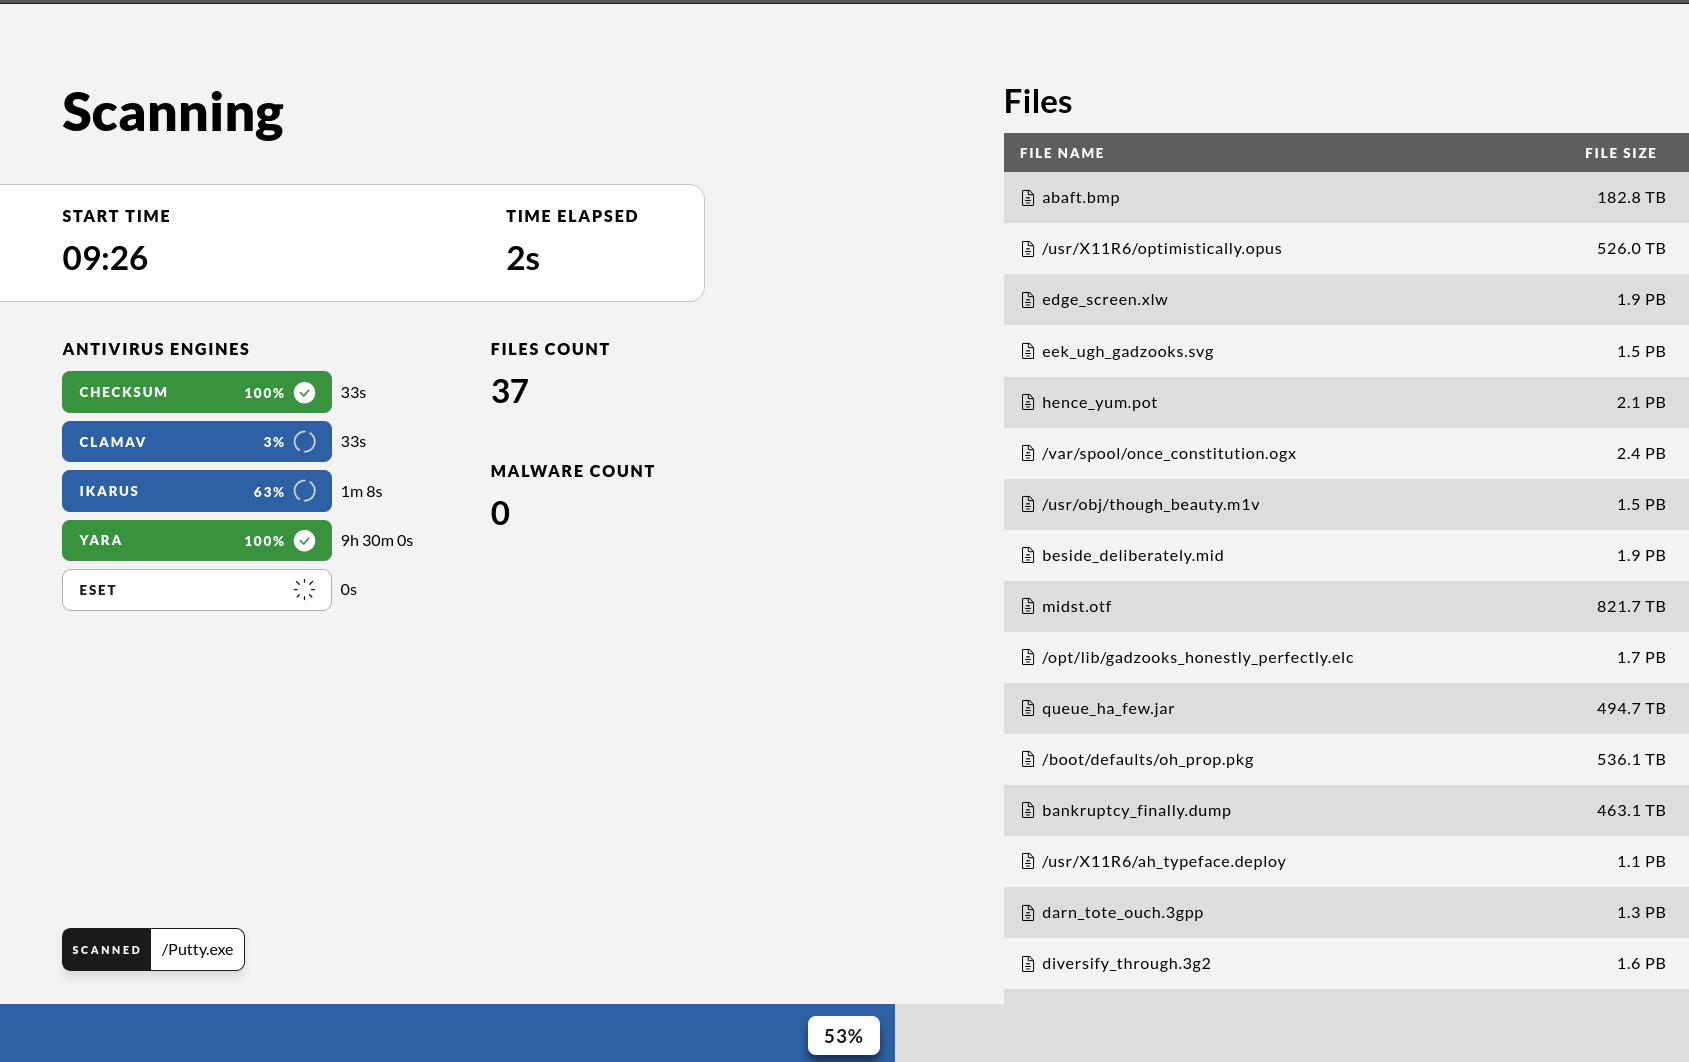
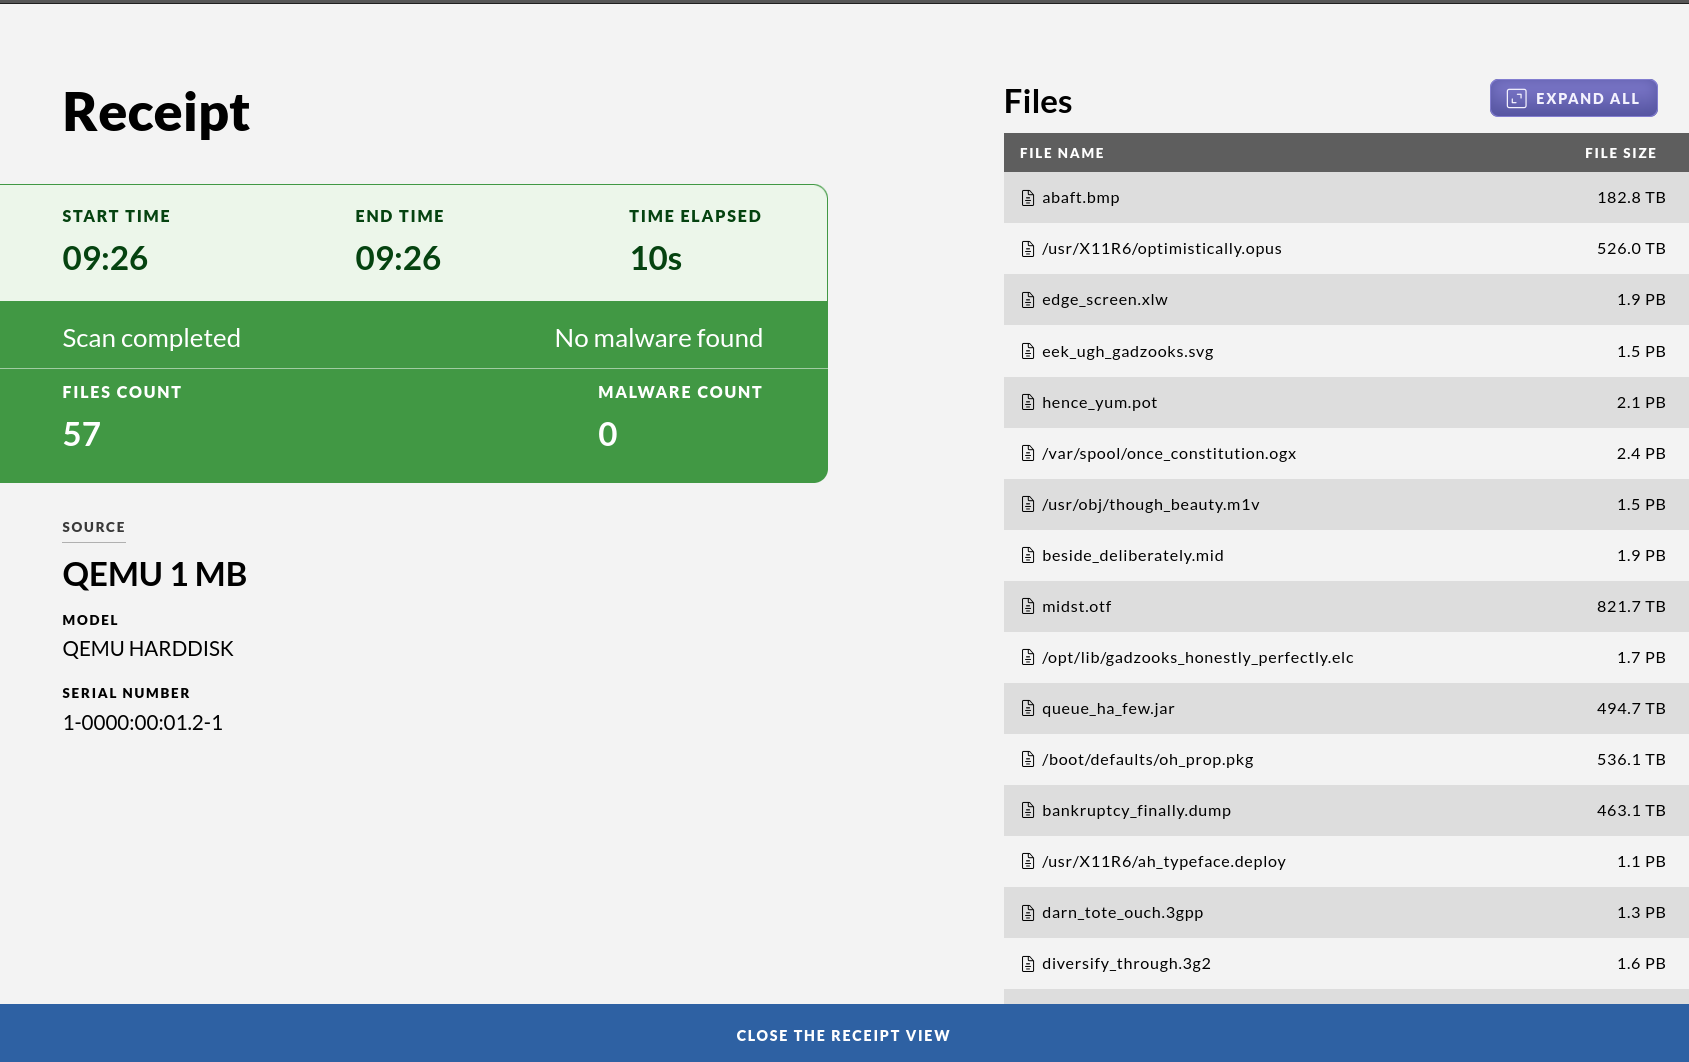
If nothing malicious was detected you will see a green screen together with a receipt which gives an overview of which files were scanned and their unique checksums. If a printer is attached and enabled you will also get a printout of this summary.
In the case that unwanted files were detected the screen will go red and a listing will show which file or files contained malware. If a printer is attached and enabled you will also get a printout. To only view the malicious files, press “Filter”. The drive containing the malicious files will not be modified or cleaned by the system.
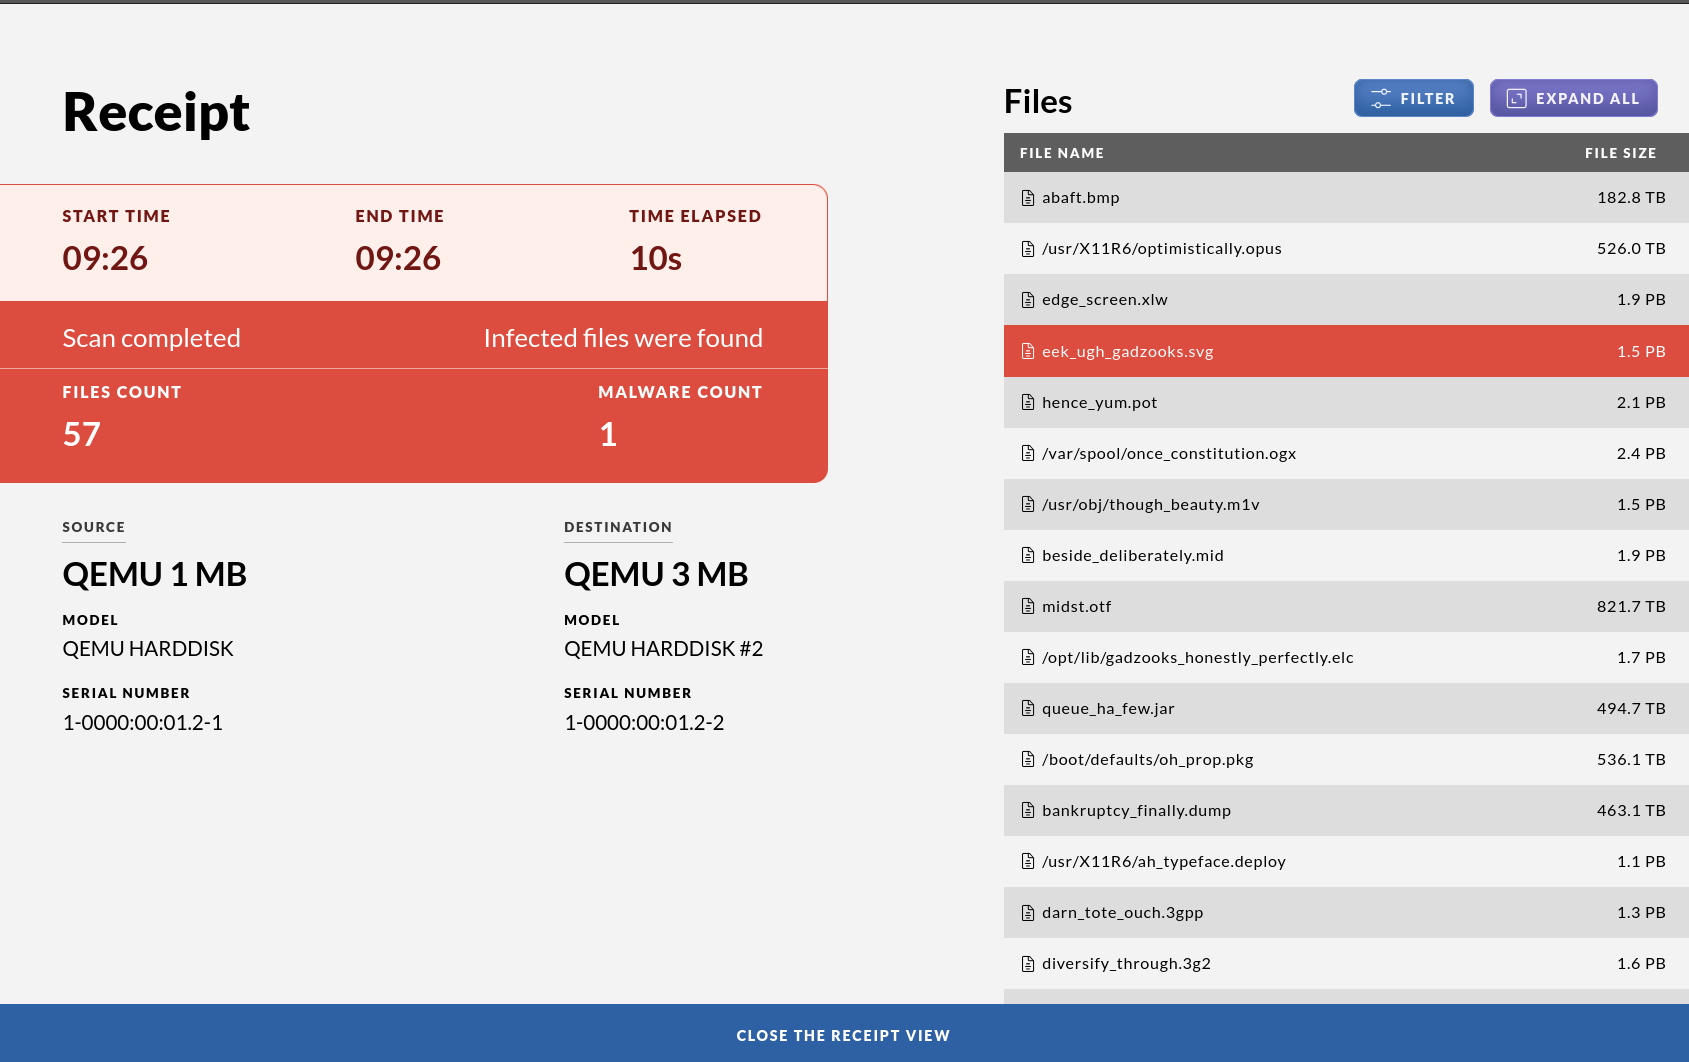
Your local security policy should dictate what to do with the USB drive in case malware is found.
4. To complete the procedure press “Done” or pull out the USB drive
Either press “Done” or remove the USB-device to close the receipt-view. If the USB-device is removed while the receipt-view is active, “Done” will be replaced by a ten second countdown, and when the countdown reaches zero the view will be closed.
To abort the countdown simply press it and it will be replaced by “Done” and the receipt-view will remain active until “Done” is pressed.
If at any point you want to abort the procedure before this, pull the USB drive.
Shred a USB drive
If the “Allow shred only” option has been enabled in the Impex Control Center one can also use the Impex station for shredding a USB drive. If the option is turned on the “Shred device” button appears when just one drive is inserted. It does not matter in which port the drive is inserted.
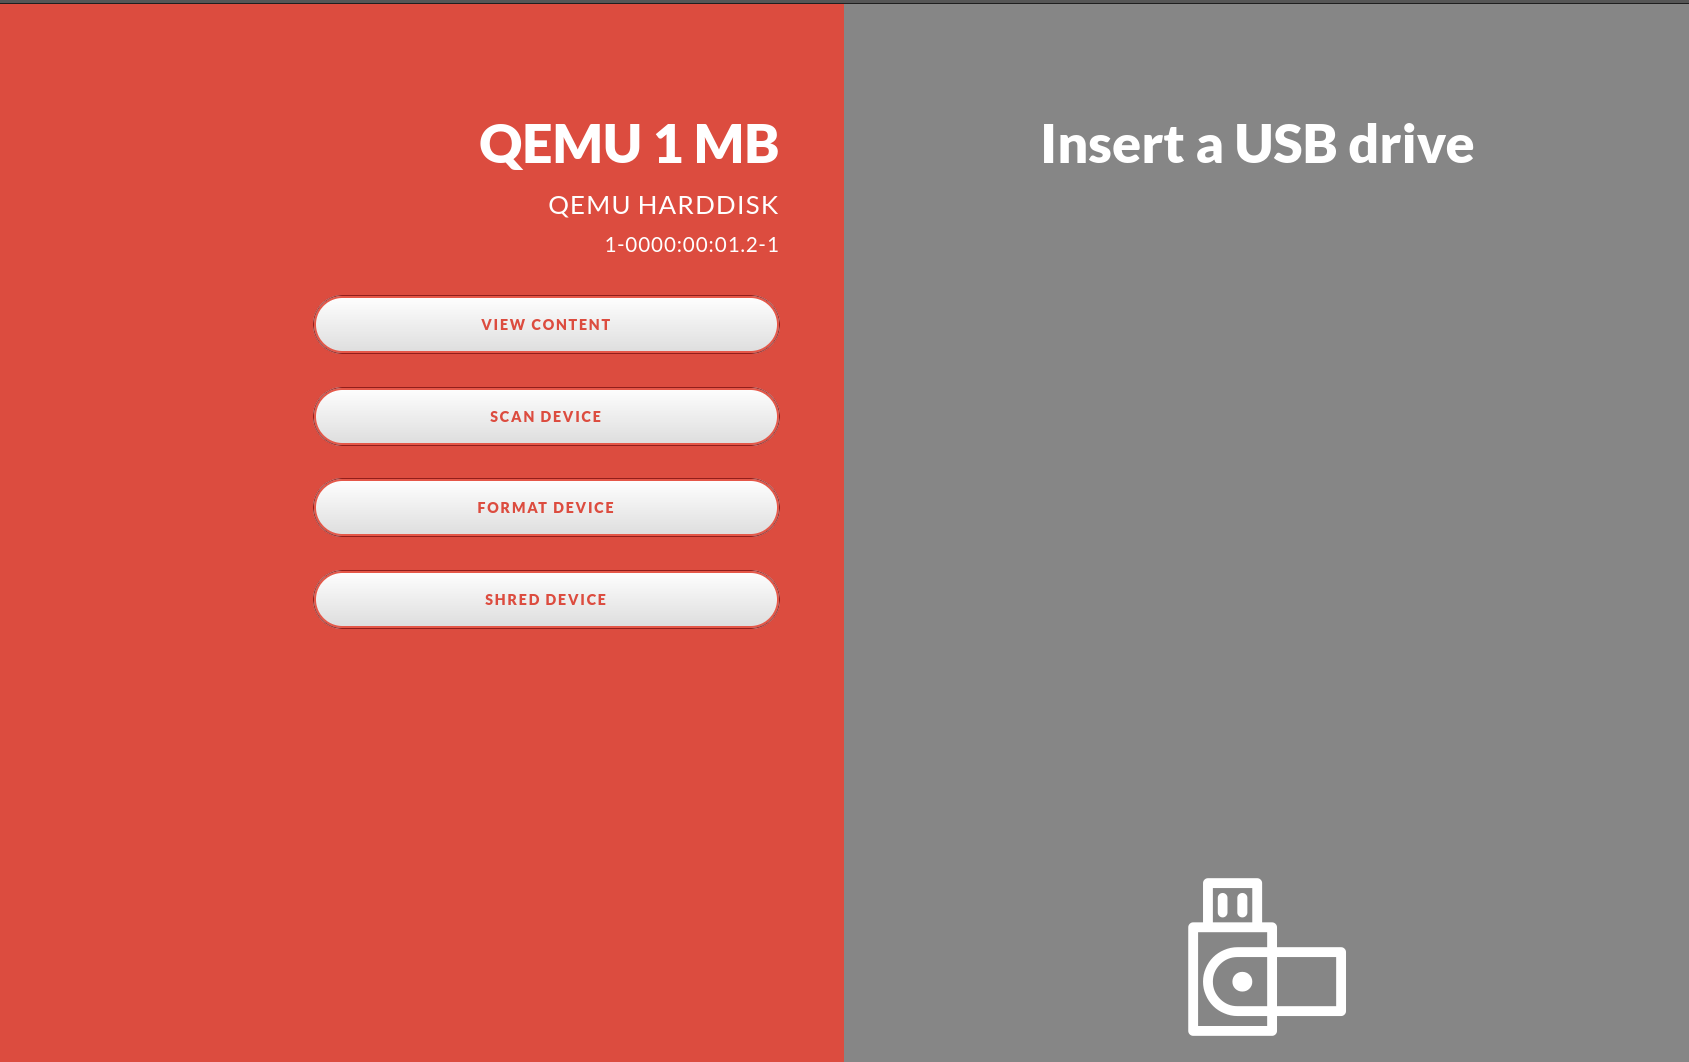
1. Insert a USB Drive
2. Press the “Shred Device” button
3. Read the text and then press “Confirm”
This screen will display text describing the actions you are about to take. If you click on “confirm”, the next step will be to shred and format the attached USB drive. If you have changed your mind, or performed this action in error, just remove the attached USB device to interrupt the shredding and formatting.
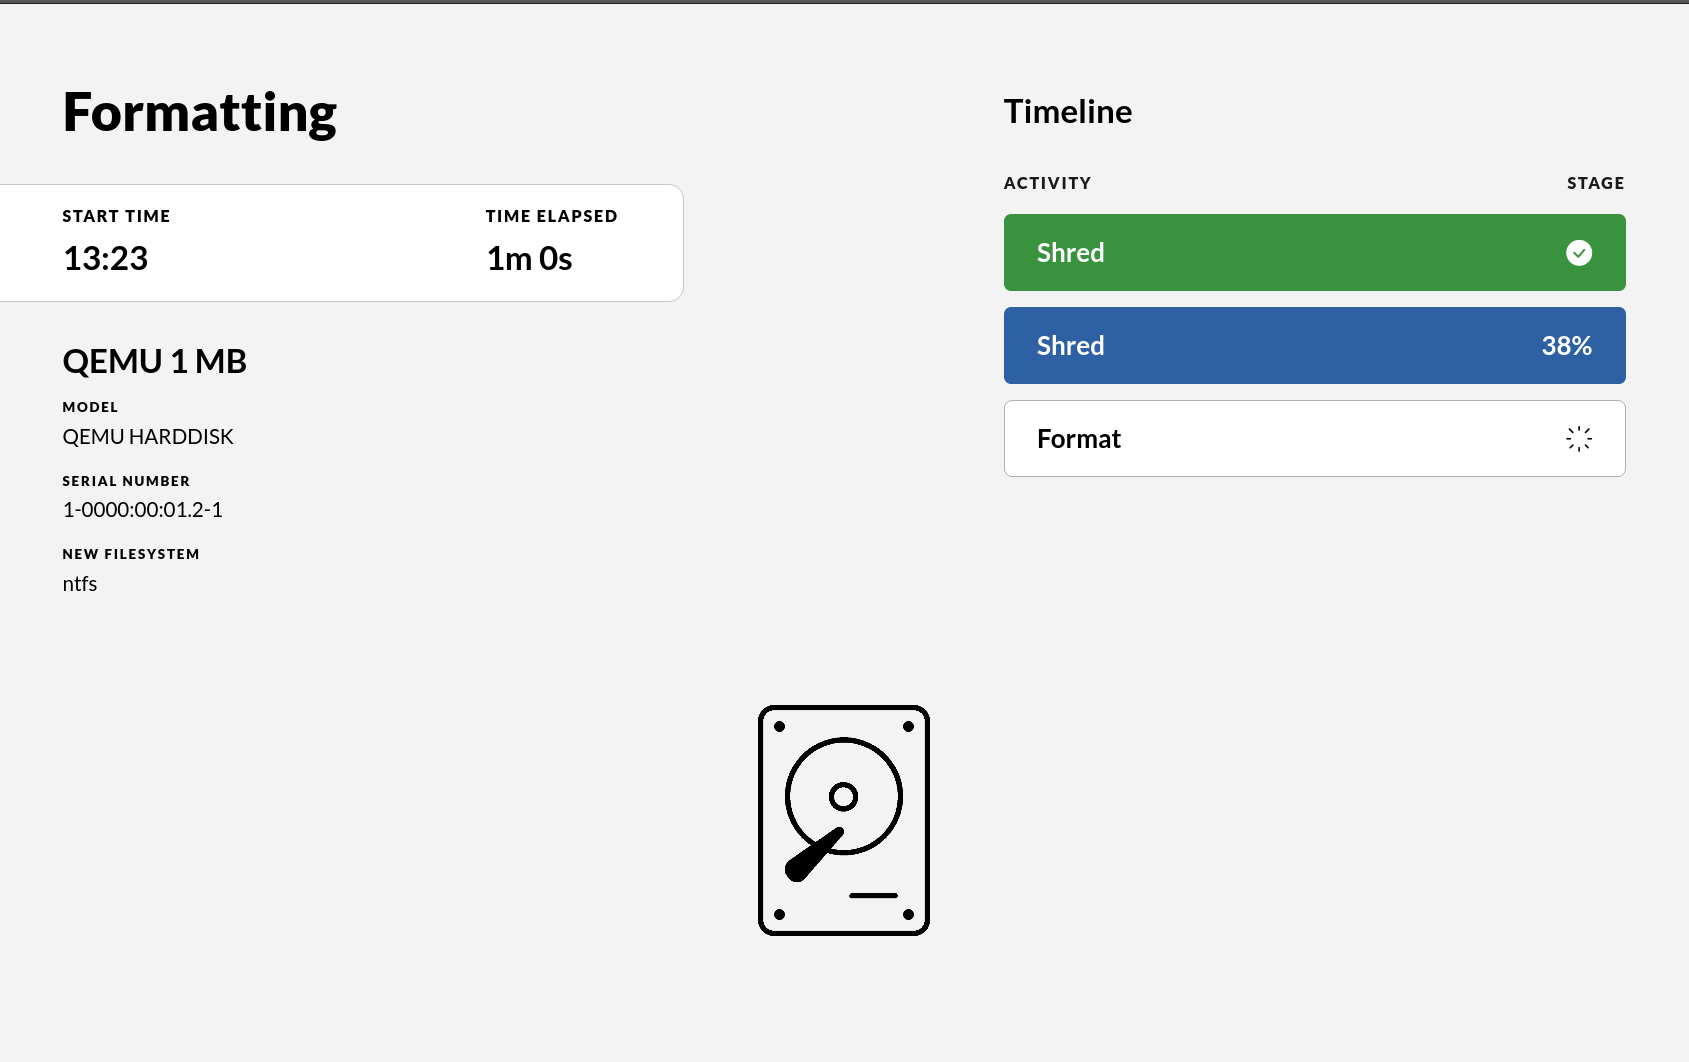
The progress bar is a measure that will display the progress of the actual shredding.
After acknowledging that the user understands that the USB drive will be shredded and all information on it will be lost the drive will be formatted and a new FAT32 file system created on it. If the drive is larger than 2TB it will be partitioned with GPT and the file system will be exfat. The default file system FAT32 can be changed in the ICC to be always exfat or always NTFS.
If the station has been configured to allow filesystem selection, you can instead choose the target filesystem yourself. Before confirming, press the filesystem shown to open “Choose file system” and select the option you want from the list provided by the ICC (for example vfat, ntfs or exfat).
After the process is complete the final view will contain a receipt showing information about the drive. It will also contain information on how many passes of shredding occurred. The system automatically shreds in three passes if the drive is detected to be a magnetic spin disk. If it is a flash drive, only one pass is done to preserve write cycles on the hardware. Since there is no problem with magnetic residues on a flash drive, one pass is considered enough.
Note that some drive enclosures, perhaps with some RAID or SSD disk cache functionality do not report a rotation rate even if they contain magnetic spin disks. In this case Impex will only do one write cycle and it is up to the end user to redo the shred action as many times as policy demands.
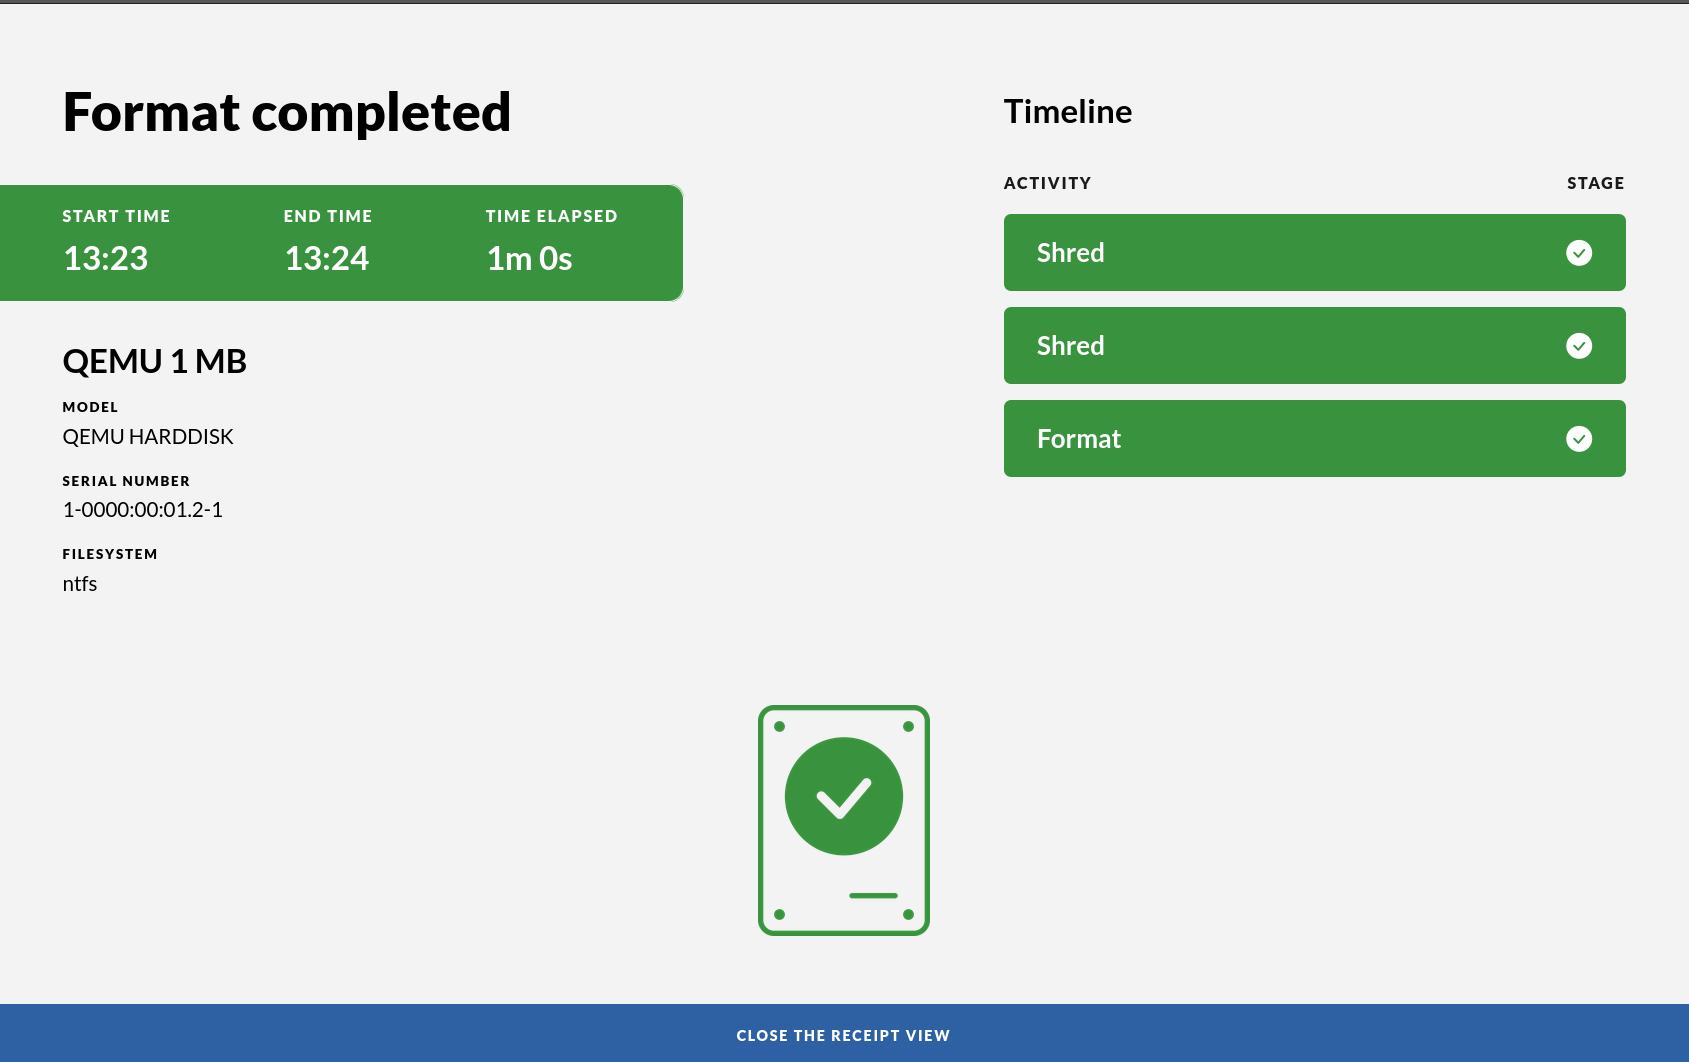
The receipt is shown on the screen. The receipt will contain important information, including:
- brand and model of the attached usb devices
- name of the attached usb devices
- size of the attached usb devices
- file system used when formatting
- serial numbers of the attached devices
- how many shredding passes was performed
4. Press “Done” and remove the USB drive
The USB drive is now formatted and clean, ready for use.
5. Shredding disclaimer on SSDs
Due to how flash drives work, there is no guarantee that each sector gets shredded. The firmware in the drive might direct writes to different sectors even though the same block is written to. This is called wear leveling and is a method to increase a SSDs life span.
6. Bitlocker exception
Bitlocker drives cannot be shredded at the moment because Impex cannot re-create the bitlocker container. If a device has a bitlocker container on it, the shred-button will not be shown. We recommend changing the bitlocker password to something very long which is practically the same as shredding it. This might change in an upcoming version.
Scan an encrypted archive
Some files can be protected with a password, thus creating an encrypted file. This is a popular feature for archive files, like zip archives. Thus, to be able check an archive that is encrypted, the file must be decrypted to allow for the files inside the archive to be reachable for the scan engine. Impex currently supports two different ways of doing this: a centralized way by distributing password lists using the ICC management server or by having an user supply the passwords at the Impex kiosk.
Before performing a scan or transfer, you can extract files from an encrypted archive by entering the required password, ensuring that no unwanted files are missed by the scanning engines.
Recognized encrypted archives are shown with a locked-padlock icon. When an encrypted archive is successfully extracted using the correct password, its contents appear in the file list and the icon changes to an unlocked padlock. All files including extracted ones are stored only temporarily on Impex USB Protect, and extracted files are not transferred to the target USB media during a transfer.
If an encrypted file is not recognized and doesn’t show the padlock icon, you can click on the file to attempt unlocking it.
Please note that extraction of encrypted archives is only possible if there is enough disk space. If there is not enough disk space an error message will be shown to the user after an attempted extraction has been performed.
Supported formats:
- ZIP
- 7z
Indicator showing the media contains encrypted archives
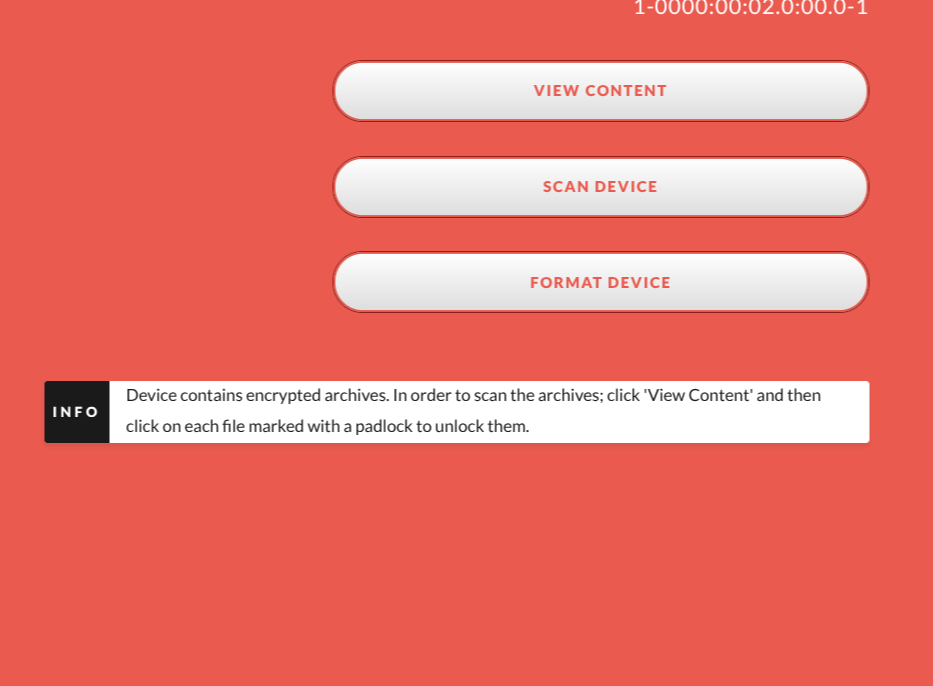
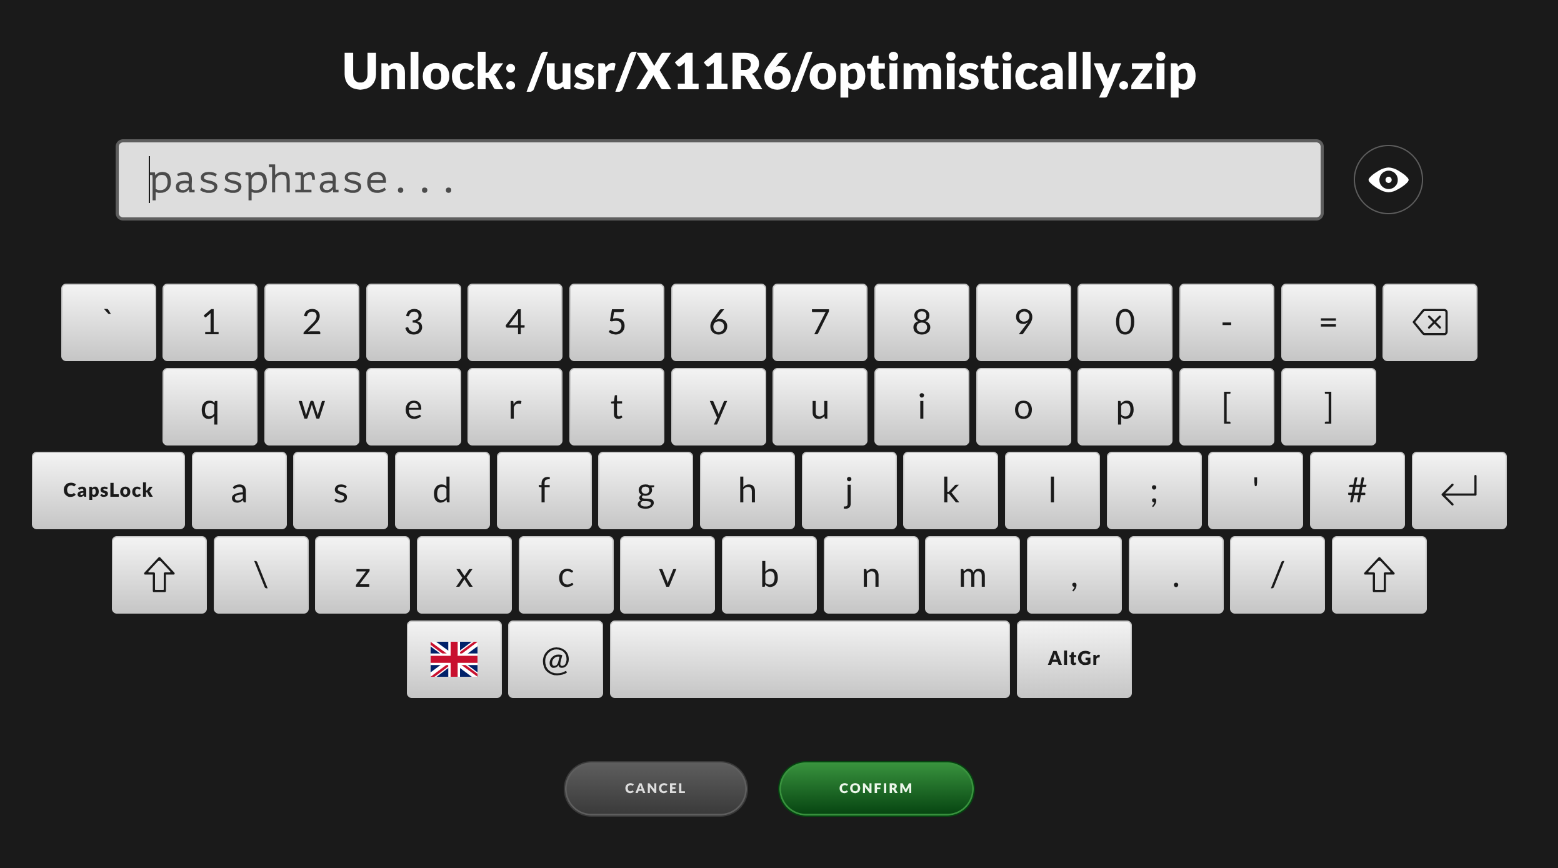
1. Click the file to extract

2. Type the password
3. File listing after file is unlocked

4. Start a scan or transfer
After the file is extracted start a scan or transfer.
Multiple Partition Devices
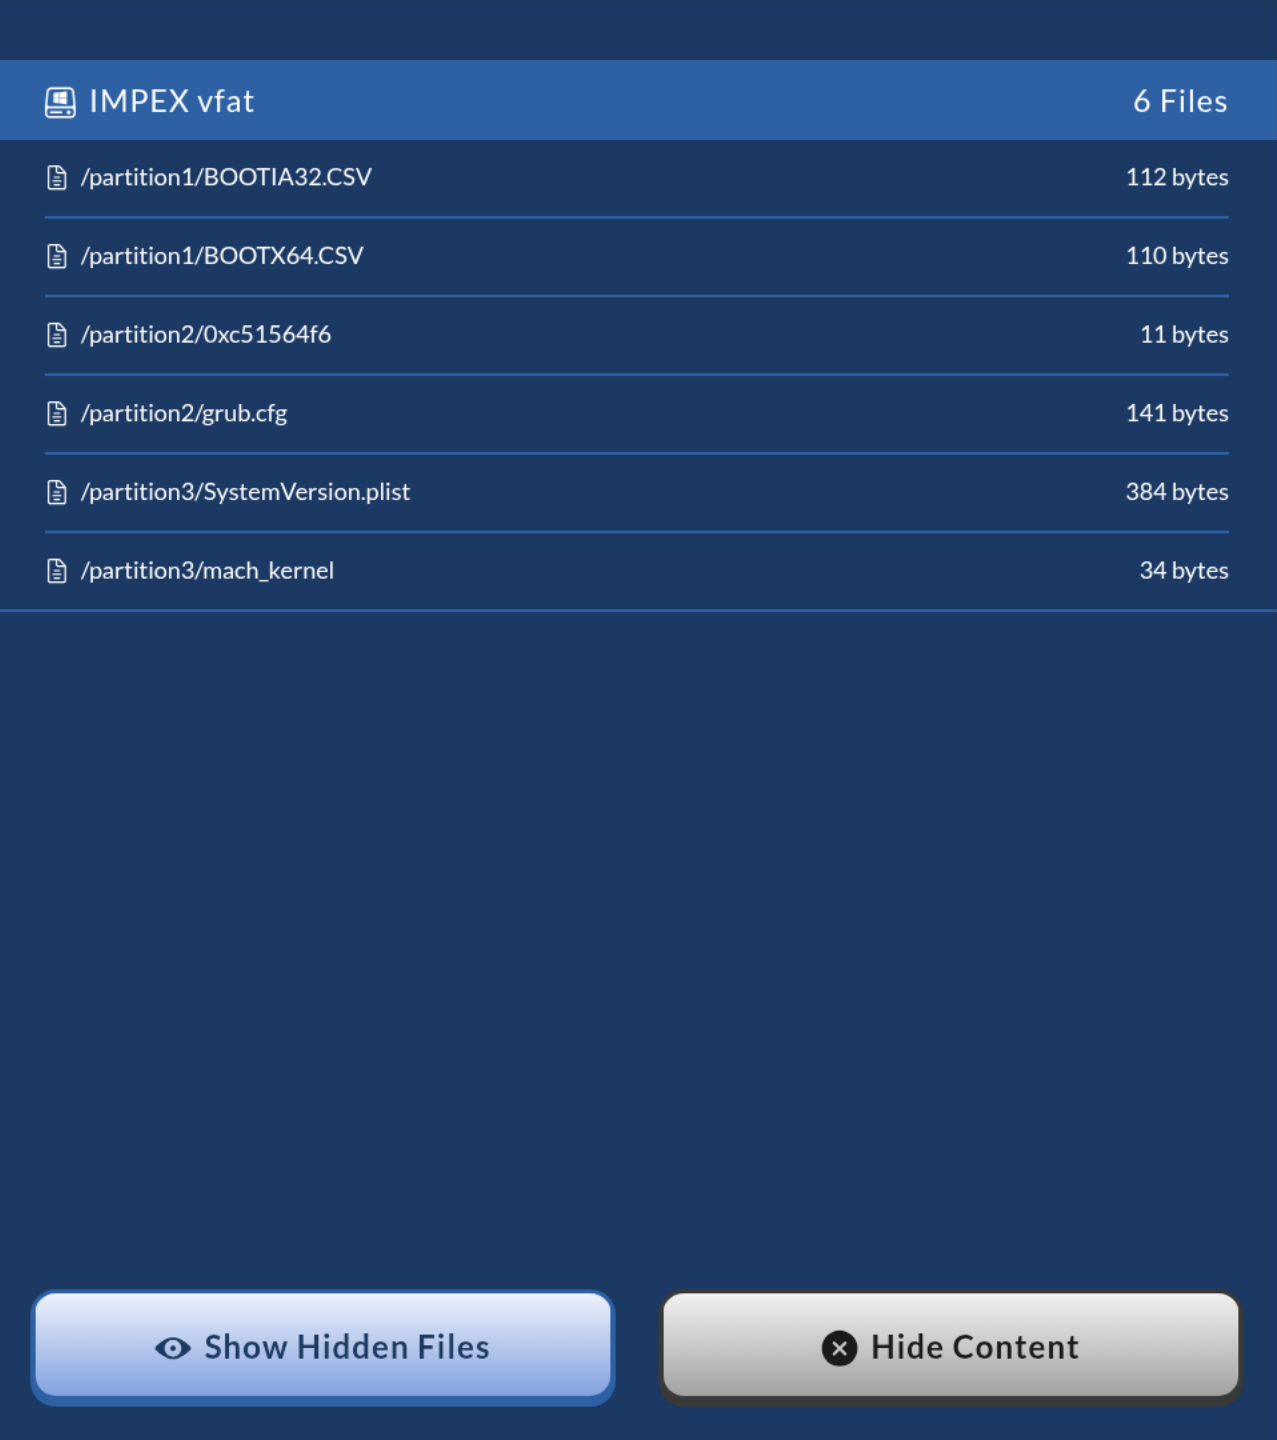
Impex supports devices with multiple partitions and will always scan all available partitions. Below shows the file view for an inserted device with 2 partitions.
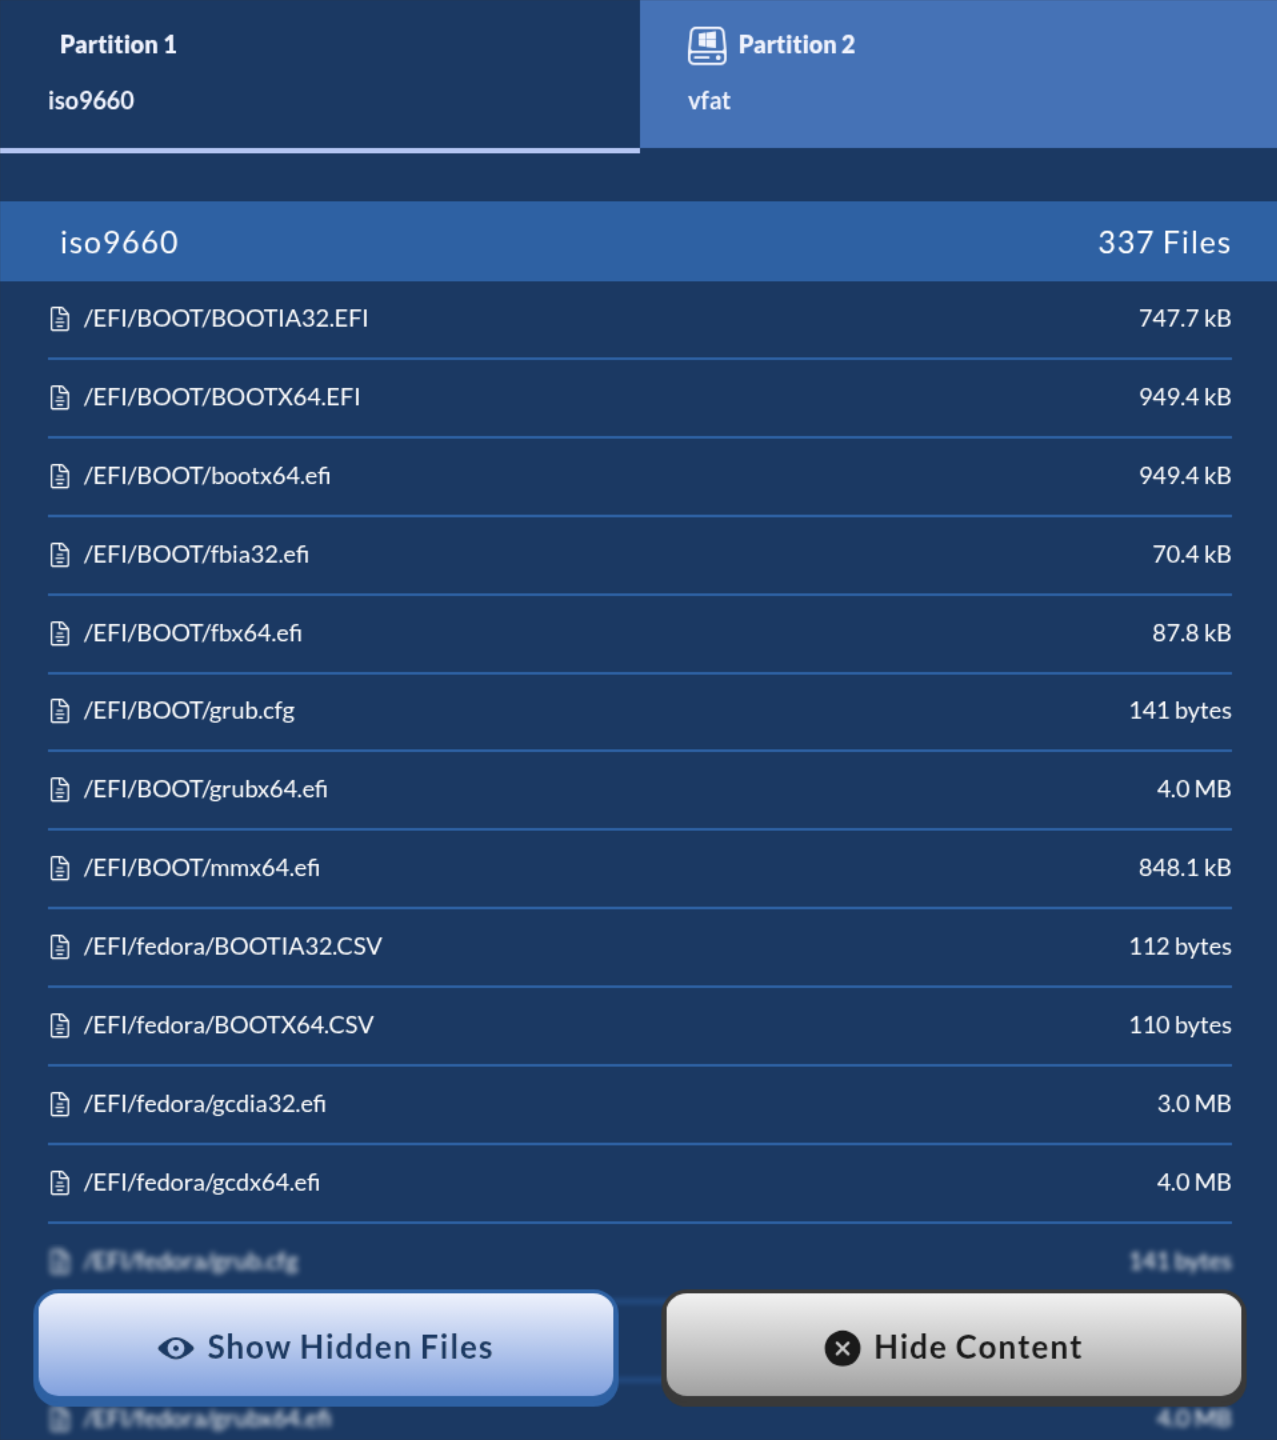
Following will explain how Impex handles devices with multiple partitions and how the behavior differs from normal operation. Note that Linux LVM (Logical Volume Manager) partitions are not supported as of this writing.
Scan and Transfer
When scanning multiple partitions, each partition will be scanned in succession. The scan summary and any reports will always show the full scan results.
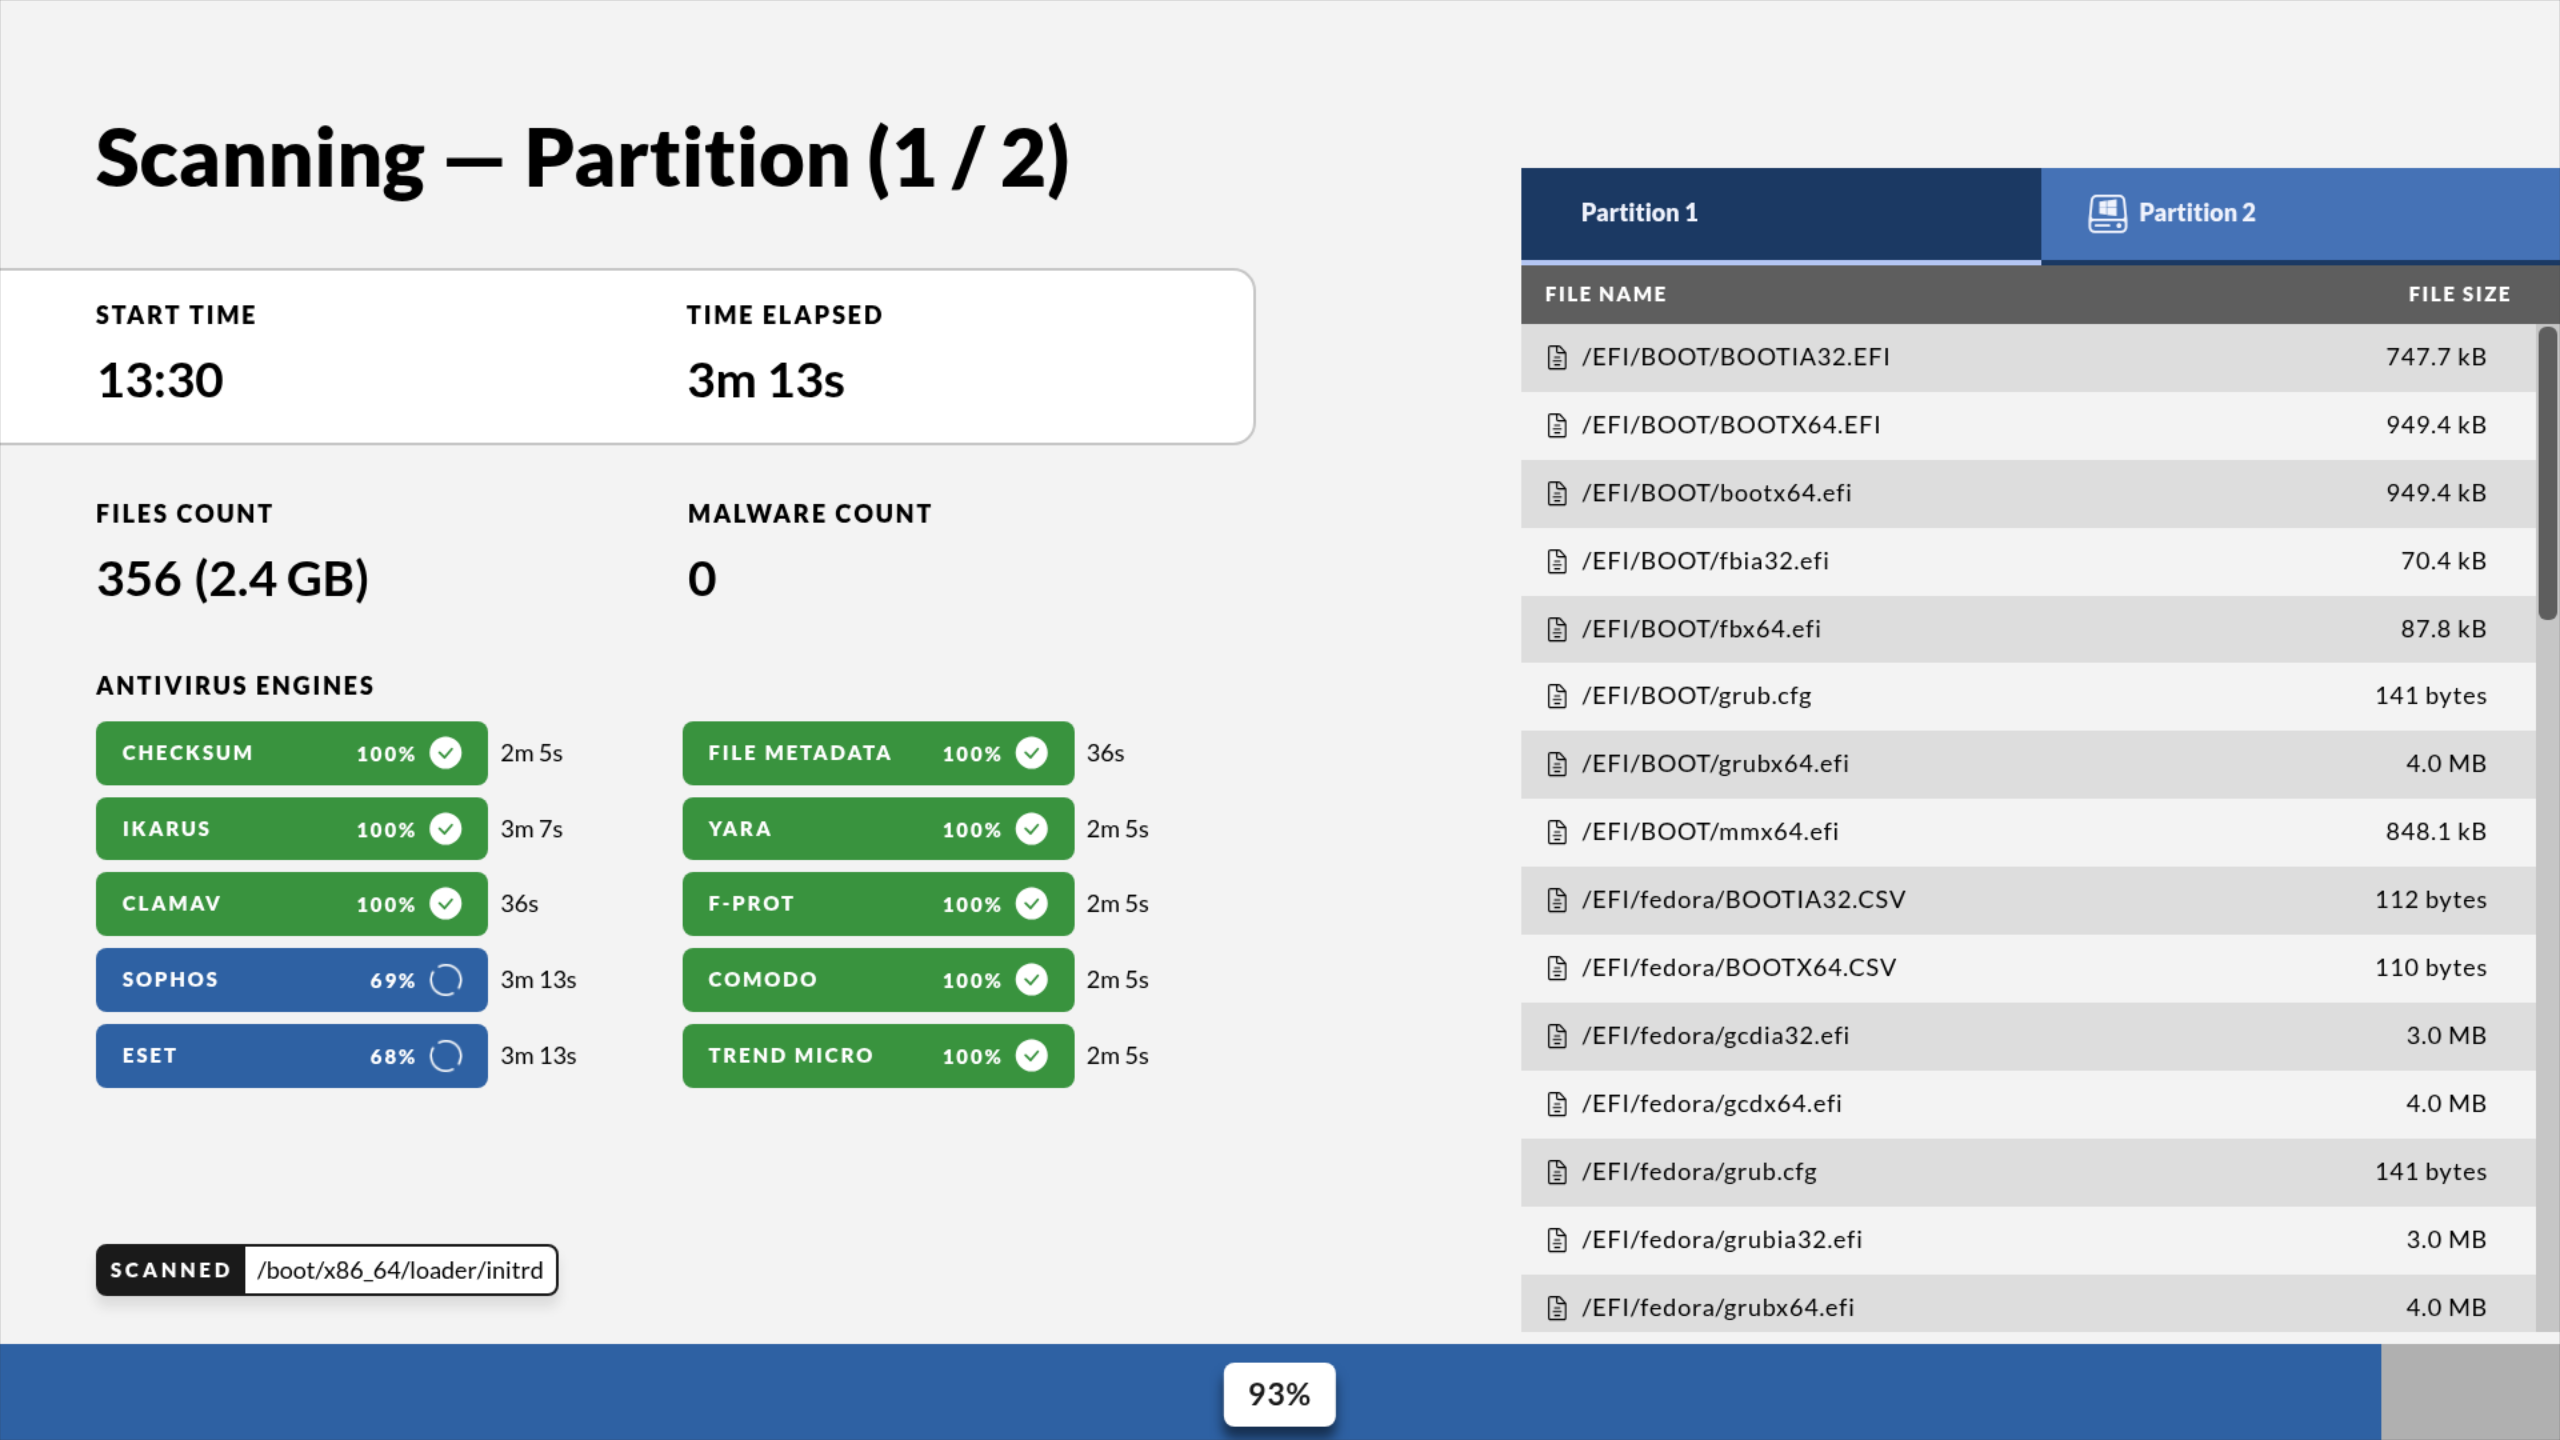
During a transfer operation, if the scan is clean without any malware, the target will be partitioned and formatted. The station will attempt to replicate the partition layout from the source device using the following steps.
- All partitions must have supported file systems
- Partition table type will be set to GPT for drives larger than 2 TiB, MBR otherwise.
- If the target device is larger than the source device, partitions will be expanded to fit all available space
- If the target device is smaller, partitions are shrunk instead
If the partitioning fails during any step, it will fall back to the regular single partition formatting. If so, files will be placed within directories named after the partition they came from, E.g. partition1.
File Selector
If the Impex station is configured to have the file selector enabled, files can be selected and deselected from multiple partitions. Deselected files will not be scanned or transferred to the target device. However, when using the file selector, the transfer target will always be formatted to a single partition. Transferred files will be placed within directories in the same way as the image above.
Note: the file selector requires temporary file storage to be enabled, since it needs a local copy of each file to let you select and deselect them before anything is transferred. If temporary file storage has been turned off on the station (see “Disable temporary file storage”), the file selector will not be available.
The file selector has a button to show or hide hidden files (“Show hidden files” / “Hide hidden files”), and a checkbox to select every file at once (“select all”, or “select partition” when multiple partitions are present). The number of currently selected files is shown as “(n/total) Files Selected”. On a device with multiple partitions, each partition has its own tab; within a partition you can browse into folders by pressing them, and press “..” to go back up a level.
Save Report on USB
When the Impex station is set to add scan reports to the USB device these will be placed in a “.impex” directory. The directory will be added to the first non-EFI partition.
Disable Format Target
When the station is configured to not format the target during transfer, files will be placed in subdirectories instead named after the partition they came from.
Device and hardware error messages
Blocked devices
If a connected device is not allowed to be used, for example due to policy configured in the ICC, it is shown as blocked. Press “Blocked device information” to see why: the reason, the device’s address, side, model, vendor and any other details are listed. Press “Confirm” to acknowledge and clear the message.
USB hardware errors
If the station detects a problem with a connected USB device at the hardware level, a “Device errors detected” button appears. Press it to open “Potential USB device errors”, which lists the device, its model and the error message for each affected device. Press “Confirm” to acknowledge and clear the errors.
Multiple CD/DVD readers
Impex only supports one CD/DVD reader connected at a time. If more than one is detected, a message is shown: “Only one CD/DVD reader is supported. Please disconnect the additional reader.”
Two read-only devices
A transfer requires a writable target. If both connected devices are read-only, a message is shown: “You have connected two read-only devices, no action can be done. Please remove one if you want to scan or toggle the read/write knob on one device if you want to do a transfer.”
Unreadable partitions
If a partition has a filesystem Impex does not recognize, it cannot be mounted, scanned or transferred. This is shown as “Partition could not be read”, together with the partition’s name, size and the error encountered. The partition may still contain a valid filesystem readable by other computers, so handle the device with caution. On a multi-partition device, an unreadable partition is shown as “Unknown” in its own tab.
The on-screen keyboard
Wherever text needs to be entered - for example identification, a Bitlocker password, an encrypted archive password, or an Xtransfer PIN - the same on-screen keyboard is used.
For password fields, press the eye icon to temporarily show the characters you have typed, and press it again to hide them.
The flag key on the keyboard switches the keyboard layout only (for example to type special characters found on a different physical layout) - it does not change the interface language. To change the interface language, use the flag symbol in the top right corner as described in “Change language” below.
If a physical keyboard is connected and enabled for the station, it can be used instead of the on-screen keyboard: typing, Enter and Backspace all work as expected.
Change language
The Impex station interface has support for several languages. To switch languages press on the Flag symbol up in the right corner and choose your desired language in the popup.
This is the screen with a language symbol in the top right corner. By clicking on the touch screen, you will be able to change language settings in the Impex station.
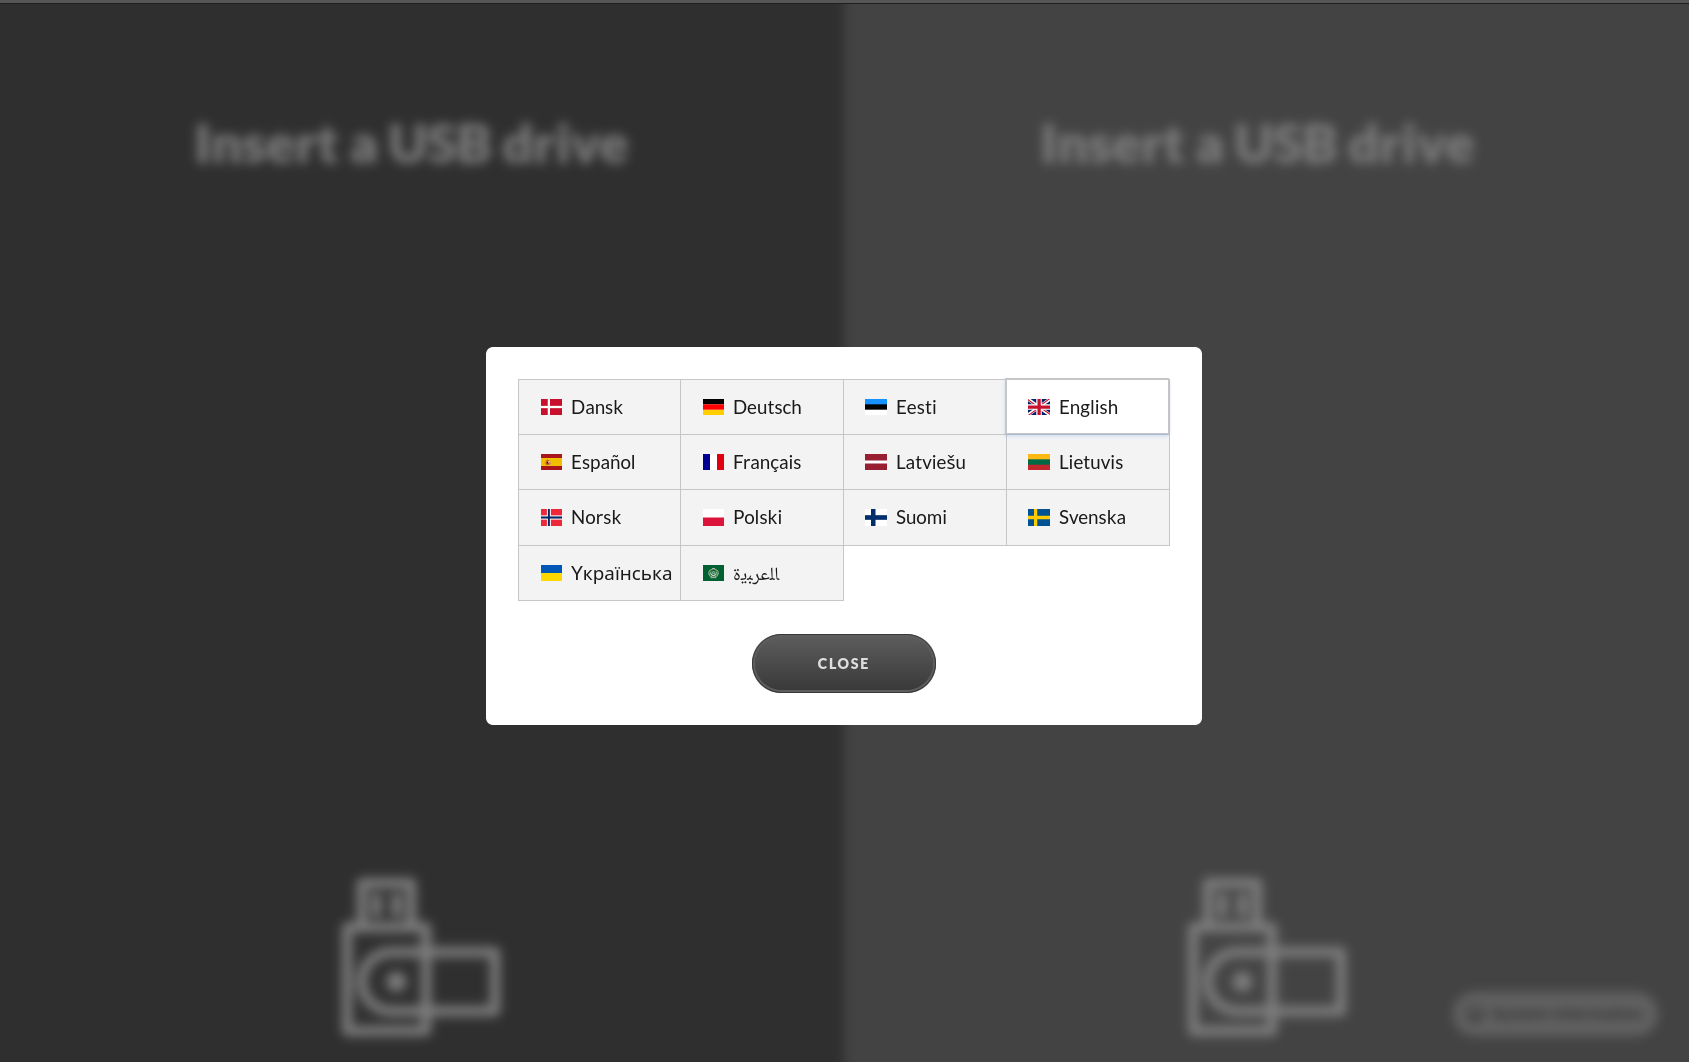
When you have clicked on the flag symbol, a menu will appear. This menu will display the different languages that you can select to set the Impex station user interface language.
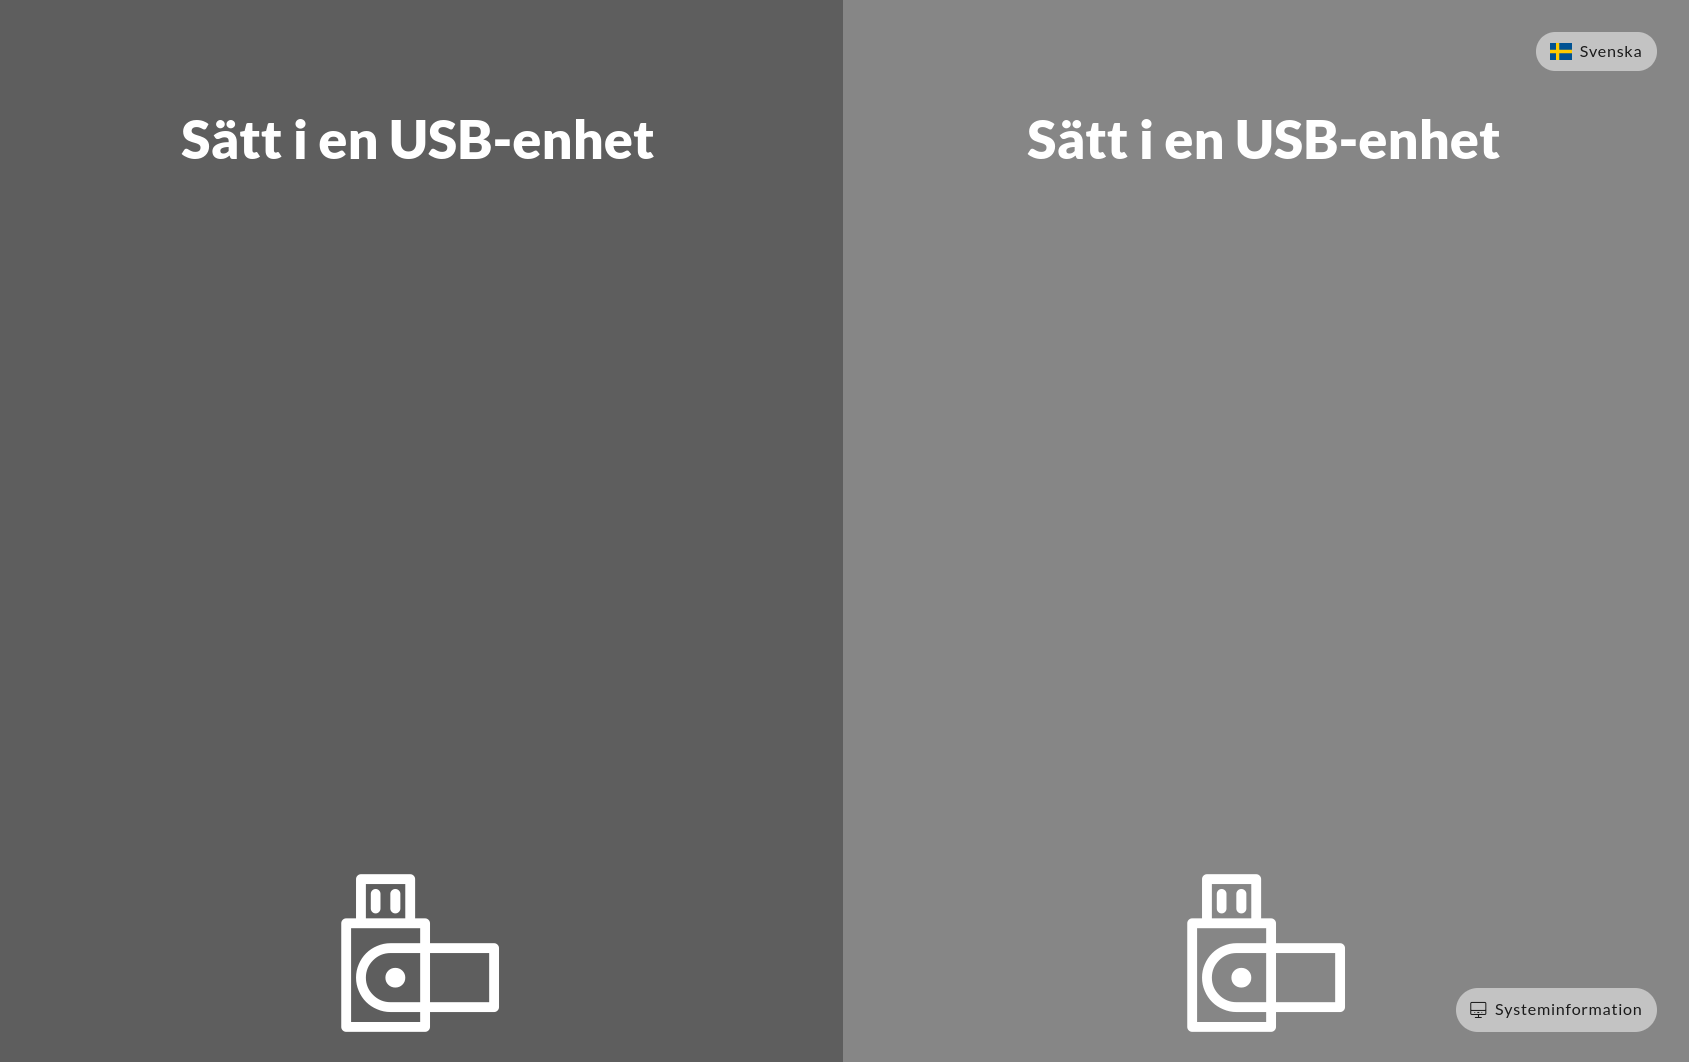
This is what the interface looks like after changing the language setting to Swedish.
Idle behavior, locking and user sessions
Screensaver
If the station has been idle for longer than the configured timeout, and no media is inserted, a screensaver is shown with the prompt “Touch to activate” (or “Click to activate” on a station without a touch screen). If you were identified when the screensaver activated, you are automatically logged out. Touch or click anywhere to dismiss the screensaver and return to the normal screen.
Locked screen
If your session is no longer authorized, for example because it has expired, the station shows a “Locked” screen. This clears automatically once the station is authorized again, for example after you identify yourself again.
Current user and logging out
Once you have identified yourself, your identification is shown at the top of the screen. Press it to log out; you will be asked to confirm before your session ends. This is not available while connected via Xtransfer - see the Xtransfer chapter for how to log out in that case.
Battery indicator
On stations equipped with a battery, a battery icon with the current charge percentage is shown, along with whether the station is currently charging.
System Information Page
The System Information page contains information about the configuration and health of the Impex station, and is opened using the button in the bottom right corner of the initial screen. This button turns red if there are connection problems to the ICC. The page has several sections:
- Station - the station’s software version, identification, hardware information and OS update status.
- Network status - the network configuration and connectivity to the Impex Control Center.
- Configuration - the settings configured for this station in the Impex Control Center.
- Antivirus engines - the antivirus engines installed on the station and their versions.
- Support - contact details for getting help with the station, if configured.
Note: This information page is primarily intended for technical staff on site, but can be useful for others as well.
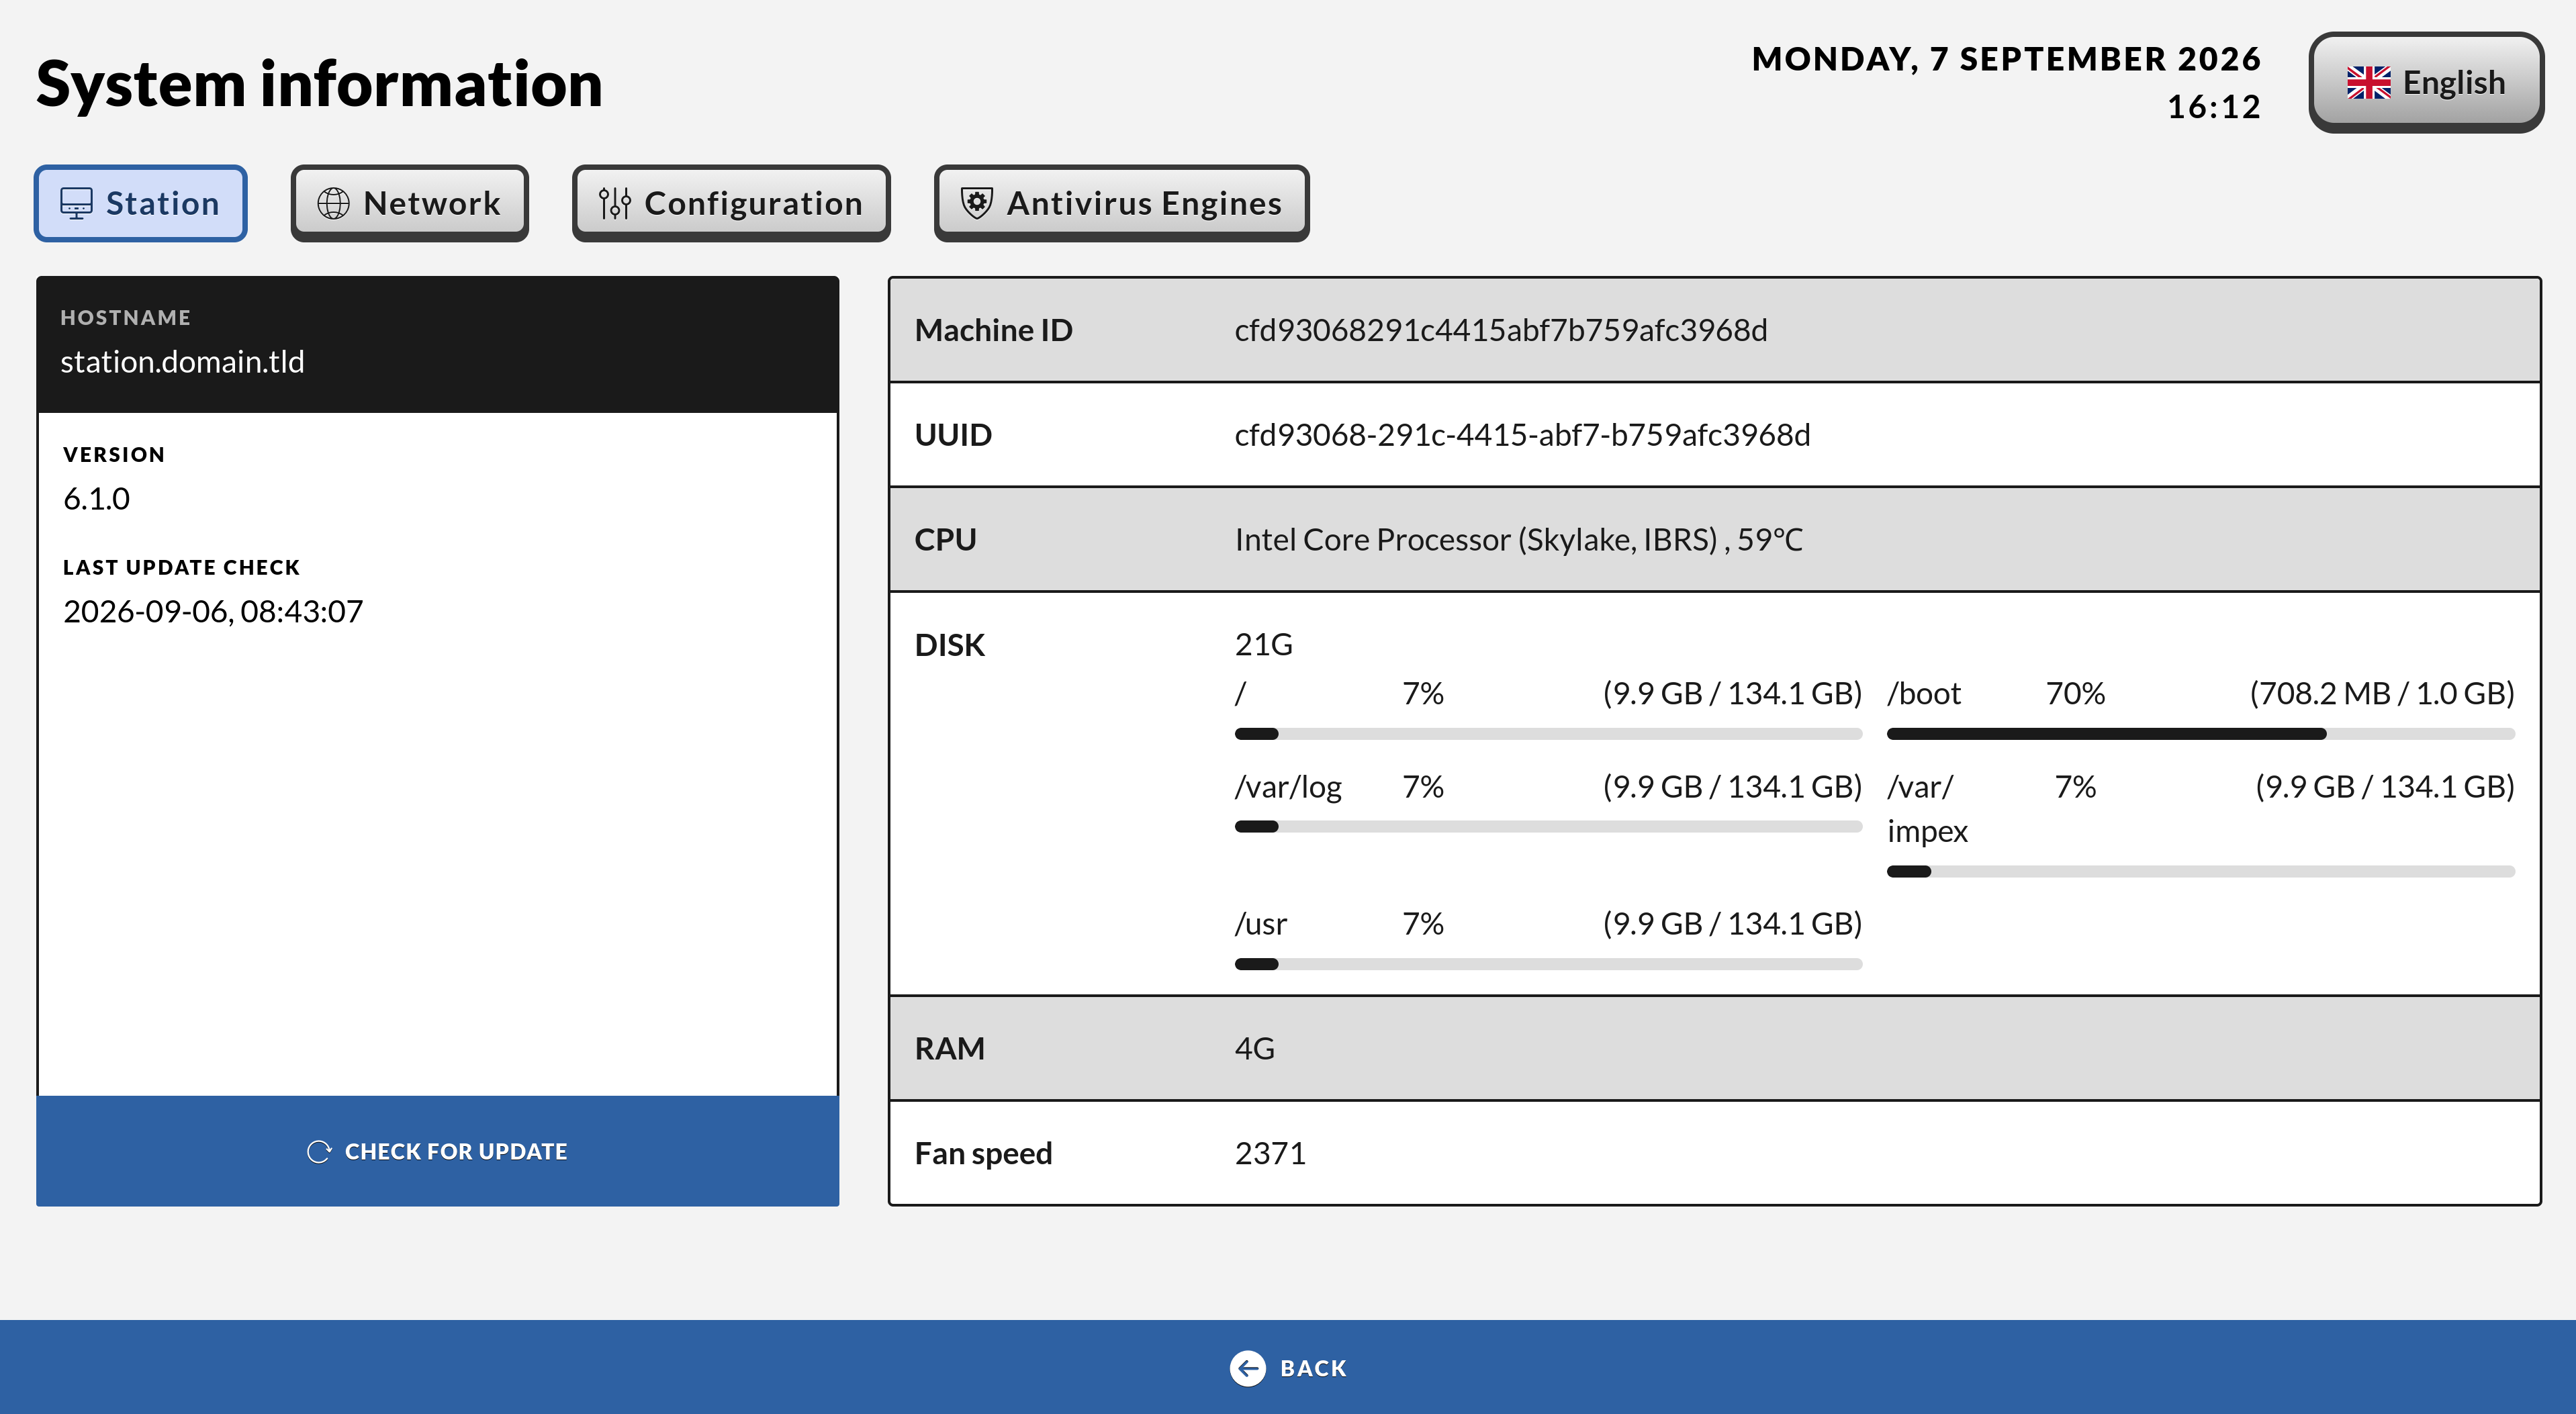
The Station section contains information about the version of the Impex software, the local station’s identification, its hostname, its machine ID and UUID, CPU and fan information, and disk usage per partition. It also contains the last time OS updates were fetched, and a Check for update button to check immediately instead of waiting for the automatic schedule.
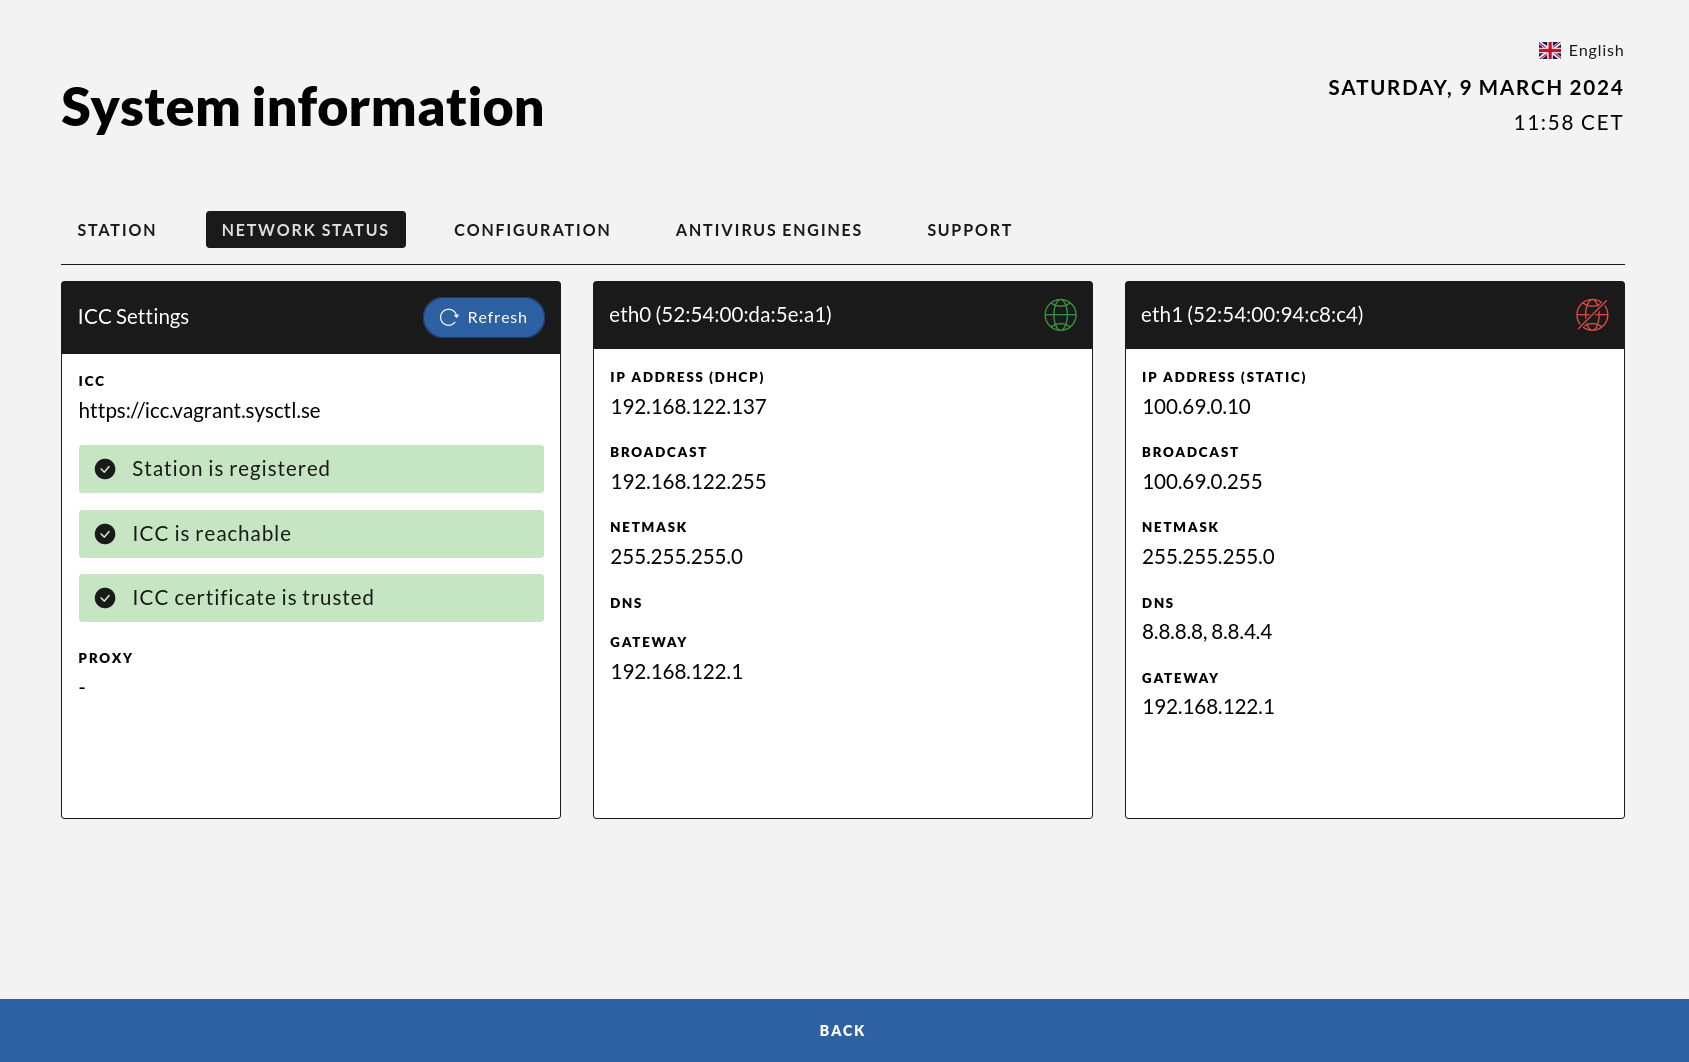
The Network status section shows the network address configuration and which Impex Control Center the station is connected to, along with a set of individual checks (registration, connectivity, gateway reachability, hosts-file resolution, certificate trust and repository reachability). Press a certificate to see its details (subject, issuer, validity and fingerprints). The ICC settings also offer Refresh to check status immediately and, once registered, a Re-register to ICC Server option.
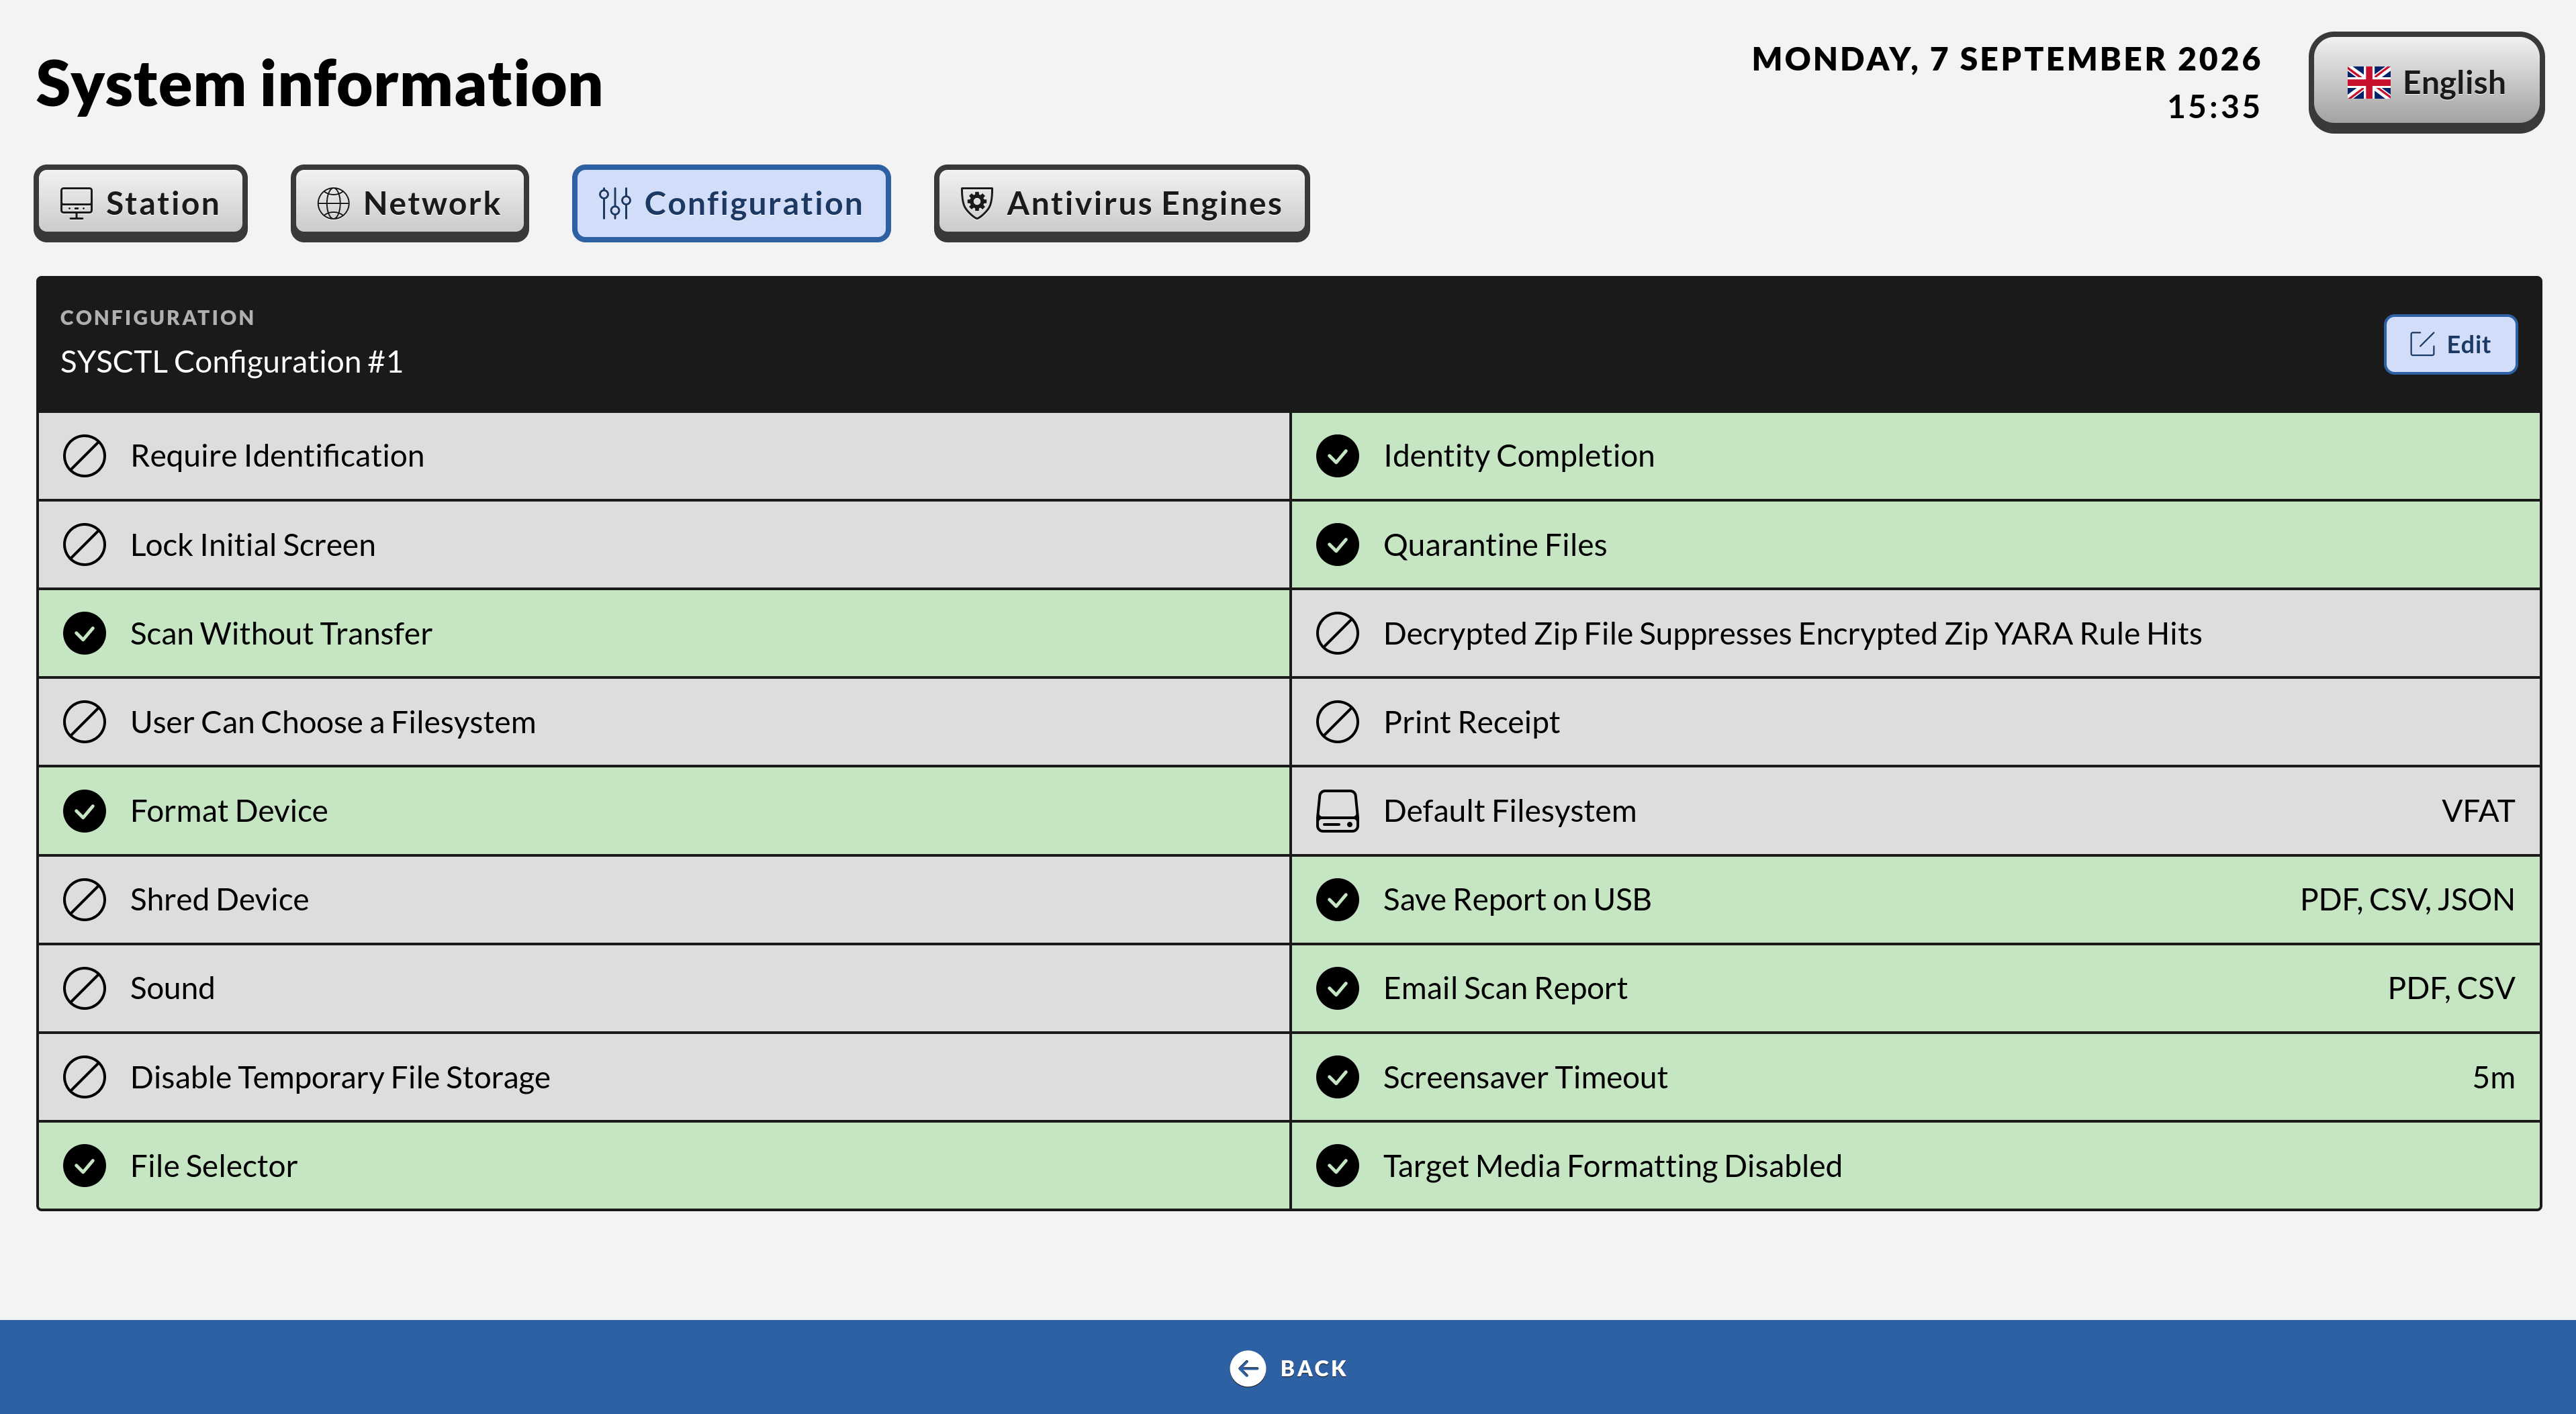
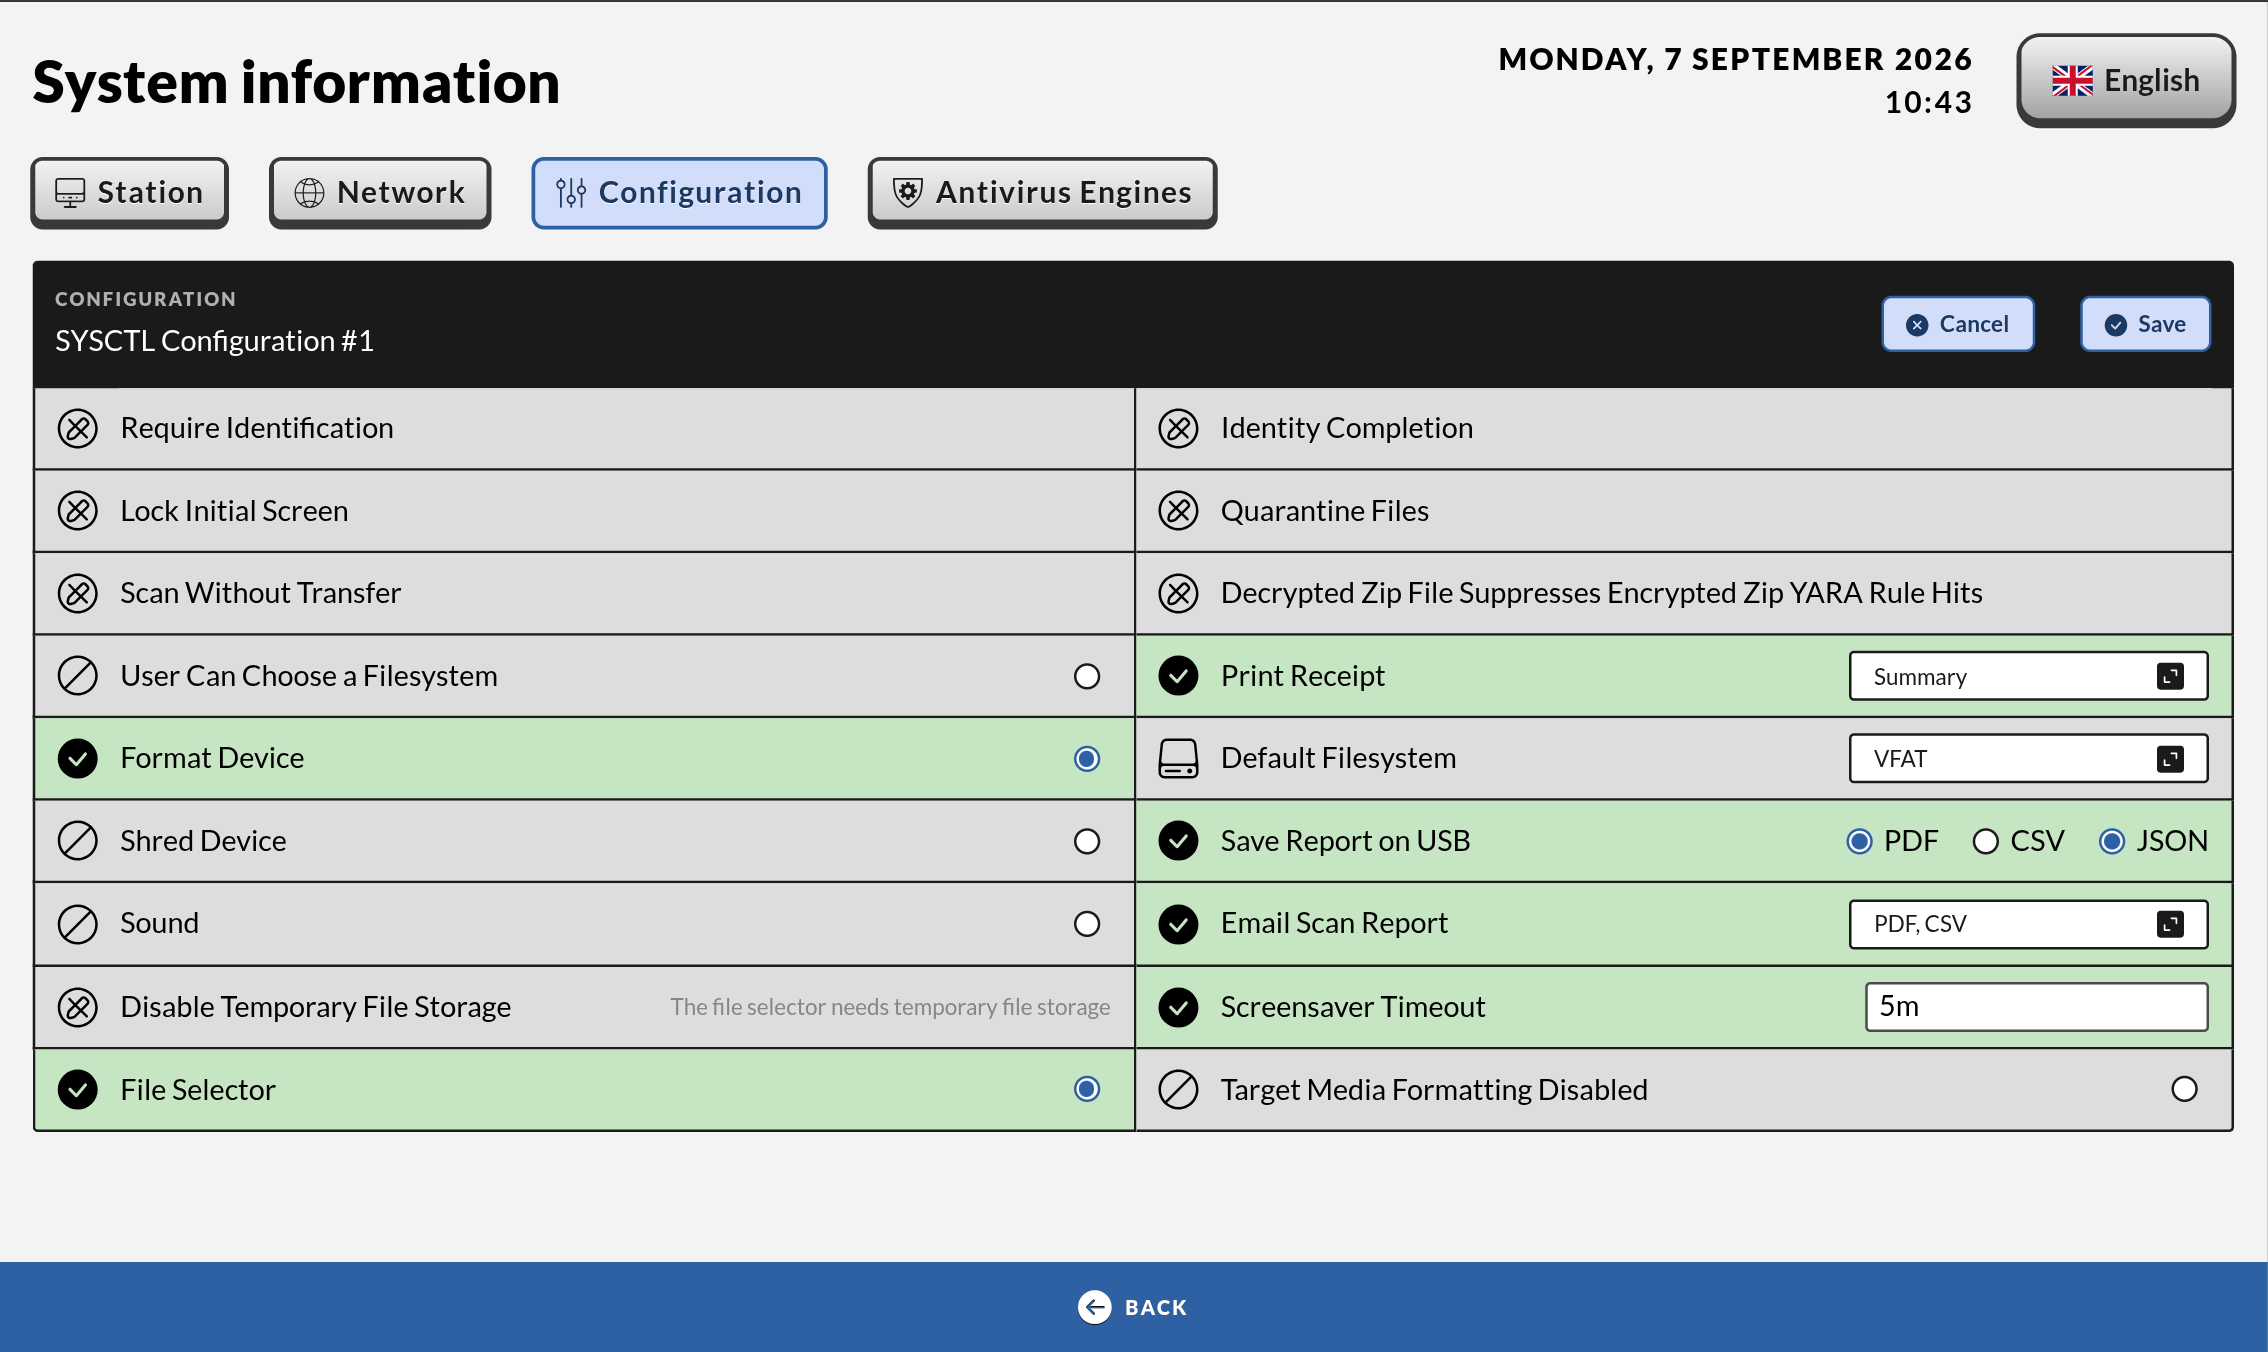
The Configuration section shows settings set in the Impex Control Center for this station. Normally, these settings can only be changed on the server side. However, if the station has been configured to allow local overrides, or while the station is offline, an “Edit” button appears that lets you change most of these settings directly on the station - for example the scan/format/shred modes, sound, the file selector, printing and report options, and the screensaver timeout. A small number of settings - requiring identification, locking the initial screen, scan-without-transfer, identity-list completion, file quarantine, and suppressing YARA on decrypted files - always remain server-only.
The Antivirus engines section lists the antivirus engines configured for this station, along with their software and definition versions and when they were last updated, and has its own Check for update button to check immediately instead of waiting for the automatic schedule.
The Support section is only shown if it has been activated from the ICC, and lists a name, phone number and email address to contact for help with the station.
Examples of printed receipt
Pictures of the physical receipt to demonstrate the content of receipts when malware is found or when a normal run, without any malware is reported.
Receipt without any found malware
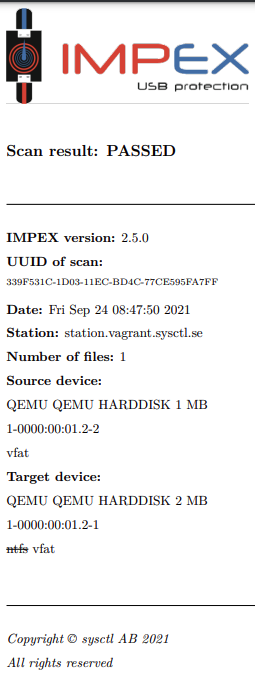
This example is of a receipt that is printed when Impex did not find any malware.
Receipt from when Impex have found malware
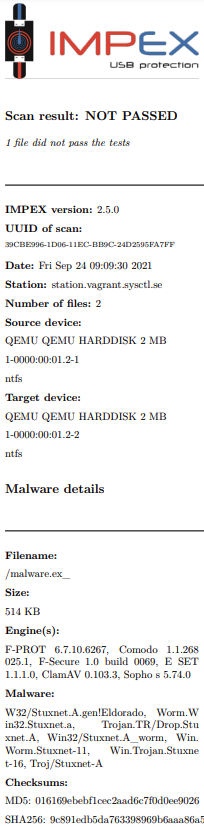
This example is of a receipt that is printed when Impex has found malware. Note that the various names given to the malware are written as well as which AV engines were active on the station when the scan was performed.
The scan summary screen
After a scan or transfer completes, the scan summary screen shows the results in more detail. The following controls are available in addition to what is described in the step-by-step chapters above.
Filtering the file list
Press “malwares” to show only the files that were flagged as malware. Press “exceptions” to show only files that matched an allowlist rule configured in the ICC (see “File exceptions” below). Only one filter can be active at a time.
File exceptions
If the ICC has been configured with rules that allow specific, known files or patterns even if they would otherwise be flagged, a matching file is marked with a yellow caution icon and, when expanded, shows “File exception” together with the matching “Rule ID”. Files that match an exception rule are not shown as malware, even if an AV engine flagged them.
Expand all / Collapse all
Press “Expand all” to open the detail row for every file in the list at once, or “Collapse all” to close them again.
Printing a receipt on demand
If a receipt printer is attached and enabled, press “print receipt” to print the summary again. The button is temporarily disabled for a few seconds after each press to prevent accidental double printing.
Closing the summary automatically
If the USB device is removed while the summary is shown, the “Done” button is replaced by a ten-second countdown, after which the view closes automatically. Press the countdown to cancel it; the button shows “Done” again and the view stays open until you press it.
Scan and transfer files from one USB drive to another (only text instruction)
This step-by-step guide is for scanning a USB drive for virus and malware and if none are found, transfer them to a second USB drive.
1. Insert the source drive into the left port
2. Insert the destination or target drive in the right port
The screen should now display both of the drives, their brand and model name. Press the “View Content” button to look at the actual files on the drive.
3. Press on the left arrow to transfer the files to the right side drive
Please note that the right side drive will be erased and cleaned (formatted) to make sure it is empty. If the source drive is a CD or DVD the target drive file system will be exfat.
4. Depending on your local security policy you might have to enter your identification using the on-screen keyboard and press a confirm button to continue
The files on your source USB drive will now be analysed for virus, malware and other unwanted software. During this process a progress bar will be shown depicting a rough estimate on how much time is left.
If nothing malicious was detected you will see a green screen together with a receipt which gives an overview of which files were scanned and their unique checksums. If a printer is attached and enabled you will also get a printout of this summary.
In the case that unwanted files were detected the screen will go red and a listing will show which file or files contained malware. Note that in this case no files will be transferred so the target USB drive will still be clean. If a printer is attached and enabled you will also get a printout. To view only the malicious files, press “Filter”. The source drive containing the malicious files will not be modified or cleaned by the system.
Your local security policy should dictate what to do with the source USB drive in case malware is found.
5. To complete the scanning press “Done” and pull out the USB drives
If at any point you want to abort the procedure, pull the USB drives. It is also worth mentioning that the station does not require you to copy from left to right. The process can also be done in the other direction. That means you can also transfer files from right to left. The files will be analysed and scanned before being copied, no matter in what direction they are copied to. This can in certain situations be more intuitive depending on the physical placement of the Impex station.
CD and DVD drives
Impex also supports optical media such as CD and DVD discs, in addition to USB drives, SD cards and external hard drives. This chapter describes behavior specific to optical drives.
Audio CDs
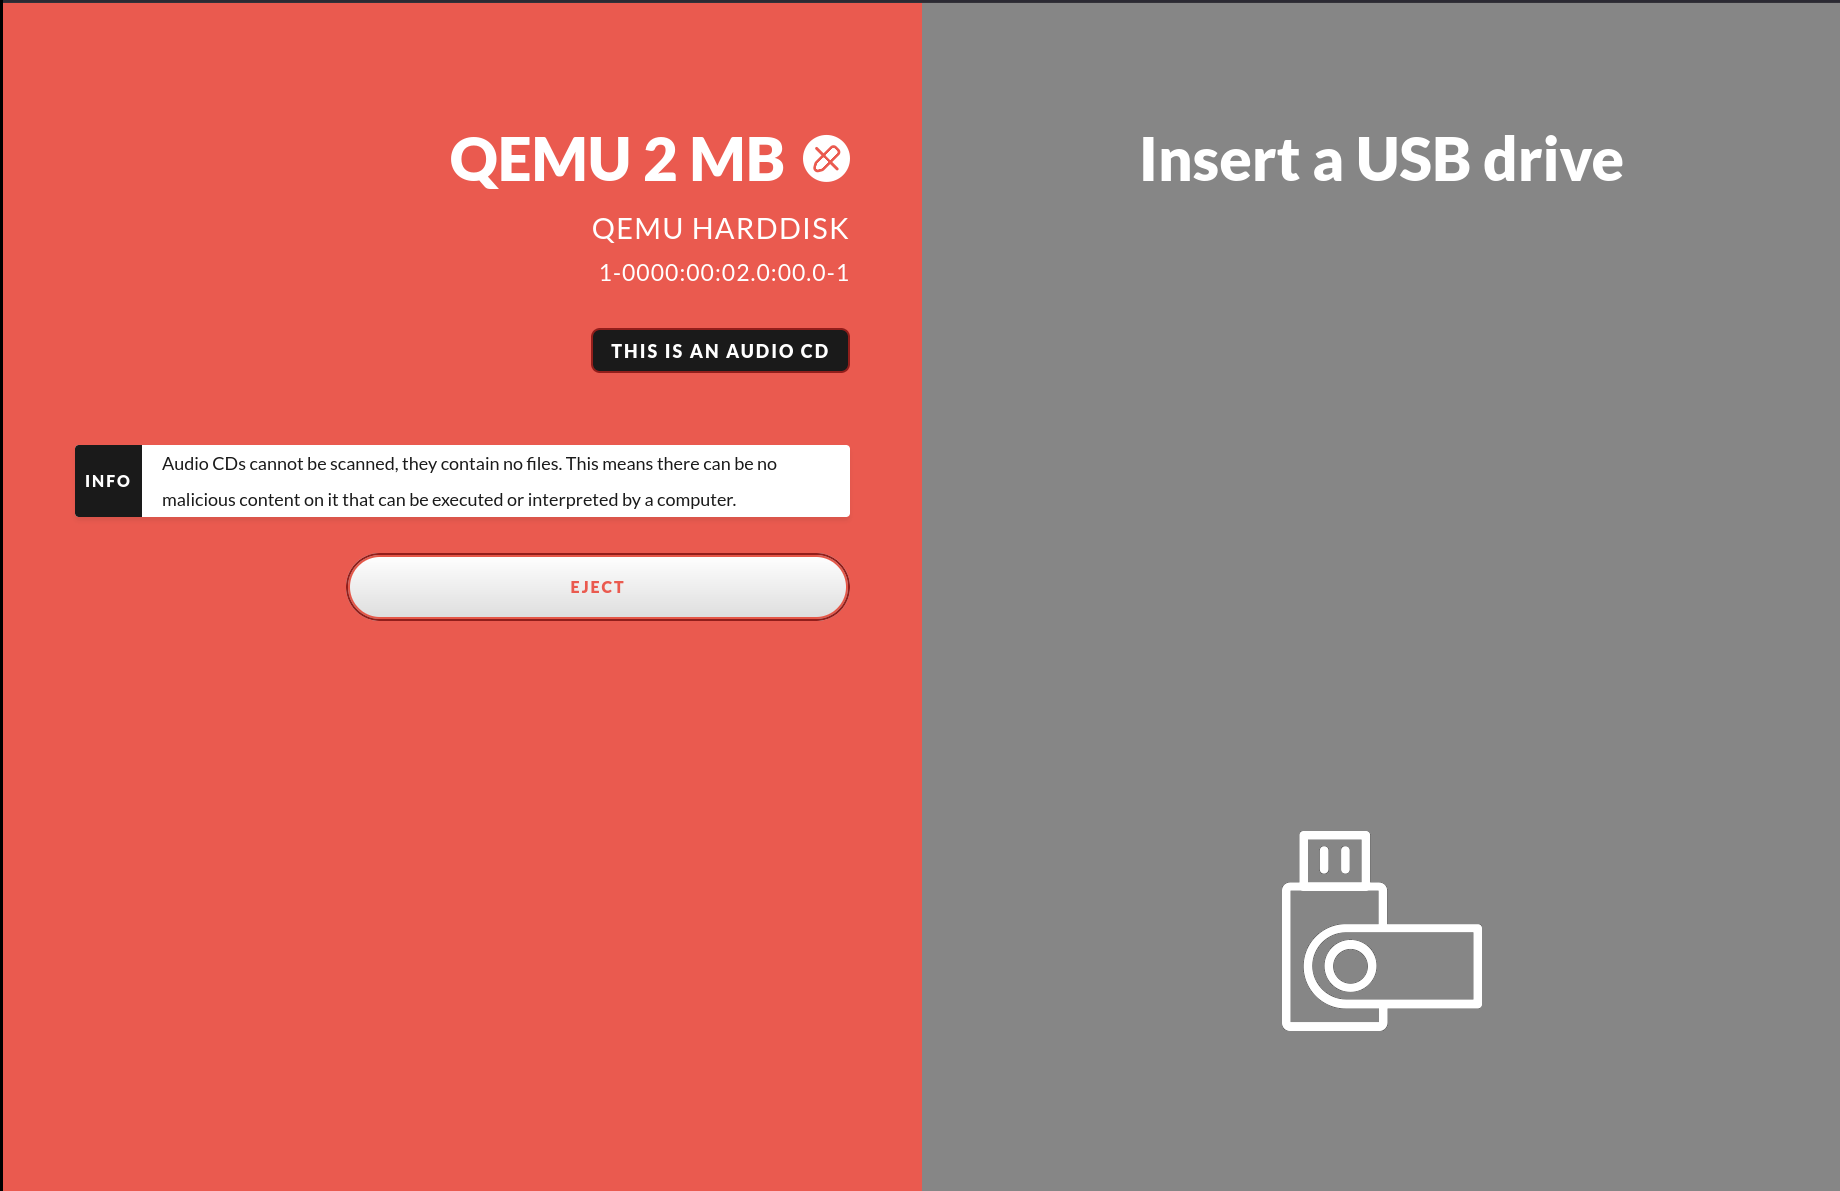
Optical Compact Discs with only audio tracks on them cannot be scanned since there are no actual files on them. When an Audio CD is inserted the following view is presented to the user.
Eject button
If the inserted media supports it, an “Eject” button is shown next to the device. Press it to safely eject the media before removing it - for example to open the tray of a CD/DVD drive.
Operating modes
This chapter covers setting up a USB Protect station once it has already been installed and started for the first time, as described in the installation manual. It is split into two parts depending on how the station is run: USB Protect in online mode describes setting up a station connected to an ICC, while USB Protect in offline mode describes configuring, and keeping up to date, a station that is run standalone, disconnected from any network.
USB Protect in online mode
This section describes how to administer a USB Protect station that is connected to an ICC: network and ICC configuration, USB side mapping, software and definition updates, and scheduled maintenance.
Configure network settings
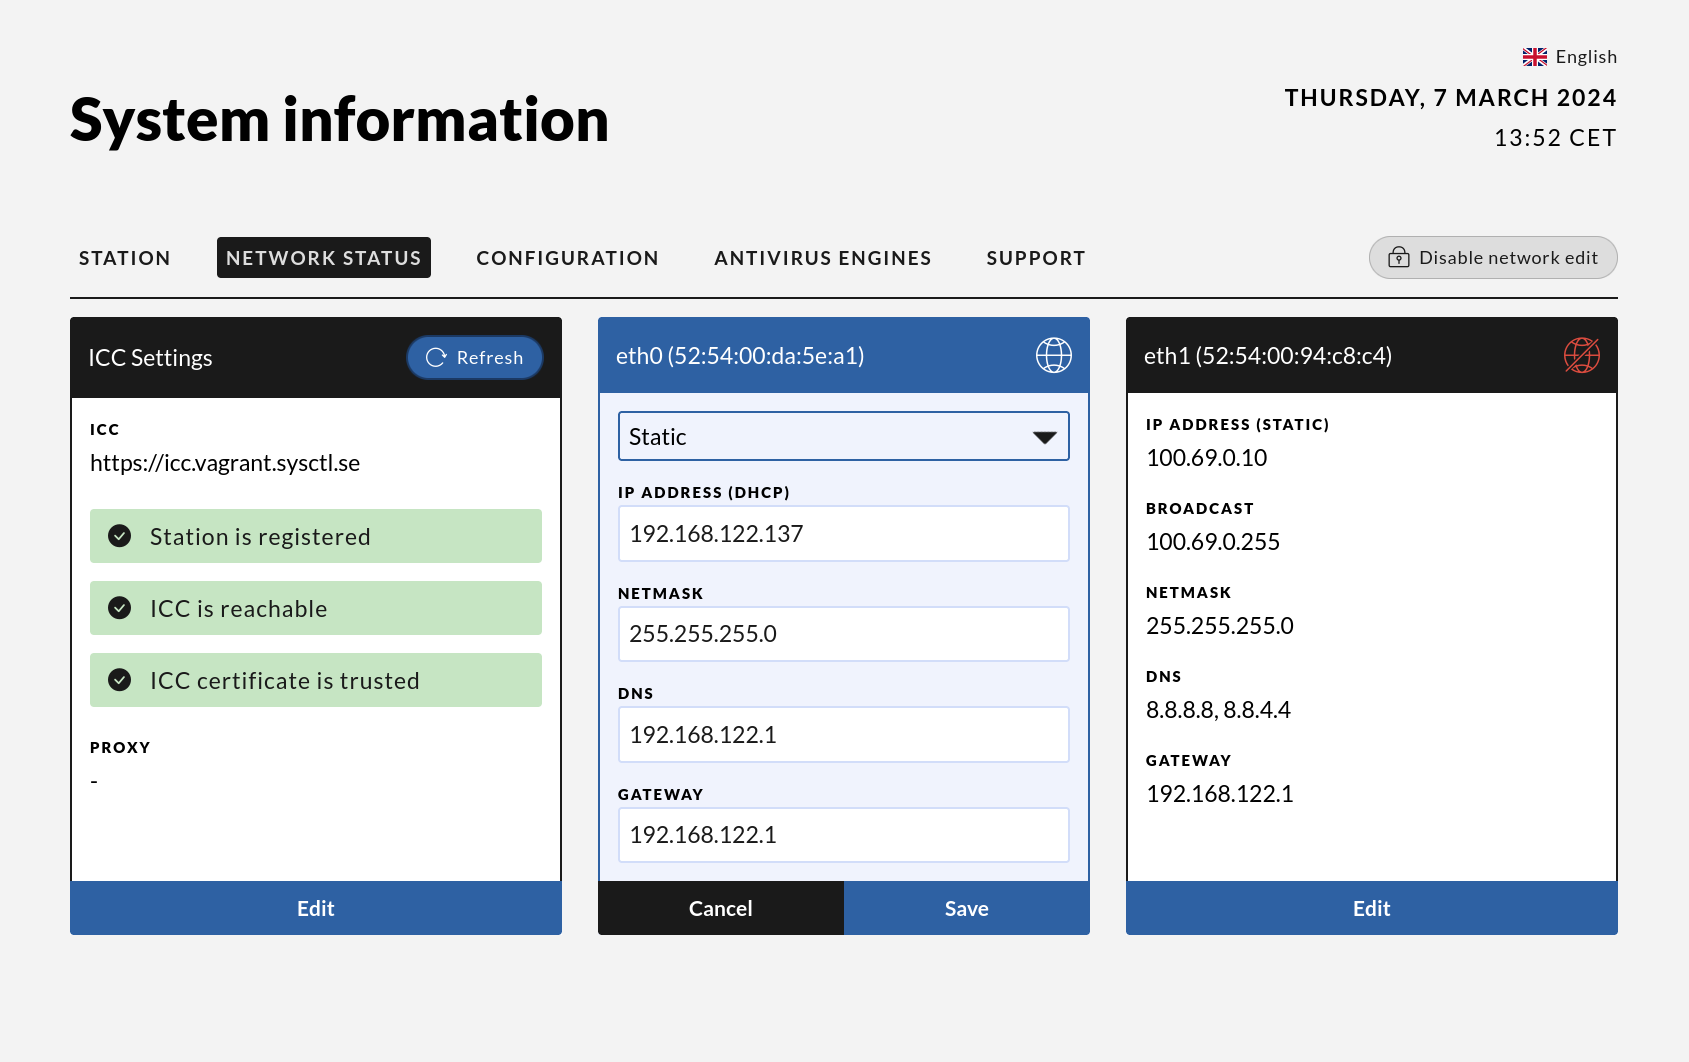
A functional network connection is required for the station to receive updates, configurations, and send scan/transfer reports to the ICC. To configure network settings on a station that has never been connected to an ICC, press “System Information” on the screen, then select “Network Status.” Click “Edit” on the device to configure it. You can choose between Auto or Manual settings. Selecting Auto requires no further configuration, while Manual requires entering the IP address, netmask, optional DNS, and gateway.
Connect to ICC
To connect a USB Protect station to ICC, one must first configure the network interface.
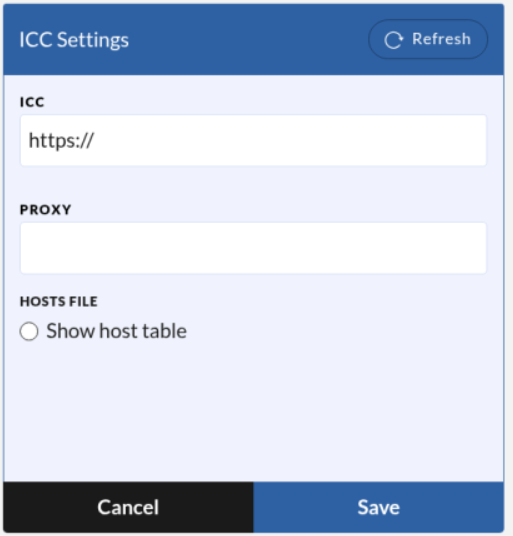
Select Edit in the ICC settings. The only required field is the ICC URL; enter the correct DNS name for the ICC instance you want to use. If a proxy is required, add the proxy configuration as well.
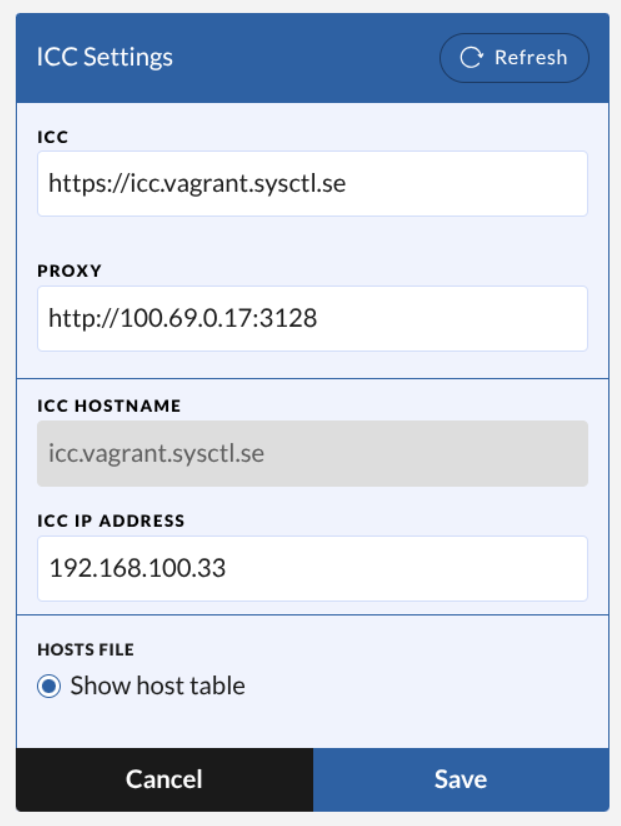
If DNS is not available for the station, you can instead specify an IP address and hostname. To do this, click Show host table and enter the correct IP address for the ICC. A field for proxy server configuration is also available if needed.
Note: The hostname is automatically parsed from the ICC URL provided in the ICC field.
Configure USB Sides
Impex stations use two sides that are visualized on screen. These sides are then mapped to a USB port and named left and right, there can be multiple USB ports mapped to the same side but only one of those ports mapped to a side can be used at the same time.
In a situation where the USB port is not mapped, usually when the station is new or the sides mapping has been reset from the ICC, a dialog will show on the screen asking for what side the attached device should be mapped to. It is not the actual device that gets mapped to a side, it is the USB port the device is attached to that gets mapped to the selected side.
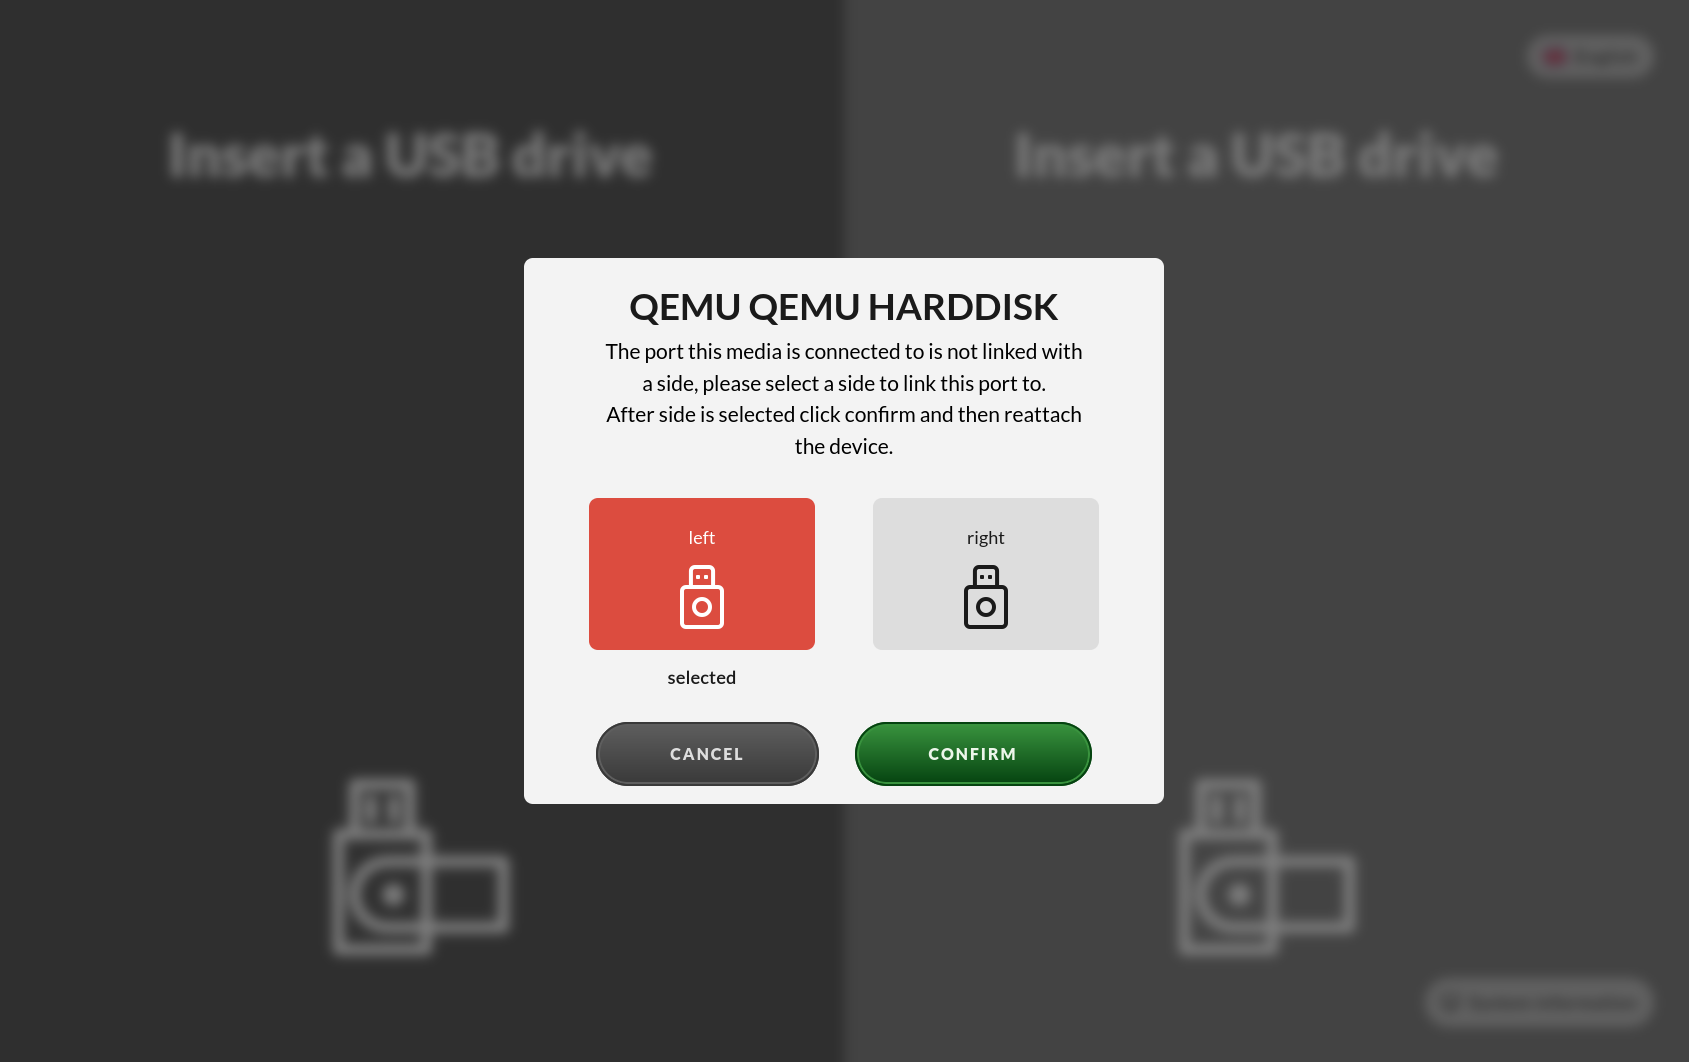
USB Port Mapping Behavior
Even after a physical USB port has been mapped to a side during the initial connection of a device, the same physical port may trigger the port-mapping function repeatedly. This can occur each time the system enumerates and identifies a new device type, even if the physical connection remains unchanged.
This behavior is intentional and results from differences in the internal device path used by the system. For example, USB 2.0 and USB 3.0 devices are enumerated using different internal paths, even when connected to the same physical port. Each such enumeration may result in a new port-mapping event.
As a consequence of this design, a single physical USB port can be associated with multiple logical mappings over time, depending on how the connected device is identified and which USB standard is used.
Due to this design approach, it is possible to permanently connect a device, such as a CD-ROM drive, to a specific side while using a dedicated internal USB port. This dedicated port is accessible via the service hatch and can subsequently be mapped to the desired side in the user interface.
Change a station’s network settings
Due to changes in network, location, or policy, it may become necessary to modify a station’s network settings, such as adding a proxy or changing the station’s IP address.
To change the network settings, you first need to download the Station Network Edit Signify bundle from the ICC. Unzip the bundle and copy the two files (run.sh and SHA256.sig) to a USB device, then insert the USB into the station.
Once the USB is inserted, press Install signed bundle from inserted device. While the bundle runs, a progress screen shows a log of status messages and a progress indicator. When it finishes, press Edit network settings to go directly to the network status view - shown only once this type of bundle has completed successfully - or Close to dismiss the screen. This will add the Edit option to the ICC settings and interfaces.
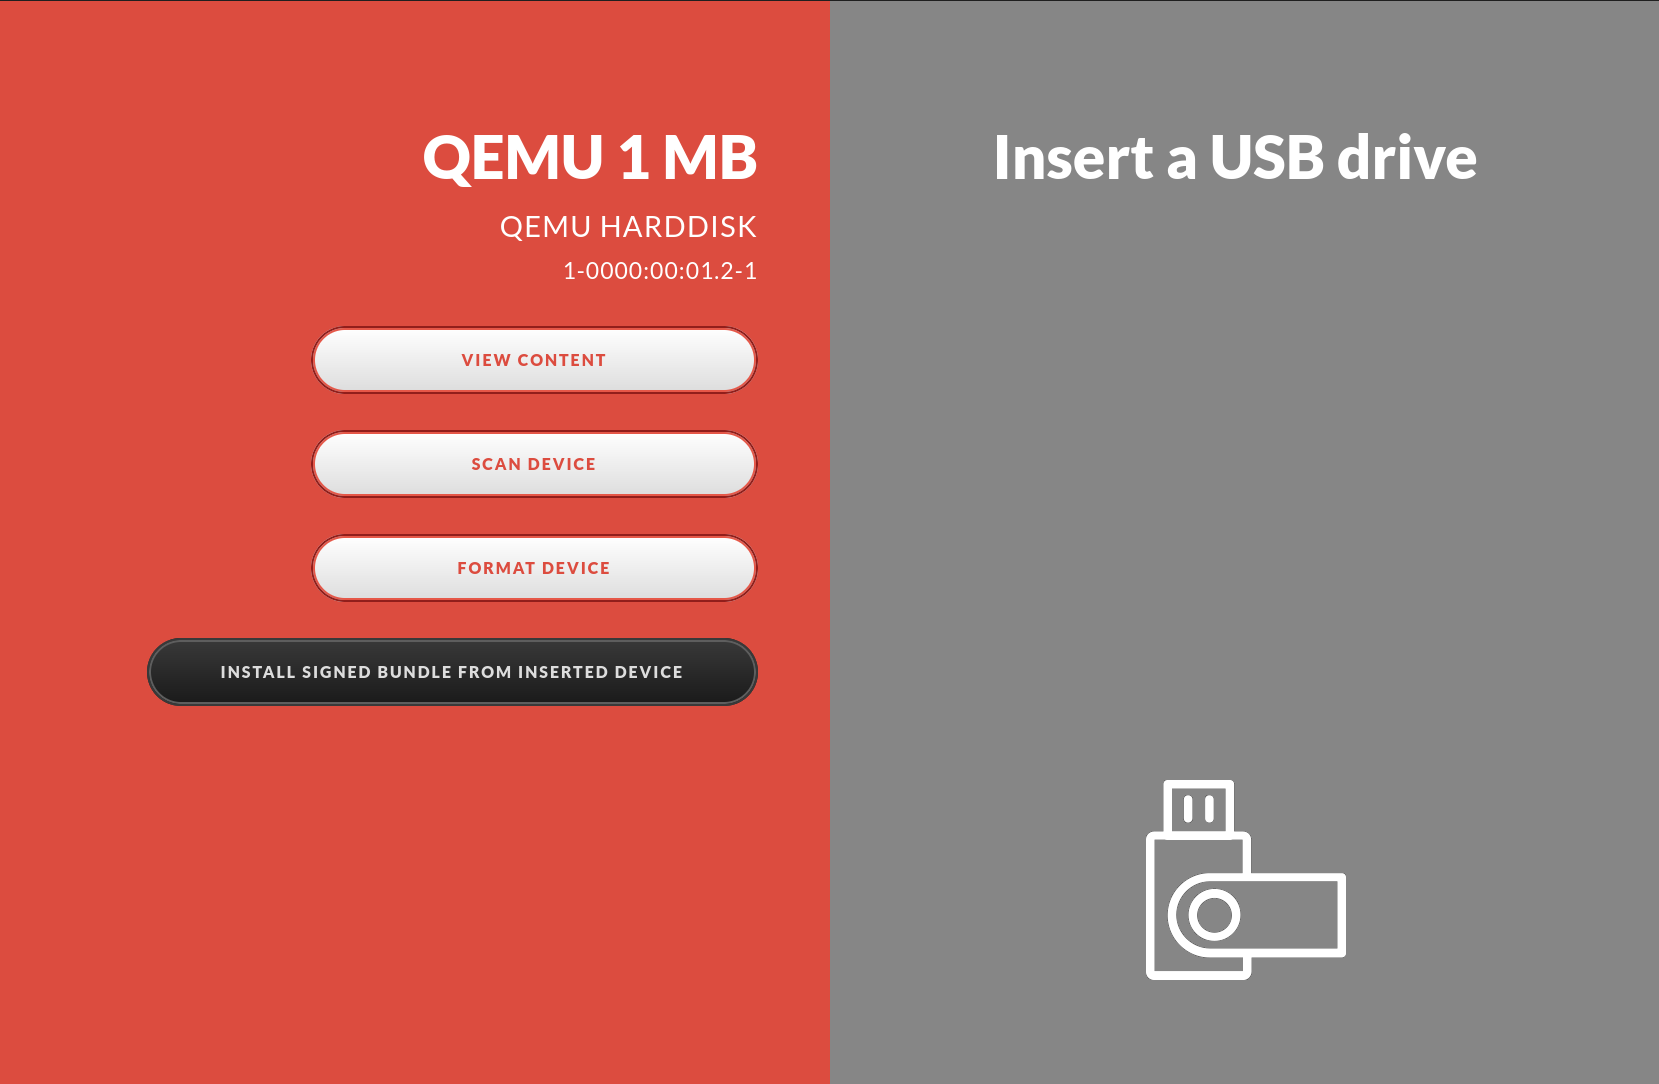
Please note that the Signify bundle only works on stations connected to the ICC from which the bundle was downloaded.
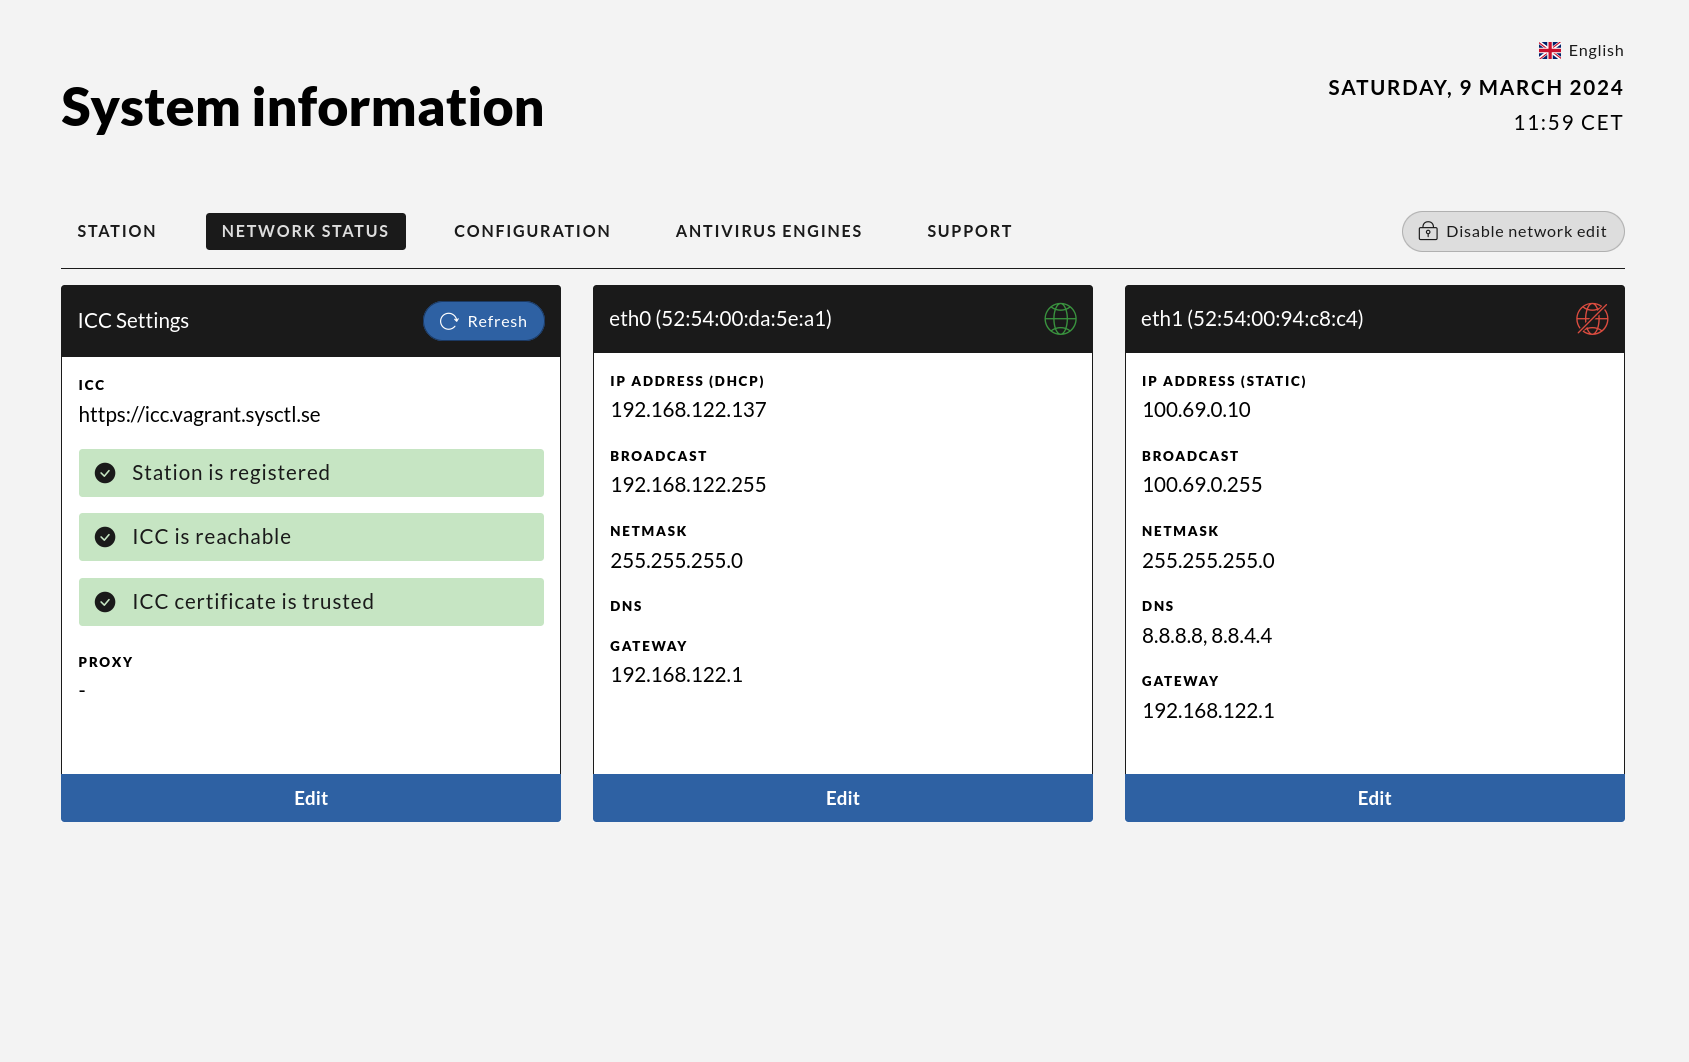
Press “Edit” on the correct network device to modify its settings, then save to apply the changes.
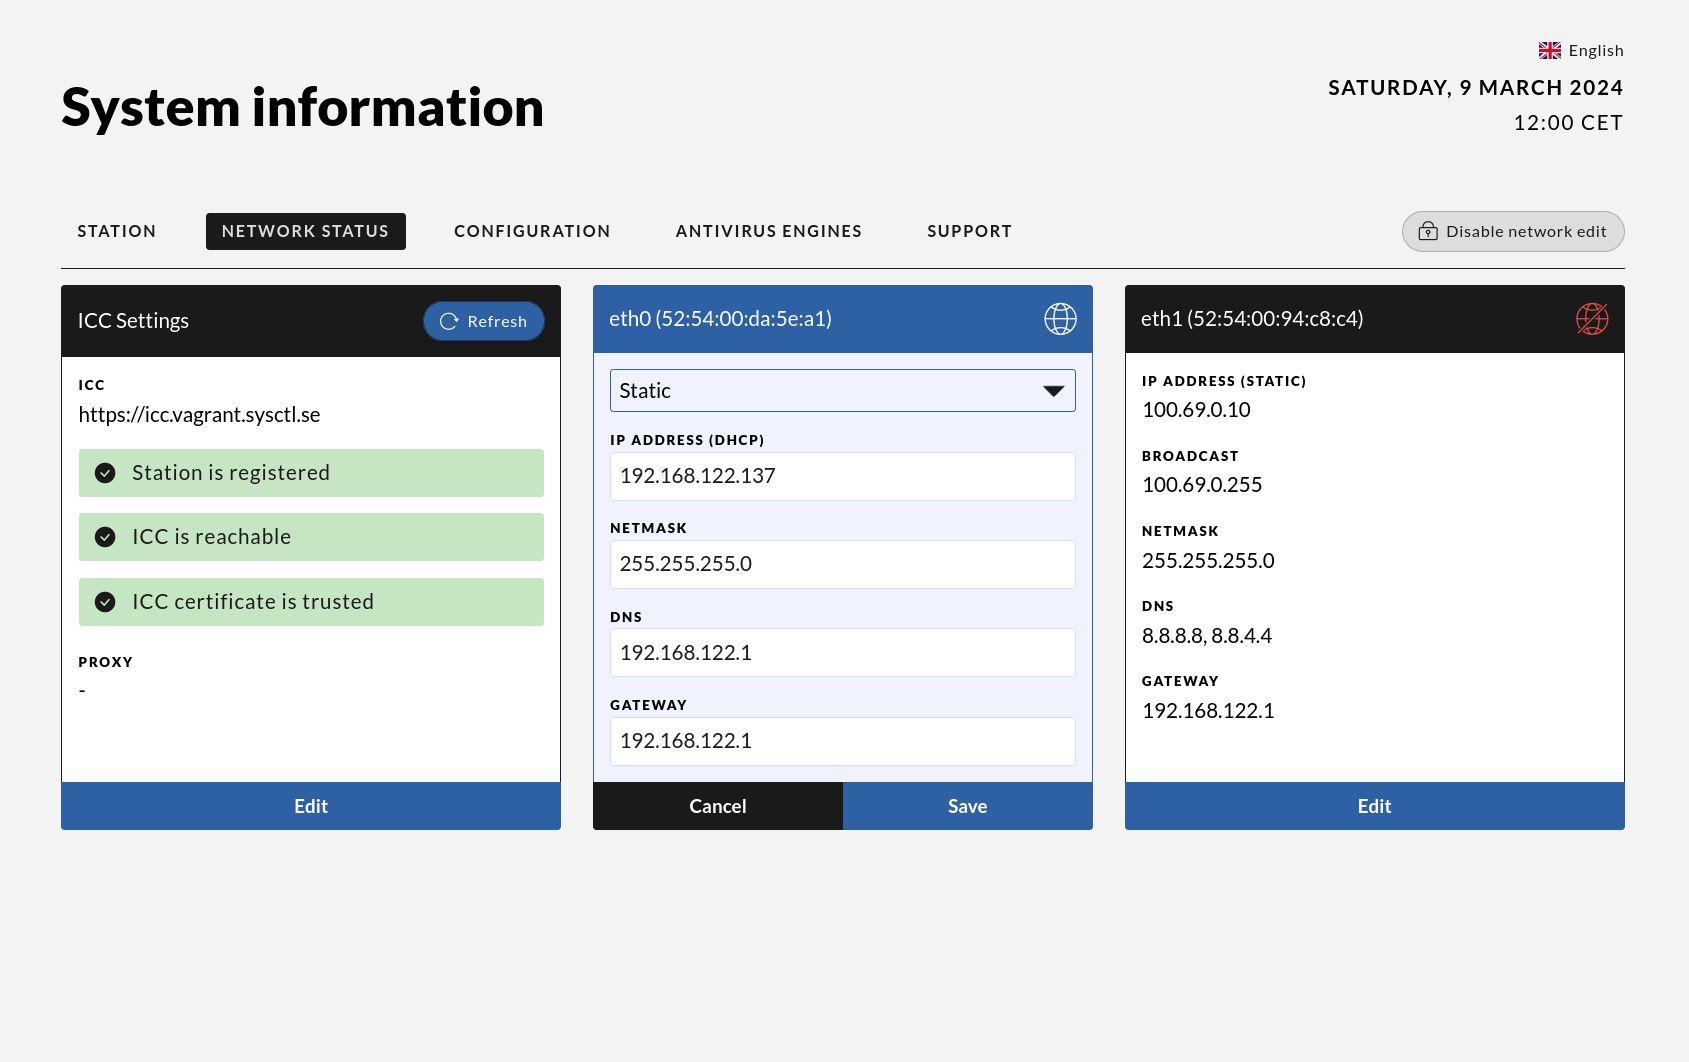
Once all settings are adjusted to your preferences and saved, simply remove the device to disable edit mode.
The USB drive is valid for one week and only works on stations connected to the ICC where the bundle was generated. The bundle is re-generated every Monday morning.
Updates and patching
Impex automatically updates itself, requiring no action from the station. There are two types of updates that are installed.
- Signature/definition files
- Operating system and application updates
Signature files
Signature files are downloaded and installed multiple times a day for various engines. This process does not impact any ongoing scans.
System Updates
Each night, the station checks for available system updates and installs them if found. During the update process, scans, formatting, and shredding cannot be initiated.
If a scan is ongoing or if less than three hours have passed since the completion of a scan, formatting, or shredding, the system will wait until the following night to check for updates.
Weekly reboots
The station will restart once a week on Sundays 06:01 in the morning with 10 minutes of random delay.
If the result from the receipt view is required after a scan and it has disappeared due to the station having restarted and no person has been on site, it is possible to use Impex receipt printer or check the result on the server to which the station is connected.
USB Protect in offline mode
A USB Protect station can also be run entirely disconnected from any network, in offline mode, with configuration, software and engine definitions installed and updated locally instead of through an ICC. Setting up a station for offline mode consists of the following tasks:
- Offline configuration - entering offline mode requires the station to have been preconfigured as such. An offline station comes with a default configuration, which can then be changed directly on the station itself.
- Offline software installation and upgrades - install the software needed to add the scanning engines used by the station, since they are not included in the base installation.
- Offline definition updates - install the latest definitions/signatures for the scanning engines that have been installed.
Since a station in offline mode has no ICC to update itself from, the same two procedures used to complete the initial setup, offline software installation and upgrades and offline definition updates, are also how the station is kept up to date afterwards. Repeat them whenever new software or definitions become available.
Offline configuration
On an offline station the configuration can be changed directly under System Information. This can also be done on an online station if it has been enabled in the ICC. From the Configuration tab some of the settings are shown and can be modified by pressing Edit in the upper right corner. Press Save afterwards to keep the changes.
Offline software installation and upgrades
The scanning engines used by a station are not included in the base installation; the software needed to install and upgrade them must be applied separately. On a station connected to an ICC this happens automatically together with the ordinary system updates, but a station in offline mode has no ICC to install from and must instead have this software applied locally, from USB - both to add engines during the initial setup and to keep the software up to date afterwards.
- Download the Software bundle files software.tgz and software.tgz.sha256.sig from https://portal.sysctl.se
- Format a USB device to ensure it is empty, then copy the downloaded files to the device.
- Insert the USB device into the station and execute the bundle. Once executed, the station will install and upgrade all necessary software, including any scanning engines that are not yet installed.
Offline definition updates
Once the scanning engines are installed, they also need their definitions/signatures kept up to date in order to detect the latest threats. As with the software itself, a station in offline mode cannot receive these updates from an ICC and must instead have them applied locally, from USB - both right after the software is installed and repeated regularly afterwards to keep the definitions current.
- Download the Definitions bundle files definitions.tgz and definitions.tgz.sha256.sig from https://portal.sysctl.se
- Format a USB device to ensure it is empty, then copy the downloaded files to the device.
- Insert the USB device into the station and execute the bundle. Once executed, the station will update the definitions/signatures for the installed scanning engines.
Console access and recovery
In certain situations, an administrator may need to access a station directly via the console to modify settings. This method grants root privileges only -no personal user accounts are available when using console access.
Note: Console access should only be used when recommended by sysctl. Most administrative tasks can typically be carried out through the ICC server interface or with signify bundles.
When Console Access Is Needed
Although rare, console access might be necessary for specific actions, such as:
- Updating wireless network credentials
- Configure NAC
- Troubleshooting network issues
Console access
Requirements for Console Access
- A keyboard is required to access the console.
- Access to the grub boot password
- The station must be configured to allow keyboard input.
- By default, keyboard access is disabled.
To enable the keyboard one must change a setting in the configuration card for this station in the ICC server GUI.
Resetting the Root Password via Single-User Mode
To reset the root password, the station must be booted into single-user mode.
Note: The keyboard layout in the GRUB meny is set to English.
- Connect a keyboard to the station.
- Reboot the station by briefly pressing the power button. Wait for it to fully shut down.
- Turn the station back on by pressing the power button again.
- During startup, press the ESC key to access the GRUB menu.
- Enter the username root and the GRUB password (retrievable from the ICC server).
- Type normal, press Enter, then press ESC once.
- Press e to edit the boot parameters.
- Locate the line starting with the name linux and append to the end of that line rw init=/bin/bash”.
- Press CTRL+X to boot in to single-user mode.
- Run the command passwd to set a new root password.
- Run touch /.autorelabel to apply correct SELinux labels.
- Finally, restart the station by executing: exec /sbin/init
Manually Disabling UDEV rules
To manually disable UDEV rules on a station, follow the steps below.
Steps:
- Boot the station into single-user mode and set a new root password (see the “Resetting the Root Password via Single-User mode” section).
- Before restarting the station (i.e, before step 12 in that process):
- Open the following file for editing:
/opt/sysctl/impex/impexd/config.json
- Locate the string “udev_rule”: true and change it to “udev_rule”: false.
- Procced to restart the station as described in step 12 of the password reset procedure.